コンテンツへスキップ

メール送信サーバー(Postfix)

以前は、自由に構築できたメールサーバー。確かに、個人サーバーが踏み台にされるケースも多く、現在、多くの人は、プロバイダーのSMTPサーバーを利用したメールサーバーを運用していると思います。

今回は、自宅LAN内の、プログラムや各種ツールからのメールを、普段利用しているメールアドアレスで受信できるように、メールの中継を行います。中継した先は、GoogleのSMTPサーバーを利用します。

(LAN内の環境)→(今回のメール送信サーバー、Postfix)→GoogleのSMTPサーバー

また、Docker内のコンテナは、通常のプライベートLANとは異なるネットワークで動いているので、Docker環境のコンテナからのメールも中継出来るように設定します。

Pstfixのインストール

sudo apt install postfix sasl2-bin bsd-mailx

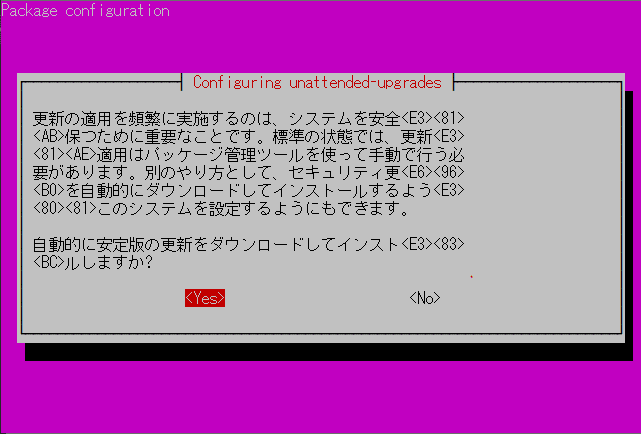
postfixのインストールを行います。インストール時にメールサーバの構成方法を設定するダイアログが表示されます。

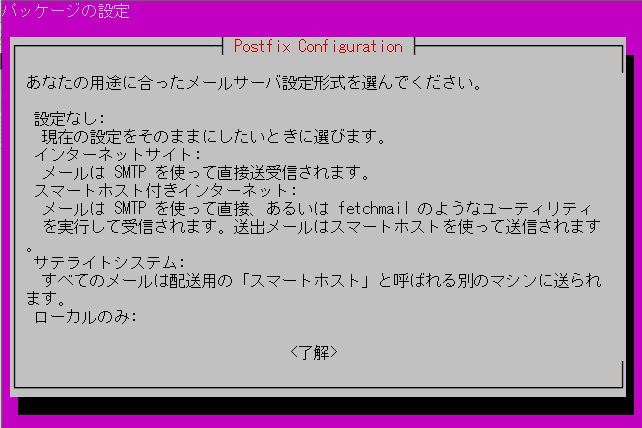
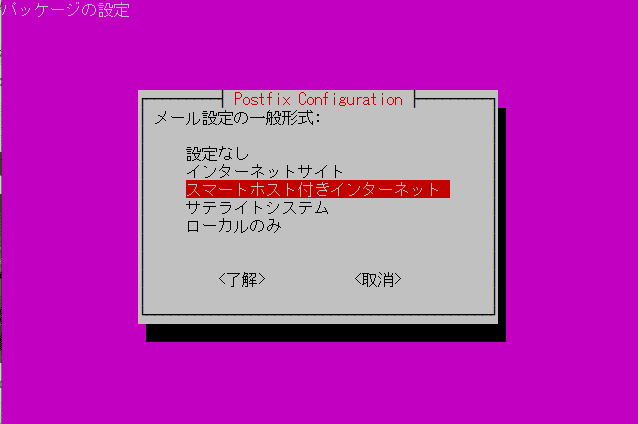
スマートホスト付きインターネットを選択します。
リレー先となるGmailのSMTPサーバーは、 [smtp.gmail.com]:587 となります。

Postfixインストール後の設定 Gmailへの転送設定(ユーザー、パスワード)

新規でsasl_passwdファイルを作成します。
この際の、Gmailアカウントのパスワードは、Goolgeのアカウント設定画面から、Google へのログインのアプリ向けのアプリパスワードを取得します。
https://myaccount.google.com/security分からない方は、「Google アプリ パスワード」で検索すると関連する情報が沢山出てくると思います。

sasl_passwdファイルに、メールの送信経路となる情報を設定します。

vi /etc/postfix/sasl_passwd
#ファイルに記載する内容
[smtp.gmail.com]:587 user@gmail.com:≪取得したGoogle アプリ パスワード≫

作成したファイルのアクセス権を変更。

chmod 0600 /etc/postfix/sasl_passwd

postmapで、メールの送信経路を有効化します。

postmap /etc/postfix/sasl_passwd

Postfix main.cfファイル更新

/etc/postfix/main.cf を用いて、環境に合わせた設定を行います。

  1. smtp_tls_security_level = may を encryptに変更します
  2. relayhost に gmailのsmtpサーバーを設定します
  3. ファイルの最後に、smtp_sasl関係の設定を追加します。
  4. 必要に応じて、mynetworksにローカルLANのIPを追加します
    例:192.168.0.0./24 など
smtp_tls_security_level = encrypt

relayhost = [smtp.gmail.com]:587

smtp_sasl_auth_enable = yes
smtp_sasl_password_maps = hash:/etc/postfix/sasl_passwd
smtp_sasl_tls_security_options = noanonymous

main.cf変更後は、postfixを再起動します。

systemctl restart postfix

postfix main.cfにdockerコンテナのIPを追加

main.cfのmynetworksにdockerコンテナのIPを追加します。
mynetworksに、172.18.0.Xを追加しました。172.18.0.0/16などでも動作しました。

docker psでコンテナID(CONTAINER ID)を取得し、docker exec -it {コンテナID} /bin/bashで、コンテナの中に入ります。コンテナ内で、hostname -iを実行しコンテナの利用するIPアドレスが確認出来ます。

ifconfig -aでもdockerが利用しているネットワークを確認できると思います。

main.cf変更後は、postfixを再起動します。

systemctl restart postfix

relay access deniedへの対応

docker環境からのメール送信に苦戦しました。メールが送れない際は、/var/log/mail.logを確認して、エラー内容を見ると原因が分かり、対応方法が見つかります。
私は、Dockerコンテナの利用するIP(自動的に割り振られる)の記載があり、メールのリレーが拒否されていました。

NVIDIA Jetson Nano

VNCなどリモートからのグラフィカルログインに困っている方が、他にもいらっしゃるかなと思い、自分向けでもありますが、リモートデスクトップの利用方法、設定方法を残しておきます。

リモートデスクトップに必要なパッケージのインストール

xrdpとxfceをインストールします。

#XRDPのインストール
sudo apt-get install xrdp

#xfceのインストール
sudo apt-get install xfce4

初期設定

xrdpとxfceの設定を行います。

echo xfce4-session >~/.xsession

/etc/xrdp/startwm.shファイルに以下の変更を行います。
ファイル下部の2行をコメントアウトし、「startxfce4」の1行を追加します。

#test -x /etc/X11/Xsession && exec /etc/X11/Xsession
#exec /bin/sh /etc/X11/Xsession
startxfce4

リモートデスクトップ接続

Windowsパソコンより、リモートデスクトップクライアントより、NVIDIA Jetson Nanoにログインします。

created by Rinker
NVIDIA
¥19,000 (2021/08/19 16:46:56時点 Amazon調べ-詳細)

Ubuntu 18.04.5 LTS に ffmpeg を導入

Jetson Nano の Ubuntu にffmpegをインストールします。
FFmpeg(エフエフエムペグ)は、動画と音声を記録・変換・再生するための非常に優秀なフリーソフトウェアです。マルチプラットフォームで利用できます。
コマンドラインから使用することができる。対応コーデックが多く、多彩なオプションを使用可能であり、バッチ処理にも向いています。

$ sudo apt update
$ sudo apt -y upgrade
$ sudo apt install ffmpeg

ffmpeg利用

ffmpegは、非常に多くの機能とオプションが準備されております。
以下のコマンドで、ヘルプの全体を見ることが出来ます。

$ ffmpeg -h full

今回は、めざましじゃんけんシステムの、めざましじゃんけん時の画像を用いて、AIによる画像認識結果を動画化しました。
その際に利用したコマンドは、以下となってます。

ffmpeg -y -framerate 3 -i ffmpeg_%4d.jpg -c:v libx264 -r 60 jankensystem.mp4

サンプル動画

ちょうど、めざましテレビでHELLOチャレンジが実施されていたので、
AIでめざましじゃんけんにチャレンジっていう感じで、Official髭男dismの「HELLO」を動画に組み合わせました。

#ハローチャレンジ

撮影テーマは「〇〇にチャレンジしよう!」

アップグレード時の保留

apt upgradeを実行した際に、特定のパッケージのアップグレードが保留されることがあります。

以下が、実行例となります。

$ sudo apt upgrade -y
パッケージリストを読み込んでいます... 完了
依存関係ツリーを作成しています
状態情報を読み取っています... 完了
アップグレードパッケージを検出しています... 完了
以下のパッケージは保留されます:
fwupd fwupdate fwupdate-signed
アップグレード: 0 個、新規インストール: 0 個、削除: 0 個、保留: 3 個。

パッケージは保留されますとなった際の対処方法

対象パッケージをaptコマンドを用いて、installオプションを用いて、apt installを実行します。
apt installを実行ごは、正常にapt upgaradeコマンドは終了するようになります。(以下のパッケージは保留されます。の表示が消えます。)

$ sudo apt install fwupd fwupdate fwupdate-signed
$ sudo apt update
$ sudo apt upgrade -y

Intel NUCを久々に確認したら、第10世代CPUのNUCも出そろってますね。

PythonのMySQLdbモジュール導入

PythonよりSQLを利用する際に、mysqlclinet ( MySQLdb ) モジュールを利用しています。
インストールされていないと、import MySQLdb時に、以下のエラーメッセージが出力されます。

ModuleNotFoundError: No module named 'MySQLdb'

pipコマンドで導入出来れば何も問題ないのですが、pip3でインストールしようとしたら、インストールに失敗しました。失敗時の出力は以下です。

$ pip3 install mysqlclient
Defaulting to user installation because normal site-packages is not writeable
Collecting mysqlclient
Downloading mysqlclient-1.4.6.tar.gz (85 kB)
|????????????????????????????????| 85 kB 1.7 MB/s
ERROR: Command errored out with exit status 1:
command: /usr/bin/python3 -c 'import sys, setuptools, tokenize; sys.argv[0] = '"'"'/tmp/pip-install-xp5fjc04/mysqlclient/setup.py'"'"'; __file__='"'"'/tmp/pip-install-xp5fjc04/mysqlclient/setup.py'"'"';f=getattr(tokenize, '"'"'open'"'"', open)(__file__);code=f.read().replace('"'"'\r\n'"'"', '"'"'\n'"'"');f.close();exec(compile(code, __file__, '"'"'exec'"'"'))' egg_info --egg-base /tmp/pip-pip-egg-info-sj8z3mc9
cwd: /tmp/pip-install-xp5fjc04/mysqlclient/
Complete output (12 lines):
/bin/sh: 1: mysql_config: not found
/bin/sh: 1: mariadb_config: not found
/bin/sh: 1: mysql_config: not found
Traceback (most recent call last):
File "<string>", line 1, in <module>
File "/tmp/pip-install-xp5fjc04/mysqlclient/setup.py", line 16, in <module>
metadata, options = get_config()
File "/tmp/pip-install-xp5fjc04/mysqlclient/setup_posix.py", line 61, in get_config
libs = mysql_config("libs")
File "/tmp/pip-install-xp5fjc04/mysqlclient/setup_posix.py", line 29, in mysql_config
raise EnvironmentError("%s not found" % (_mysql_config_path,))
OSError: mysql_config not found
----------------------------------------
ERROR: Command errored out with exit status 1: python setup.py egg_info Check the logs for full command output.

mysqlclinetの Pipインストール時エラーの対策

libmysqlclinet-devがインストールされていると、mysqlclinetのインストールが成功するようです。

aptコマンドを用いて、libmysqlclinet-devを導入し、mysqlclinetをpip3コマンドで導入します。

$ sudo apt install libmysqlclient-dev
$ pip3 install mysqlclient
created by Rinker
NVIDIA
¥19,000 (2021/08/19 16:46:56時点 Amazon調べ-詳細)

UbuntuにSambaサーバーを導入

Windows側の進化もあり、Sambaを導入した際に、作成したファイルのアクセス権や、ファイル作成時の作成ユーザーなど、意図する動作が実行されないケースがありました。
各種サイトなどを参考に、構築した際の設定値などのメモを残します。
詳しい、説明は別サイトを参照ください。

Samba をインストール

導入しているパッケージを最新化し、sambaのインストールを行います。

$ sudo apt update
$ sudo apt upgrade -y
$ sudo apt install samba

Sambaの設定ファイル(/etc/samba/smb.conf)を編集

smb.confの編集を行います。

sudo vi /etc/samba/smb.conf

以下、編集項目一覧

  • グローバルセッションに、文字コードの設定を追加
    [global]
    unix charset = UTF-8
    dos charset = CP932
  • NTドメイン、Windowsのワークグループを設定(環境に合わせて)
    workgroup = WORKGROUP
  • アクセス可能なネットワークセグメントを設定
    interfaces = 127.0.0.0/8 192.168.0.0/24 eth0
  • 最終行に共有フォルダを指定し、アクセス権類を設定
    [share]
    path = /home/share
    writable = yes
    guest ok = no
    create mask = 775
    force create mode = 775
    security mask = 775
    force security mode = 775
    directory mask = 0775
    force directory mode = 0775
    directory security mask = 0775
    force directory security mode = 0775

Samba向けユーザー作成

$ sudo smbpasswd -a user01

Sambaサービス再起動と自動起動を設定

$ sudo systemctl restart smbd
$ sudo systemctl enable smbd
Synchronizing state of smbd.service with SysV service script with /lib/systemd/systemd-sysv-install.
Executing: /lib/systemd/systemd-sysv-install enable smbd
created by Rinker
NVIDIA
¥19,000 (2021/08/19 16:46:56時点 Amazon調べ-詳細)

JenkinsのDockerイメージを再構築

JenkinsのポータルにJenkinsの新しいバージョンの通知が表示されます。
Dockerで導入したJenkinsコンテナにでは、Dockerイメージを再構築し、永続的なアップデートが必要となります。

Docker環境にJenkinsを導入した際の投稿:

「image: jenkins:latest」を利用した場合に、初期設定のプラグインインストールに失敗したので、「image: jenkins/jenkins:lts」を利用しました。

docker-composeの内容

services:
  jenkins1:
    container_name: master
    image: jenkins/jenkins:lts
    environment:
      TZ: Asia/Tokyo
    ports:
      - 8080:8080
    volumes:
      - ./jenkins_home:/var/jenkins_home
    restart: always

JenkinsのDockerイメージを再構築

  1. docker-compose動作しているDockerコンテナのシャットダウン
  2. docker-compose でイメージをビルド
  3. コンテナをバックグランドで起動
$ cd jenkins
$ sudo docker-compose down
$ sudo docker-compose pull
$ sudo docker-compose up -d

以上で、最新のltsイメージに更新されます。コンテナ便利ですね。

jenkins_homeは永続化ボリュームとして構築しているので、Jenkinsのプラグインの更新は、ポータルサイト(WEB管理画面)より通常通り実施します。

NVIDIA Jetson Nanoからのメール送信

NVIDIA Jetson Nanoの利用を開始すると、Jetson Nanoの各種プログラムからメール通知を利用したくなるケースがあります。
既に、同一環境内にSMTPサーバが導入済みである場合を全体として、Jetson NanoにSSMTPを導入し、Jetson Nanoからメール送信が出来るように設定します。
パッケージのアップデートやログのローテーション処理時のエラーなどもメール通知することが可能です。

以前の関連記事: Jetson Nano で SSMTP を利用してPHPからメール送信

ssmtpインストールおよび設定

ssmtpをインストールします。

$ sudo apt install ssmtp

ssmtp.confを編集。

root@jetson:~# vi /etc/ssmtp/ssmtp.conf
  • mailhub=@@mail_server@@
    環境内のメールサーバを指定
  • rewriteDomain=miki-ie.com
    ドメイン名を指定
  • hostname=jetson01.miki-ie.com
    ホスト名を指定
  • FromLineOverride=YES
    メール送信元より、メールのFromを指定出来るように設定
#
# The person who gets all mail for userids < 1000
# Make this empty to disable rewriting.
root=postmaster

# The place where the mail goes. The actual machine name is required no
# MX records are consulted. Commonly mailhosts are named mail.domain.com
#mailhub=mail
mailhub=@@mail_server@@

# Where will the mail seem to come from?
#rewriteDomain=
rewriteDomain=miki-ie.com

# The full hostname
#hostname=jetson01
hostname=jetson01.miki-ie.com

# Are users allowed to set their own From: address?
# YES - Allow the user to specify their own From: address
# NO - Use the system generated From: address
#FromLineOverride=YES
FromLineOverride=YES
created by Rinker
NVIDIA
¥19,000 (2021/08/19 16:46:56時点 Amazon調べ-詳細)

NVIDIA Jetson Nanoのセキュリティ対策

Ubuntuの自動アップデートを設定します。
再起動が必要な際は、指定した時間で再起動するように設定します。
自動アップデートの結果をメール送信するように設定します。

「unattended-upgrades」をインストールと有効化

「unattended-upgrades」をインストールします。

sudo apt install -y unattended-upgrades

インストールした「unattended-upgrades」を有効化します。
以下のコマンドを実行し、表示される画面で<Yes>を選択します。

sudo dpkg-reconfigure -p low unattended-upgrades

<Yes>を選択します。


「unattended-upgrades」設定

利用する設定ファイルは、以下の2つのファイルとなります。

  • /etc/apt/apt.conf.d/20auto-upgrades  : 自動アップデートとアップグレードを設定。
  • /etc/apt/apt.conf.d/50unattended-upgrades :詳細設定

「20auto-upgrades」設定

  • APT::Periodic::Update-Package-Lists "1";
    アップグレードの確認間隔
    Daily=1 / Every two days = 2 / Weekly = 7 / Every two weeks = 14 / Never = 0
  • APT::Periodic::Download-Upgradeable-Packages "1"
    セキュリティーアップデートがある場合の動作
    Download and install automatically = 1 / Download automatically = 1 / Display immediately = 0
APT::Periodic::Update-Package-Lists "1";
APT::Periodic::Unattended-Upgrade "1";

「50unattended-upgrades」設定

以下の設定変更を加えました。

  • Unattended-Upgrade::Mail "aaa@bbbl.com";
    メール通知先の設定
  • Unattended-Upgrade::MailOnlyOnError "true";
    メール通知のタイミングをエラー発生時のみに変更
  • Unattended-Upgrade::Remove-Unused-Kernel-Packages "true";
    未使用となったカーネル関連パッケージの自動削除
  • Unattended-Upgrade::Remove-Unused-Dependencies "true";
    未使用となったパッケージの自動削除(apt-get autoremove)
  • Unattended-Upgrade::Automatic-Reboot "true";
    自動再起動が実施されるように設定(自動再起動ON)
  • Unattended-Upgrade::Automatic-Reboot-Time "02:00";
    再起動時の時間を指定
// Automatically upgrade packages from these (origin:archive) pairs
//
// Note that in Ubuntu security updates may pull in new dependencies
// from non-security sources (e.g. chromium). By allowing the release
// pocket these get automatically pulled in.
Unattended-Upgrade::Allowed-Origins {
        "${distro_id}:${distro_codename}";
        "${distro_id}:${distro_codename}-security";
        // Extended Security Maintenance; doesn't necessarily exist for
        // every release and this system may not have it installed, but if
        // available, the policy for updates is such that unattended-upgrades
        // should also install from here by default.
        "${distro_id}ESMApps:${distro_codename}-apps-security";
        "${distro_id}ESM:${distro_codename}-infra-security";
//      "${distro_id}:${distro_codename}-updates";
//      "${distro_id}:${distro_codename}-proposed";
//      "${distro_id}:${distro_codename}-backports";
};

// List of packages to not update (regexp are supported)
Unattended-Upgrade::Package-Blacklist {
//      "vim";
//      "libc6";
//      "libc6-dev";
//      "libc6-i686";
};

// This option will controls whether the development release of Ubuntu will be
// upgraded automatically.
Unattended-Upgrade::DevRelease "false";

// This option allows you to control if on a unclean dpkg exit
// unattended-upgrades will automatically run
//   dpkg --force-confold --configure -a
// The default is true, to ensure updates keep getting installed
//Unattended-Upgrade::AutoFixInterruptedDpkg "false";

// Split the upgrade into the smallest possible chunks so that
// they can be interrupted with SIGTERM. This makes the upgrade
// a bit slower but it has the benefit that shutdown while a upgrade
// is running is possible (with a small delay)
//Unattended-Upgrade::MinimalSteps "false";

// Install all unattended-upgrades when the machine is shutting down
// instead of doing it in the background while the machine is running
// This will (obviously) make shutdown slower
//Unattended-Upgrade::InstallOnShutdown "true";

// Send email to this address for problems or packages upgrades
// If empty or unset then no email is sent, make sure that you
// have a working mail setup on your system. A package that provides
// 'mailx' must be installed. E.g. "user@example.com"
//Unattended-Upgrade::Mail "root";
Unattended-Upgrade::Mail "aaa@bbb.com";

// Set this value to "true" to get emails only on errors. Default
// is to always send a mail if Unattended-Upgrade::Mail is set
//Unattended-Upgrade::MailOnlyOnError "true";
Unattended-Upgrade::MailOnlyOnError "true";

// Remove unused automatically installed kernel-related packages
// (kernel images, kernel headers and kernel version locked tools).
//Unattended-Upgrade::Remove-Unused-Kernel-Packages "false";
Unattended-Upgrade::Remove-Unused-Kernel-Packages "true";

// Do automatic removal of new unused dependencies after the upgrade
// (equivalent to apt-get autoremove)
//Unattended-Upgrade::Remove-Unused-Dependencies "false";
Unattended-Upgrade::Remove-Unused-Dependencies "true";

// Automatically reboot *WITHOUT CONFIRMATION*
//  if the file /var/run/reboot-required is found after the upgrade
//Unattended-Upgrade::Automatic-Reboot "false";
Unattended-Upgrade::Automatic-Reboot "true";

// If automatic reboot is enabled and needed, reboot at the specific
// time instead of immediately
//  Default: "now"
//Unattended-Upgrade::Automatic-Reboot-Time "02:00";
Unattended-Upgrade::Automatic-Reboot-Time "02:00";

// Use apt bandwidth limit feature, this example limits the download
// speed to 70kb/sec
//Acquire::http::Dl-Limit "70";

// Enable logging to syslog. Default is False
// Unattended-Upgrade::SyslogEnable "false";

// Specify syslog facility. Default is daemon
// Unattended-Upgrade::SyslogFacility "daemon";

// Download and install upgrades only on AC power
// (i.e. skip or gracefully stop updates on battery)
// Unattended-Upgrade::OnlyOnACPower "true";

// Download and install upgrades only on non-metered connection
// (i.e. skip or gracefully stop updates on a metered connection)
// Unattended-Upgrade::Skip-Updates-On-Metered-Connections "true";

動作確認

以下のコマンドで、動作確認を実施しておきます。

$ sudo unattended-upgrade --dry-run --debug
created by Rinker
NVIDIA
¥19,000 (2021/08/19 16:46:56時点 Amazon調べ-詳細)

前提条件

JetsonにJenkins向けユーザー作成

別にセットアップされた、Jenkinsシステムより、NVIDIA Jetson Nanoを管理対象と資するために、Jetson NanoにJenkinsから操作する用のユーザーを作成します。

  1. Jetson Nanoに新規ユーザー作成
  2. Jenkins向けユーザーのsudoコマンド設定 パスワード
  3. Jenkins向けユーザーでのGitHubからのPull設定

1. Jenkins向けユーザーを作成

NVIDIA Jetson NanoにJenkinsユーザーを作成します。

$ sudo useradd -m -s /bin/bash jenkins
$ sudo passwd jenkins
Enter new UNIX password:
Retype new UNIX password:
passwd: password updated successfully

2. Jenkins向けユーザーのSudoコマンド設定

Jenkinsユーザーで、各種スクリプトを実行するので、sudoが簡単に実行出来るように設定します。
※ 全体的にパスワードなしでのsudoを許可しているので、利用するコマンドごとの設定や、各種設定ファイルのアクセス権などを環境に合わせて設定し、セキュリティ対策を行って下さい。

$ cd /etc/sudoers.d/
$ sudo vi jenkins

作成するjenkinsファイルへの記載内容

Defaults:jenkins !requiretty
jenkins ALL=(ALL) NOPASSWD:ALL

3. Jenkins向けユーザーでのGitHubからのPull設定

Jenkinsを利用して、Githubに新しいソースコードがコミットされた際に、Githubより新規ソースコードの通知をトリガーとして、Jenkinsのタスクを実行させます。

Githubへの新規コミットをトリガーに、ジャンケンシステムを構成するメインのIntel NUC Ubuntuサーバー、Raspberry Pi、NVIDIA Jetson Nanoに最新のソースコードが自動的にデプロイ(Pull)される環境を構築しました。
デプロイ前に、簡単なテストなども自動化することが出来ます。

設定には、Jenkinsユーザー向けのSSHキーをNVIDIA Jetson Nanoで作成し、作成したSSHキーをGithubに登録します。GithubにSSHキーが登録出来たら、NVIDIA Jetson NanoからGithubへのアクセスを確認します。

Jetson NanoでSSHキー作成

Jenkinsユーザー向けのSSHキーを作成します。
このSSHキーをGithubに登録します。
Githubに登録することにより、Jenkinsユーザーを用いて、Githubの操作が可能になります。

$ sudo su jenkins
$ cd /home/jenkins/
$ mkdir .ssh
jenkins@jetson02:~$ ssh-keygen -t rsa
Generating public/private rsa key pair.
Enter file in which to save the key (/home/jenkins/.ssh/id_rsa):
Enter passphrase (empty for no passphrase):
Enter same passphrase again:
Your identification has been saved in /home/jenkins/.ssh/id_rsa.
Your public key has been saved in /home/jenkins/.ssh/id_rsa.pub.
The key fingerprint is:
SHA256:
The key's randomart image is:

GithubへSSHキーの登録と接続確認

https://github.com/settings/keys で id_rsa.pub の内容を登録します。

NVIDIA Jetson NanoからGithubへ接続確認

最後に、対象のサーバーより接続確認を行います。

ssh -T git@github.com
created by Rinker
NVIDIA
¥19,000 (2021/08/19 16:46:56時点 Amazon調べ-詳細)