コンテンツへスキップ

Synologyを用いたWEBサーバーへのサイト追加

前提

Synologyでドキュメントルート、外部公開設定

WEB公開するフォルダ(ドキュメントルート)作成と、登録するドメイン名を登録します。
「Web Station」の「仮想ホスト」より「作成」ボタンより、Virtual Hostの新規追加を行います。

「ドキュメントルート」設定項目の「検索する」ボタンより、表示される設定画面より「フォルダの作成」ボタンを押し、新規作成するフォルダ名を登録します。

新規サイトに Synology 無料SSL証明書導入(Let’s Encrypt)設定

「コントロールパネル」の「セキュリティ」を選択します。

「セキュリティ」画面より、「証明書タブ」を選択し、新規サイトの証明書を追加します。

SYNOLOGY シノロジー DiskStation DS218j デュアルコアCPU搭載多機能パーソナルクラウド 2ベイNASキット DS218j[DS218J]

Raspberry PiのApache2にドメイン名指定の仮想ホスト

サブドメインを用いて、Apache2のVirtualHostを設定します。
Raspberry Piで運用している「aaa.com」がApacheのメインサイトに設定されている環境で、「bbb.aaa.com」のサブドメインに新規WEBサーバーバーチャルホストを設定します。WEBリクエストのURLの違いにより、表示する/利用するWEBサーバーの切替が行われます。

前提条件など

VirtualHost向け設定ファイル

テンプレートファイル「000-default.conf」をコピーして、今回作成するVirtualHost設定ファイルの雛形を作成し、設定ファイルを作成します。

@raspberrypi:/etc/apache2/sites-available $ pwd
/etc/apache2/sites-available
@raspberrypi:/etc/apache2/sites-available $ sudo cp 000-default.conf  bbb.aaa.com.conf

コピーして作成したbbb.aaa.com.confファイルを編集。

<VirtualHost *:80>
# The ServerName directive sets the request scheme, hostname and port that
# the server uses to identify itself. This is used when creating
# redirection URLs. In the context of virtual hosts, the ServerName
# specifies what hostname must appear in the request's Host: header to
# match this virtual host. For the default virtual host (this file) this
# value is not decisive as it is used as a last resort host regardless.
# However, you must set it for any further virtual host explicitly.

ServerName bbb.aaa.com

ServerAdmin webmaster@bbb.aaa.com
DocumentRoot /var/www/bbb.aaa.com

# Available loglevels: trace8, ..., trace1, debug, info, notice, warn,
# error, crit, alert, emerg.
# It is also possible to configure the loglevel for particular
# modules, e.g.
#LogLevel info ssl:warn

ErrorLog ${APACHE_LOG_DIR}/error.log
CustomLog ${APACHE_LOG_DIR}/access.log combined

# For most configuration files from conf-available/, which are
# enabled or disabled at a global level, it is possible to
# include a line for only one particular virtual host. For example the
# following line enables the CGI configuration for this host only
# after it has been globally disabled with "a2disconf".
#Include conf-available/serve-cgi-bin.conf
</VirtualHost>

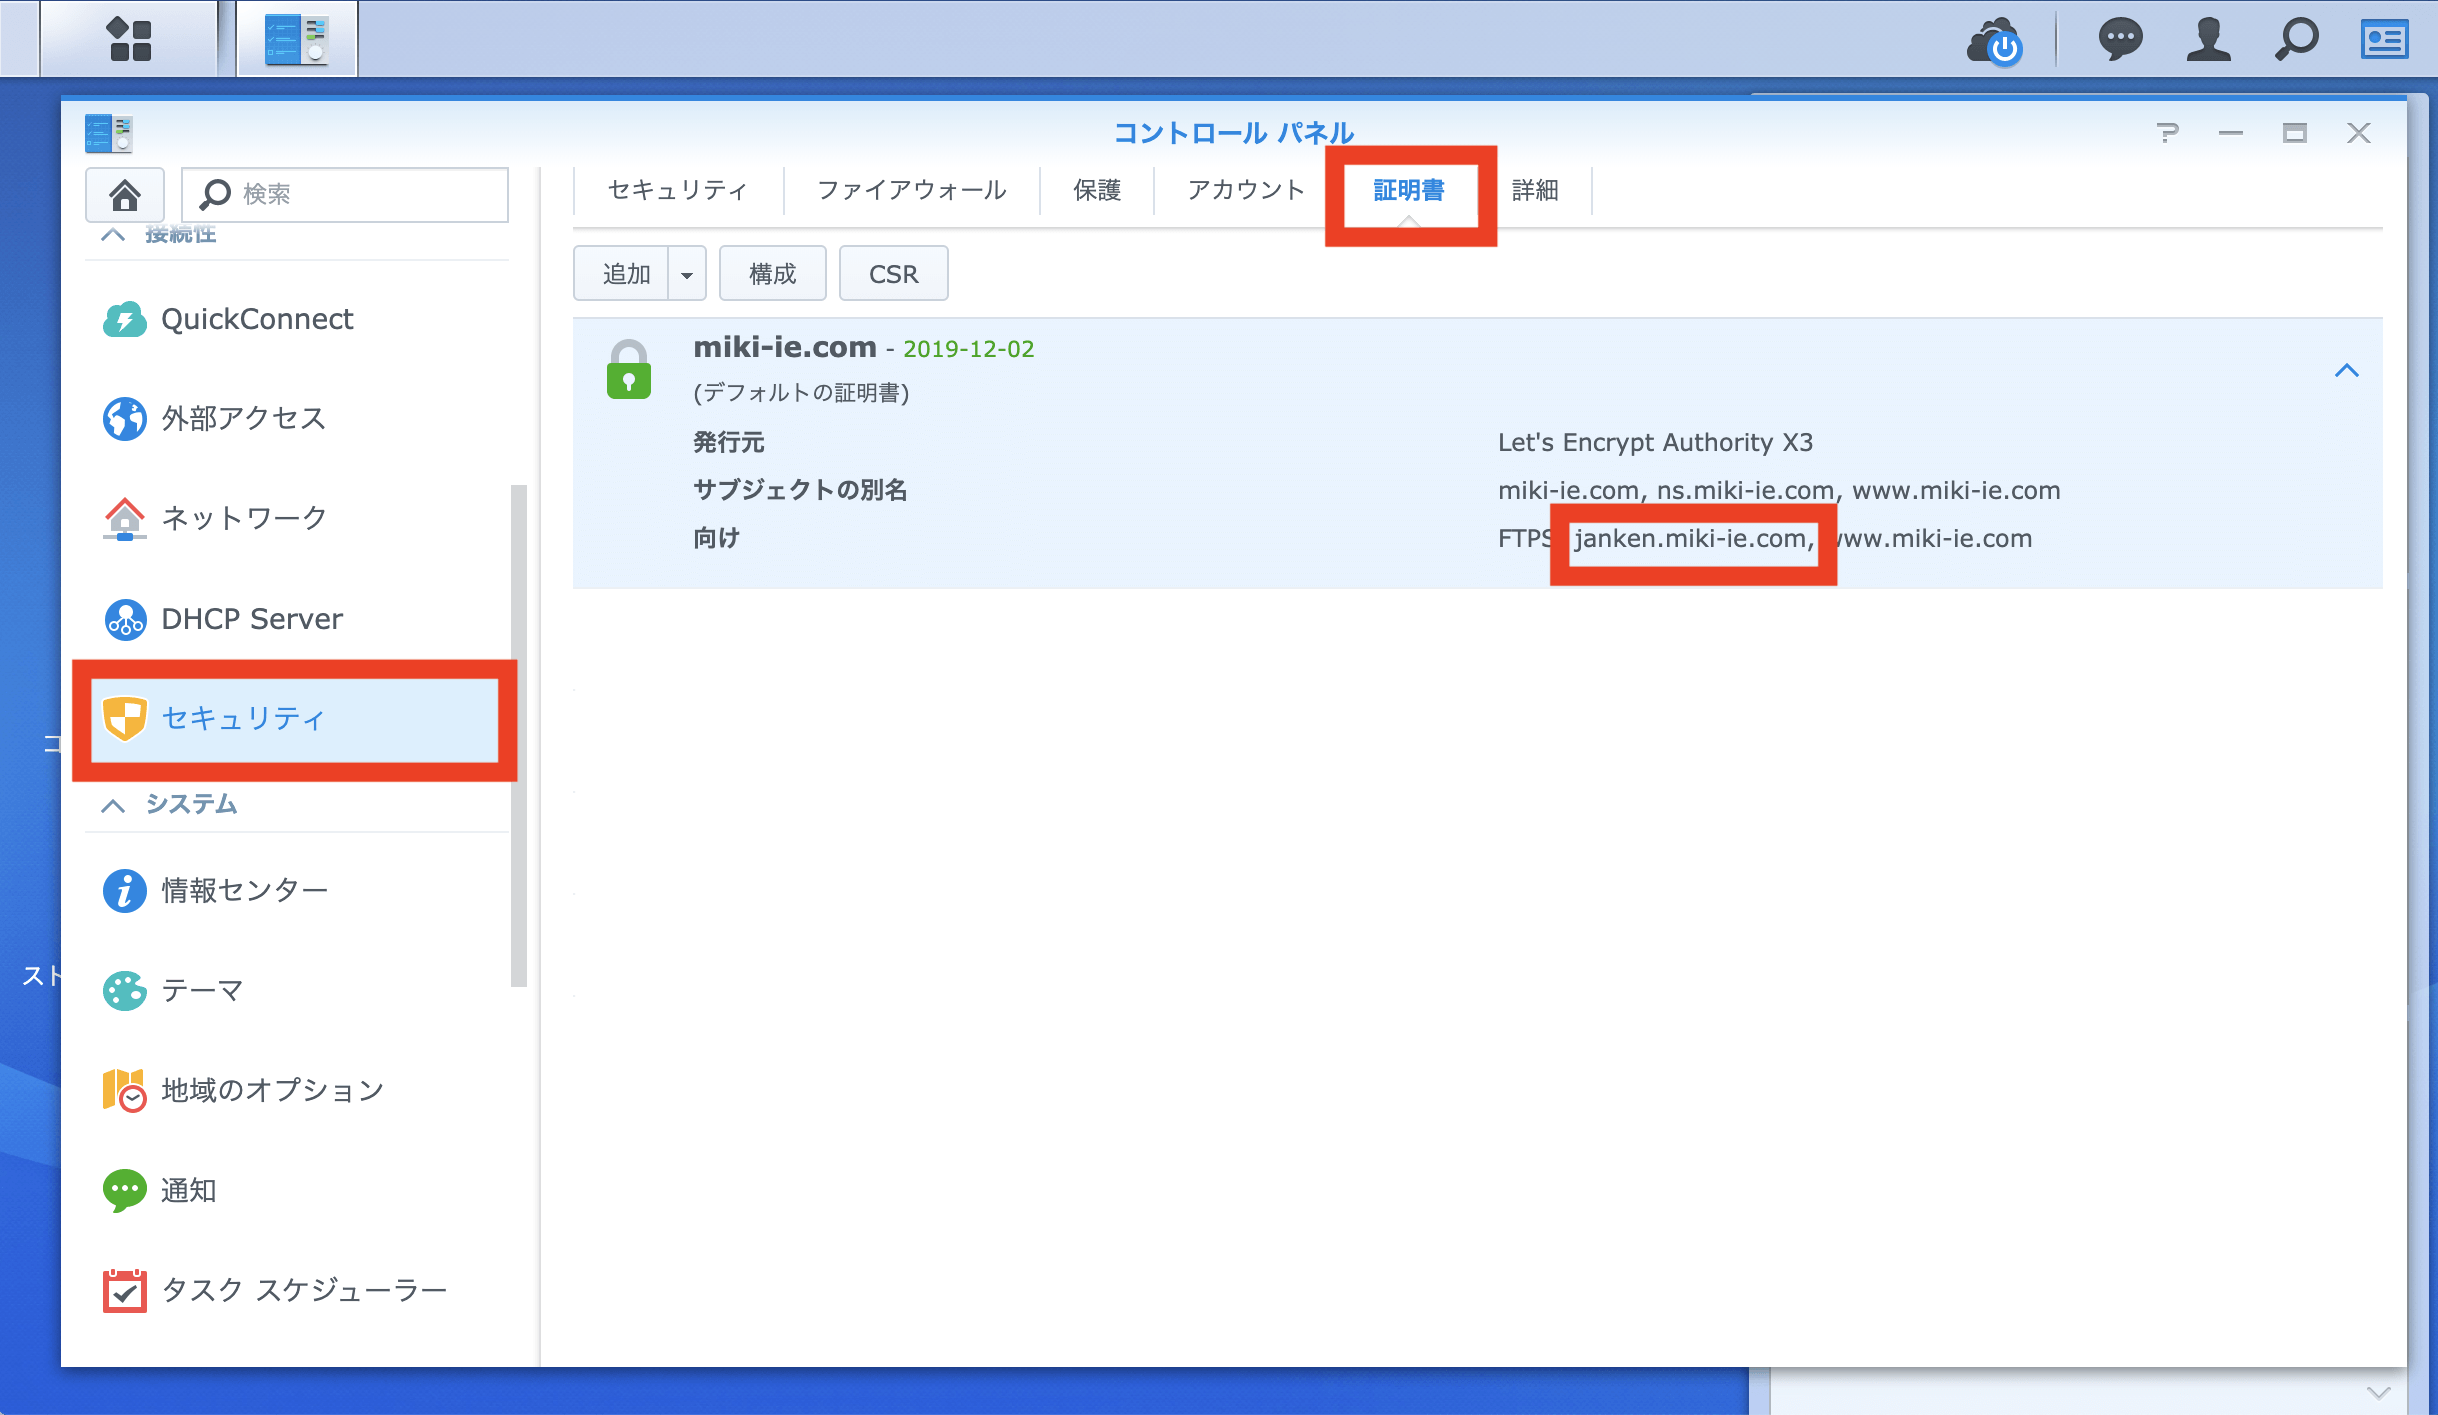
VirtualHost設定の有効化とApache2への反映

a2ensite コマンドを用いて、作成した設定ファイルをAvailable からEnabelへ。

sudo a2ensite bbb.aaa.com.conf

Apacheを再起動して、VirtualHostは利用可能となります。
sudo service apache2 restart

Raspberry PiにLet's EncryptのSSL証明書

現時点ですと、EncryptのSSLを発行する際に、通常の方法ですとポート80を証明書を発行したい(SSL証明書を受け取りたい)サーバーで開放する必要がありました。
よって、Raspberry Piでは、自己証明書SSLを利用しておりました。Raspberry Piの自己証明書SSL
ポート80を利用しているSynologyは、Synologyの機能を用いて、Let's Encryptの証明書を導入しております。Synology無料SSL証明書導入(Let’s Encrypt)

最近の便利さには、日々関心しておりますが、今回の驚きも大きかったです。
Apacheの設定まで確認し、必要な証明書を確認し、各種設定含め自動実行出来ます。

cerbotおよびpython-cerbot-apacheの導入

@raspberrypi:~ $ sudo apt-get install certbot
@raspberrypi:~ $ sudo apt-get install python-certbot-apache

python-cerbot-apacheをインストール祭に、次のパケケージもインストールされます。python3-augeas python3-certbot-apache

cerbot --apacheを実行し、SSL証明書発行およびapacheのSSL設定

cerbot --apacheを実行し、SSL証明書を設定したいドメインを選択し、SSL証明書の発行およびApacheのSSL関係設定を実施します。
実際には、対象ドメインの選択のみで、全て自動で設定されます。

@raspberrypi:~ $ sudo certbot --apache
Saving debug log to /var/log/letsencrypt/letsencrypt.log
Plugins selected: Authenticator apache, Installer apache

Which names would you like to activate HTTPS for?
- - - - - - - - - - - - - - - - - - - - - - - - - - - - - - - - - - - - - - - -
1: www.domain1.com
2: aaa.domain2.com
3: www.domain2.com
- - - - - - - - - - - - - - - - - - - - - - - - - - - - - - - - - - - - - - - -
Select the appropriate numbers separated by commas and/or spaces, or leave input
blank to select all options shown (Enter 'c' to cancel): 2,3
Obtaining a new certificate
Deploying Certificate to VirtualHost /etc/apache2/sites-enabled/aaa.domain2-ssl.conf
Created an SSL vhost at /etc/apache2/sites-available/domain2-le-ssl.conf
Deploying Certificate to VirtualHost /etc/apache2/sites-available/domain2-le-ssl.conf
Enabling available site: /etc/apache2/sites-available/domain2-le-ssl.conf

Please choose whether or not to redirect HTTP traffic to HTTPS, removing HTTP access.
- - - - - - - - - - - - - - - - - - - - - - - - - - - - - - - - - - - - - - - -
1: No redirect - Make no further changes to the webserver configuration.
2: Redirect - Make all requests redirect to secure HTTPS access. Choose this for
new sites, or if you're confident your site works on HTTPS. You can undo this
change by editing your web server's configuration.
- - - - - - - - - - - - - - - - - - - - - - - - - - - - - - - - - - - - - - - -
Select the appropriate number [1-2] then [enter] (press 'c' to cancel): 2
Redirecting vhost in /etc/apache2/sites-enabled/aaa.domain2.conf to ssl vhost in /etc/apache2/sites-enabled/aaa.domain2-ssl.conf
Redirecting vhost in /etc/apache2/sites-enabled/domain2.conf to ssl vhost in /etc/apache2/sites-available/domain2-le-ssl.conf

- - - - - - - - - - - - - - - - - - - - - - - - - - - - - - - - - - - - - - - -
Congratulations! You have successfully enabled https://aaa.domain2.com and
https://www.domain2.com

You should test your configuration at:
https://www.ssllabs.com/ssltest/analyze.html?d=aaa.domain2.com
https://www.ssllabs.com/ssltest/analyze.html?d=www.domain2.com
- - - - - - - - - - - - - - - - - - - - - - - - - - - - - - - - - - - - - - - -

IMPORTANT NOTES:
- Congratulations! Your certificate and chain have been saved at:
/etc/letsencrypt/live/aaa.domain2.com/fullchain.pem
Your key file has been saved at:
/etc/letsencrypt/live/aaa.domain2.com/privkey.pem
Your cert will expire on 2019-12-03. To obtain a new or tweaked
version of this certificate in the future, simply run certbot again
with the "certonly" option. To non-interactively renew *all* of
your certificates, run "certbot renew"
- If you like Certbot, please consider supporting our work by:

Donating to ISRG / Let's Encrypt: https://letsencrypt.org/donate
Donating to EFF: https://eff.org/donate-le

cerbot renewで証明書更新をテスト

証明書の有効期限が1ヶ月未満になると、証明書の再取得が行われます。
コマンド実行をテストし、次のステップで、cronの定期実行ジョブとして、コマンドラインを登録します。

@raspberrypi:/var/www/vhosts/aaa.domain2.com $ sudo certbot renew
Saving debug log to /var/log/letsencrypt/letsencrypt.log

- - - - - - - - - - - - - - - - - - - - - - - - - - - - - - - - - - - - - - - -
Processing /etc/letsencrypt/renewal/domain2.com.conf
- - - - - - - - - - - - - - - - - - - - - - - - - - - - - - - - - - - - - - - -
Cert not yet due for renewal

- - - - - - - - - - - - - - - - - - - - - - - - - - - - - - - - - - - - - - - -
Processing /etc/letsencrypt/renewal/aaa.domain2.com.conf
- - - - - - - - - - - - - - - - - - - - - - - - - - - - - - - - - - - - - - - -
Cert not yet due for renewal

- - - - - - - - - - - - - - - - - - - - - - - - - - - - - - - - - - - - - - - -

The following certs are not due for renewal yet:
/etc/letsencrypt/live/domain2.com/fullchain.pem expires on 2019-12-03 (skipped)
/etc/letsencrypt/live/aaa.domain2.com/fullchain.pem expires on 2019-12-03 (skipped)
No renewals were attempted.
- - - - - - - - - - - - - - - - - - - - - - - - - - - - - - - - - - - - - - - -

cronの定期実行ジョブ登録

以下の例では、毎週日曜日の深夜1時にcertbot renewが実行されるように登録しています。

0 1 * * 7 certbot renew


Apache2系のインストール

絶対難しくなった。と思うのは私だけ?
設定ファイルを分割しすぎ、直感的に分からない。
Virtual Hostに、CGIモジュール導入で苦労したので、記事にしておきます。

Apache2をRaspberry Piへインストール

Apache「apache2」、SQLサーバー「 mariadb-server」、PHPのSQLモジュール「 php-mysql」をインストールします。
MySQLサーバー「mysql-server」をインストールしようとしましたが、「パッケージ 'mysql-server' にはインストール候補がありません」と表示されました。

MariaDB は MySQL の派生のようで、今後のスタンダードになっていくオープンソースのデータベースのようです。

@raspberrypi:~ $ sudo apt-get update
@raspberrypi:~ $ sudo apt-get upgrade
@raspberrypi:~ $ sudo apt-get install apache2

@raspberrypi:~ $ sudo apt-get install mysql-server
mariadb-server-10.0E: パッケージ 'mysql-server' にはインストール候補がありません

@raspberrypi:~ $ sudo apt-get install mariadb-server

@raspberrypi:~ $ sudo apt-get install php-mysql

Apache2の設定ファイル

設定ファイル編集方法

# It is split into several files forming the configuration hierarchy outlined
# below, all located in the /etc/apache2/ directory:
#
# /etc/apache2/
# |-- apache2.conf
# | `-- ports.conf
# |-- mods-enabled
# | |-- *.load
# | `-- *.conf
# |-- conf-enabled
# | `-- *.conf
# `-- sites-enabled
# `-- *.conf

conf-(available|enabled)、mods-(available|enabled)、sites-(available|enabled)、というディレクトリがあります。
confには設定ファイル、modsは拡張機能、sitesにはサイトの設定があります。
それぞれ「available」「enabled」の2つのフォルダが存在します。
設定ファイルを作成する際は、「available」フォルダに設定ファイルを作成し、次のコマンドで、設定ファイルを有効化、無効化します。

  • 有効化コマンド
    • a2enconf 設定ファイル有効化
    • a2enmod 拡張機能有効化
    • a2ensite サイト有効化
  • 無効化コマンド
    • a2disconf 設定ファイル無効化
    • a2dismod 拡張機能無効化
    • a2dissite サイト無効化

有効化、無効化のコマンドにより、「available」フォルダ内の設定ファイルのリンクが、「enabled」フォルダ内に作成・削除されます。

設定ファイル変更後は、apacheサービスの設定再読み込みや再起動が必要です。

設定ファイル編集

拡張機能をする際は、有効化されているモジュールを調べます。

# apache2ctl -M

「cgi_module」は、デフォルトでは有効になっていないので、以下のコマンドでCGIが利用出来るように変更します。

# a2enmod cgi
# apache2ctl -M|grep cgi
cgid_module (shared)

CGIを利用したいフォルダに「 +ExecCGI」を追記し、CGIが動作するように設定します。以下は、トップフォルダでCGIを利用出来るようにした際の例です。

<Directory /var/www/>
Options Indexes FollowSymLinks MultiViews +ExecCGI
AllowOverride None
Order allow,deny
allow from all
</Directory>

サービス操作

参考にApache2のサービス操作のコマンドを載せておきます。

Usage: apache2 {start|stop|graceful-stop|restart|reload|force-reload}
@raspberrypi:~ $ sudo service apache2 reload
@raspberrypi:~ $ sudo service apache2 restart

参考にさせて頂いたサイト

LinuxからValue-domainのDDNS(Dynamic DNS)更新

関連記事:SynologyでValueDomain向けのDDNS設定方法

SynologyでのDDNS更新も良い機能だなと思いましたが、今回はオーソドックスにLinuxホストからValue DomainのDDNS更新方法です。
Raspberry Piで設定を実施しました。
VALUE-DOMAIN(バリュードメイン)

VALUE-DOMAINのIP更新方法

VALUE-DOMAINで本設定を行う際は、VALUE-DOMAINのポータルサイトよりIP更新時に用いるドメインのパスワードを取得する必要があります。
参考URL:https://www.value-domain.com/ddns.php?action=howto

ツールなどからのアクセス先(HTTP GET/POSTリクエスト)

https://dyn.value-domain.com/cgi-bin/dyn.fcg?d=ドメイン名&p=パスワード&h=ホスト名&i=IPアドレス

パラメータ説明
d更新するドメインを指定します。
例:value-domain.com
p更新するドメインのパスワードを指定します。
例: 1234
h更新するドメインのホスト名を指定します。DNSレコード編集画面のホスト名と全く同じ仕様です。
例: *(全ホスト)、www、指定なしはホスト名なし
i更新するドメインのIPアドレスを指定します。指定しない場合は、自動的に接続者のIPアドレスが設定されます。
aaaaレコードが存在し、IPアドレスがIPv6フォーマットの場合、aaaaレコードのホストがアップデートされます。

Raspberry PiからVALUE-DomainのIPアドレス変更

DDNS更新のスクリプトファイル準備

設定ファイルを作成します。ドメイン名と取得したパスワードを記載します。

# Place this file on /etc/update_ddns.conf
# SECURITY: run `chmod 600 /etc/update_ddns.conf'
# to make it unreadable by non-root users.
DOMAIN=***.***
PASSWORD=**************
HOST=*

IPアドレスを更新するスクリプトです。
IPアドレス変更時に、VALUE-DOMAINにIP変更を通知します。

#!/bin/bash

CONFIG_FILE='/etc/update_ddns.conf'
IP_CACHE_FILE='/tmp/update_ddns_ip'
DDNS_CACHE_FILE='/tmp/update_ddns_result'

# sources DOMAIN= , PASSWORD= and HOST=
source $CONFIG_FILE

old_ip=`[ -e $IP_CACHE_FILE ] && cat $IP_CACHE_FILE || echo ''`
new_ip=`wget --quiet -O - 'https://dyn.value-domain.com/cgi-bin/dyn.fcg?ip'`
if [ "$old_ip" = "$new_ip" ]; then
    echo "NO CHANGE ($new_ip)"
    logger -t UPDATE_DDNS "INFO: NO CHANGE ($new_ip)"
    exit 0
fi

url="https://dyn.value-domain.com/cgi-bin/dyn.fcg?d=$DOMAIN&p=$PASSWORD&h=$HOST&i="
result=0
wget --quiet -O - "$url" 2>/dev/null | tee $DDNS_CACHE_FILE | grep 'status=0' >/dev/null && result=1

if (( !$result )); then
    echo `date` 'FAILED'
    logger -t UPDATE_DDNS "ERROR: FAILED result:" `cat $DDNS_CACHE_FILE`
    exit 1
fi

echo $new_ip > $IP_CACHE_FILE

echo "UPDATED ($new_ip)"
logger -t UPDATE_DDNS "INFO: UPDATED with new IP:$new_ip"
exit 0

作成したファイルの実行権限を変更します。

$ sudo chmod 600 /etc/update_ddns.conf
$ sudo chmod 755 /etc/update_valuedomain_ddns

定期実行登録(crontab登録)

2分、7分、12分と5分毎にスクリプトを実行し、IPアドレスが変更していないか確認を行うように、crontabにスクリプトを登録します。

$ sudo crontab -e
2-57/5 * * * * /etc/update_ddns.sh


めざましじゃんけん 画像検出システム

めざましじゃんけん結果

テレビ画像よりフジテレビ、めざましテレビ内で実施されるめざましじゃんけんの結果を蓄積します。めざましじゃんけんは、デジタル放送のコンテンツであり、B-CAS(ビーキャス)カードを用いた受信装置により、データ放送を画面表示させ、リアルタイムに参加する必要があります。番組録画しても、データ放送のコンテンツは録画することは出来ません。

  1. 環境準備(インストール)

  2. Darknet/YOLOで学習モデル準備

  3. システム実装と結果公開

  4. プログラム関連技術

本システム実装に関連した、プログラム関係のTips。

    • PHP
    • Python
  1. 【機械学習導入】ニューラルネットワークChainerフレームワーク

    • 導入方法
    • 機械学習
    • Out of Memoryへの対応
    • 学習モデルのRaspberry Piでの実行

Raspberry Piの自己証明書SSL作成

自己証明書でなく無料で利用ができるLet's Encript(参考記事(Let's Encrypt導入))を利用したかったのですが、メインのWEBサーバーであるSynologyがPort80を利用しており、現時点のLet's Encrypt証明書を入手するツールにおいて、Port80以外の8080などでhttp通信を待ち受けているサイトでの簡単なSSL証明書作成および入手方法が見つかりませんでした。
手動発行やSynologyからフックさせる方法はありそうでしたが、今後の3ヶ月毎の自動更新などを考え、利用を諦めました。HTTPのポート番号指定「--http-01-port 8080」やHTTPSのポート番号指定「--tls-sni-01-port 4443」を実施しましたが、最初にポート80へのアクセスが発生しておりました。
そこで、 今回は昔ながらの自己証明書作成を実施しました。

現在運用しているシステム構成イメージ(API連携プラットフォーム
SynologyとRaspbery Piの共存構成イメージ

SSL証明書作成

以下コマンド一覧です。

@raspberrypi:~ $ su -
Password:
root@raspberrypi:~# cd /etc/ssl/private/
root@raspberrypi:/etc/ssl/private# openssl genrsa -aes256 -out server.key 2048
root@raspberrypi:/etc/ssl/private# openssl req -new -days 3650 -key server.key -out server.csr

apacheのSSL関係の構成定義ファイルに作成した証明書を登録します。「/etc/apache2/sites-available/default-ssl.conf」
しかし、現時点で作成したSSLのサーバ証明書はパスワードが設定されているので、apacheサーバ再起動時にパスワード入力が必要となるので、パスワード不要なサーバー証明書を後程作成しなおします。

##change
#SSLCertificateFile /etc/ssl/certs/ssl-cert-snakeoil.pem
#SSLCertificateKeyFile /etc/ssl/private/ssl-cert-snakeoil.key
##change
SSLCertificateFile /etc/ssl/private/server.crt
SSLCertificateKeyFile /etc/ssl/private/server.key

以下、コマンドログです。

@raspberrypi:~ $ su -
Password: 

Wi-Fi is currently blocked by rfkill.
Use raspi-config to set the country before use.

root@raspberrypi:~# cd /etc/ssl/private/
root@raspberrypi:/etc/ssl/private# openssl genrsa -aes256 -out server.key 2048
Generating RSA private key, 2048 bit long modulus (2 primes)
....................................+++++
....................+++++
e is 65537 (0x010001)
Enter pass phrase for server.key:パスワード
Verifying - Enter pass phrase for server.key:パスワード
root@raspberrypi:/etc/ssl/private# 
root@raspberrypi:/etc/ssl/private# openssl req -new -days 3650 -key server.key -out server.csr
Ignoring -days; not generating a certificate
Enter pass phrase for server.key:パスワード
You are about to be asked to enter information that will be incorporated
into your certificate request.
What you are about to enter is what is called a Distinguished Name or a DN.
There are quite a few fields but you can leave some blank
For some fields there will be a default value,
If you enter '.', the field will be left blank.
-----
Country Name (2 letter code) [AU]:JP
State or Province Name (full name) [Some-State]:Tokyo
Locality Name (eg, city) []:Tokyo
Organization Name (eg, company) [Internet Widgits Pty Ltd]:MIKI-IE
Organizational Unit Name (eg, section) []:IT
Common Name (e.g. server FQDN or YOUR name) []:miki-ie.com
Email Address []:mail@192.168.0.108

Please enter the following 'extra' attributes
to be sent with your certificate request
A challenge password []:(空欄)
An optional company name []:(空欄)
root@raspberrypi:/etc/ssl/private# ls
server.csr  server.key  ssl-cert-snakeoil.key
root@raspberrypi:/etc/ssl/private# 
root@raspberrypi:/etc/ssl/private# openssl x509 -in server.csr -out server.crt -req -signkey server.key -days 3650
subject=C = JP, ST = Tokyo, L = Tokyo, O = MIKI-IE, OU = IT, CN = miki-ie.com, emailAddress = mail@192.168.0.108
Getting Private key
Enter pass phrase for server.key:パスワード
root@raspberrypi:/etc/ssl/private# ls
server.crt  server.csr  server.key  ssl-cert-snakeoil.key
root@raspberrypi:/etc/ssl/private# 
root@raspberrypi:/etc/ssl/private# cd /etc/apache2/sites-available/
root@raspberrypi:/etc/apache2/sites-available# ls
000-default.conf  default-ssl.conf
root@raspberrypi:/etc/apache2/sites-available# vi default-ssl.conf 
root@raspberrypi:/etc/apache2/sites-available# cat default-ssl.conf 
<IfModule mod_ssl.c>
        <VirtualHost _default_:4443>
                ServerAdmin webmaster@192.168.0.108

                DocumentRoot /var/www/html

                # Available loglevels: trace8, ..., trace1, debug, info, notice, warn,
                # error, crit, alert, emerg.
                # It is also possible to configure the loglevel for particular
                # modules, e.g.
                #LogLevel info ssl:warn

                ErrorLog ${APACHE_LOG_DIR}/error.log
                CustomLog ${APACHE_LOG_DIR}/access.log combined

                # For most configuration files from conf-available/, which are
                # enabled or disabled at a global level, it is possible to
                # include a line for only one particular virtual host. For example the
                # following line enables the CGI configuration for this host only
                # after it has been globally disabled with "a2disconf".
                #Include conf-available/serve-cgi-bin.conf

                #   SSL Engine Switch:
                #   Enable/Disable SSL for this virtual host.
                SSLEngine on

                #   A self-signed (snakeoil) certificate can be created by installing
                #   the ssl-cert package. See
                #   /usr/share/doc/apache2/README.Debian.gz for more info.
                #   If both key and certificate are stored in the same file, only the
                #   SSLCertificateFile directive is needed.
#SSLCertificateFile     /etc/ssl/certs/ssl-cert-snakeoil.pem
#SSLCertificateKeyFile /etc/ssl/private/ssl-cert-snakeoil.key
##miki
SSLCertificateFile /etc/ssl/private/server.crt
SSLCertificateKeyFile /etc/ssl/private/server.key

                #   Server Certificate Chain:
                #   Point SSLCertificateChainFile at a file containing the
                #   concatenation of PEM encoded CA certificates which form the
                #   certificate chain for the server certificate. Alternatively
                #   the referenced file can be the same as SSLCertificateFile
                #   when the CA certificates are directly appended to the server
                #   certificate for convinience.
                #SSLCertificateChainFile /etc/apache2/ssl.crt/server-ca.crt

                #   Certificate Authority (CA):
                #   Set the CA certificate verification path where to find CA
                #   certificates for client authentication or alternatively one
                #   huge file containing all of them (file must be PEM encoded)
                #   Note: Inside SSLCACertificatePath you need hash symlinks
                #                to point to the certificate files. Use the provided
                #                Makefile to update the hash symlinks after changes.
                #SSLCACertificatePath /etc/ssl/certs/
                #SSLCACertificateFile /etc/apache2/ssl.crt/ca-bundle.crt

                #   Certificate Revocation Lists (CRL):
                #   Set the CA revocation path where to find CA CRLs for client
                #   authentication or alternatively one huge file containing all
                #   of them (file must be PEM encoded)
                #   Note: Inside SSLCARevocationPath you need hash symlinks
                #                to point to the certificate files. Use the provided
                #                Makefile to update the hash symlinks after changes.
                #SSLCARevocationPath /etc/apache2/ssl.crl/
                #SSLCARevocationFile /etc/apache2/ssl.crl/ca-bundle.crl

                #   Client Authentication (Type):
                #   Client certificate verification type and depth.  Types are
                #   none, optional, require and optional_no_ca.  Depth is a
                #   number which specifies how deeply to verify the certificate
                #   issuer chain before deciding the certificate is not valid.
                #SSLVerifyClient require
                #SSLVerifyDepth  10

                #   SSL Engine Options:
                #   Set various options for the SSL engine.
                #   o FakeBasicAuth:
                #        Translate the client X.509 into a Basic Authorisation.  This means that
                #        the standard Auth/DBMAuth methods can be used for access control.  The
                #        user name is the `one line' version of the client's X.509 certificate.
                #        Note that no password is obtained from the user. Every entry in the user
                #        file needs this password: `xxj31ZMTZzkVA'.
                #   o ExportCertData:
                #        This exports two additional environment variables: SSL_CLIENT_CERT and
                #        SSL_SERVER_CERT. These contain the PEM-encoded certificates of the
                #        server (always existing) and the client (only existing when client
                #        authentication is used). This can be used to import the certificates
                #        into CGI scripts.
                #   o StdEnvVars:
                #        This exports the standard SSL/TLS related `SSL_*' environment variables.
                #        Per default this exportation is switched off for performance reasons,
                #        because the extraction step is an expensive operation and is usually
                #        useless for serving static content. So one usually enables the
                #        exportation for CGI and SSI requests only.
                #   o OptRenegotiate:
                #        This enables optimized SSL connection renegotiation handling when SSL
                #        directives are used in per-directory context.
                #SSLOptions +FakeBasicAuth +ExportCertData +StrictRequire
                <FilesMatch "\.(cgi|shtml|phtml|php)$">
                                SSLOptions +StdEnvVars
                </FilesMatch>
                <Directory /usr/lib/cgi-bin>
                                SSLOptions +StdEnvVars
                </Directory>

                #   SSL Protocol Adjustments:
                #   The safe and default but still SSL/TLS standard compliant shutdown
                #   approach is that mod_ssl sends the close notify alert but doesn't wait for
                #   the close notify alert from client. When you need a different shutdown
                #   approach you can use one of the following variables:
                #   o ssl-unclean-shutdown:
                #        This forces an unclean shutdown when the connection is closed, i.e. no
                #        SSL close notify alert is send or allowed to received.  This violates
                #        the SSL/TLS standard but is needed for some brain-dead browsers. Use
                #        this when you receive I/O errors because of the standard approach where
                #        mod_ssl sends the close notify alert.
                #   o ssl-accurate-shutdown:
                #        This forces an accurate shutdown when the connection is closed, i.e. a
                #        SSL close notify alert is send and mod_ssl waits for the close notify
                #        alert of the client. This is 100% SSL/TLS standard compliant, but in
                #        practice often causes hanging connections with brain-dead browsers. Use
                #        this only for browsers where you know that their SSL implementation
                #        works correctly.
                #   Notice: Most problems of broken clients are also related to the HTTP
                #   keep-alive facility, so you usually additionally want to disable
                #   keep-alive for those clients, too. Use variable "nokeepalive" for this.
                #   Similarly, one has to force some clients to use HTTP/1.0 to workaround
                #   their broken HTTP/1.1 implementation. Use variables "downgrade-1.0" and
                #   "force-response-1.0" for this.
                # BrowserMatch "MSIE [2-6]" \
                #               nokeepalive ssl-unclean-shutdown \
                #               downgrade-1.0 force-response-1.0

        </VirtualHost>
</IfModule>

root@raspberrypi:/etc/apache2/sites-available# service apache2 restart
Enter passphrase for SSL/TLS keys for 127.0.1.1:4443 (RSA): *******

apache2/httpサービス再起動時にパスワード入力不要とする

  1. 現在のserver証明書のバックアップ
  2. パスワード無しの証明書を作成

元ファイルのバックアップ

# cp server.key server.key.org

パスフレーズの解除

# openssl rsa -in server.key -out server.key
apache2サービスを再起動し、パスワードが要求されないことを確認し、すべての手順終了です。

Webhooksの利用

Webhooksは、WEB APIとなります。
Webhook(Webコールバック、HTTPプッシュAPIなど)はあるアプリケーションから別のアプリケーションに対してリアルタイムな情報提供を実現するための仕組みです。
Web/URLアクセスを行います。
Webhooksは、WEB受信とWEB送信側の機能を実現出来ます。

  1. SynologyやRaspberry PiからのURLアクセスを受け付けるWebhook
  2. WebhookからSynologyやRaspberry PiへアクセスするWebhook

の2つの利用形態があります。

IFTTTは、「if(もし) this(この状態) then(の場合は) that(それをする)」なので、
Synologyなどが、IFTTT処理の実行を開始させたい場合は、SynologyよりWebhookを実行します。(SynologyよりWebhookにURLアクセスします)

IFTTT処理でアクションさせたい処理がSynology側などにある場合は、WebhookよりSynologyへURLアクセスさせます。

トリガー(That)

外部よりWebhookにURLアクセスする必要があります。
その際のアクセスするURLや、アクセスに必要なアクセスキーは、Webhooksの「Documation」画面より入手可能です。
{event}はトリガーごとに設定するので、IFTTTでレシピを作成する際に指定します。

実際にThis部分を指定する画面は以下となります。
Event Nameを設定する部分があり、ここで、設定した文字列がURL部分{event}となります。

例:https://maker.ifttt.com/trigger/test/with/key/XXXXXXXXXXXXXXXXXXXXXX
トリガーアクセス時に変数を加える場合は、GETやPOSTで変数を与えます。

アクション(This)


Webhookより外部にURLアクセスを実施します。
その際のアクセスするURLや、自分がSynologyなどに準備したPHPファイルなどのWEBコンテンツとなります。
アクセスURLにWEBアクセス方法GETやPOSTなど、そしてコンテンツタイプおよびBodyに変数を指定します。
日本語を扱う場面も多いと思うので、URLエンコードされたコンテンツの送信をオススメします。


前提条件

  • Synologyのサーバの公開設定が終わっている
    • ルーターのNAT / Port Foward / Virtual Serverの設定が出来ており、インタネットからサーバーにアクセスできる

DDNS(Dynamic DNS)ダイナミックDNS/動的DNS

インターネットを利用する際に必要となる、パブリックIPアドレス(インターネットにおける世界で一意なアドレス)。
ドメイン(miki-ie.comなど)は、人にもわかりやすい表札や屋号のようなもの。
DNS(Domain Name Serivce)は、ドメインとIPアドレスの割り当てを行います。

DDNSとは、IPアドレスが頻繁に変わるホストに固定的にドメイン名を割り当て、アドレス変更に即座に追随してDNS情報を更新するシステム。 また、その仕組みを利用して提供される動的なDNSサービス。

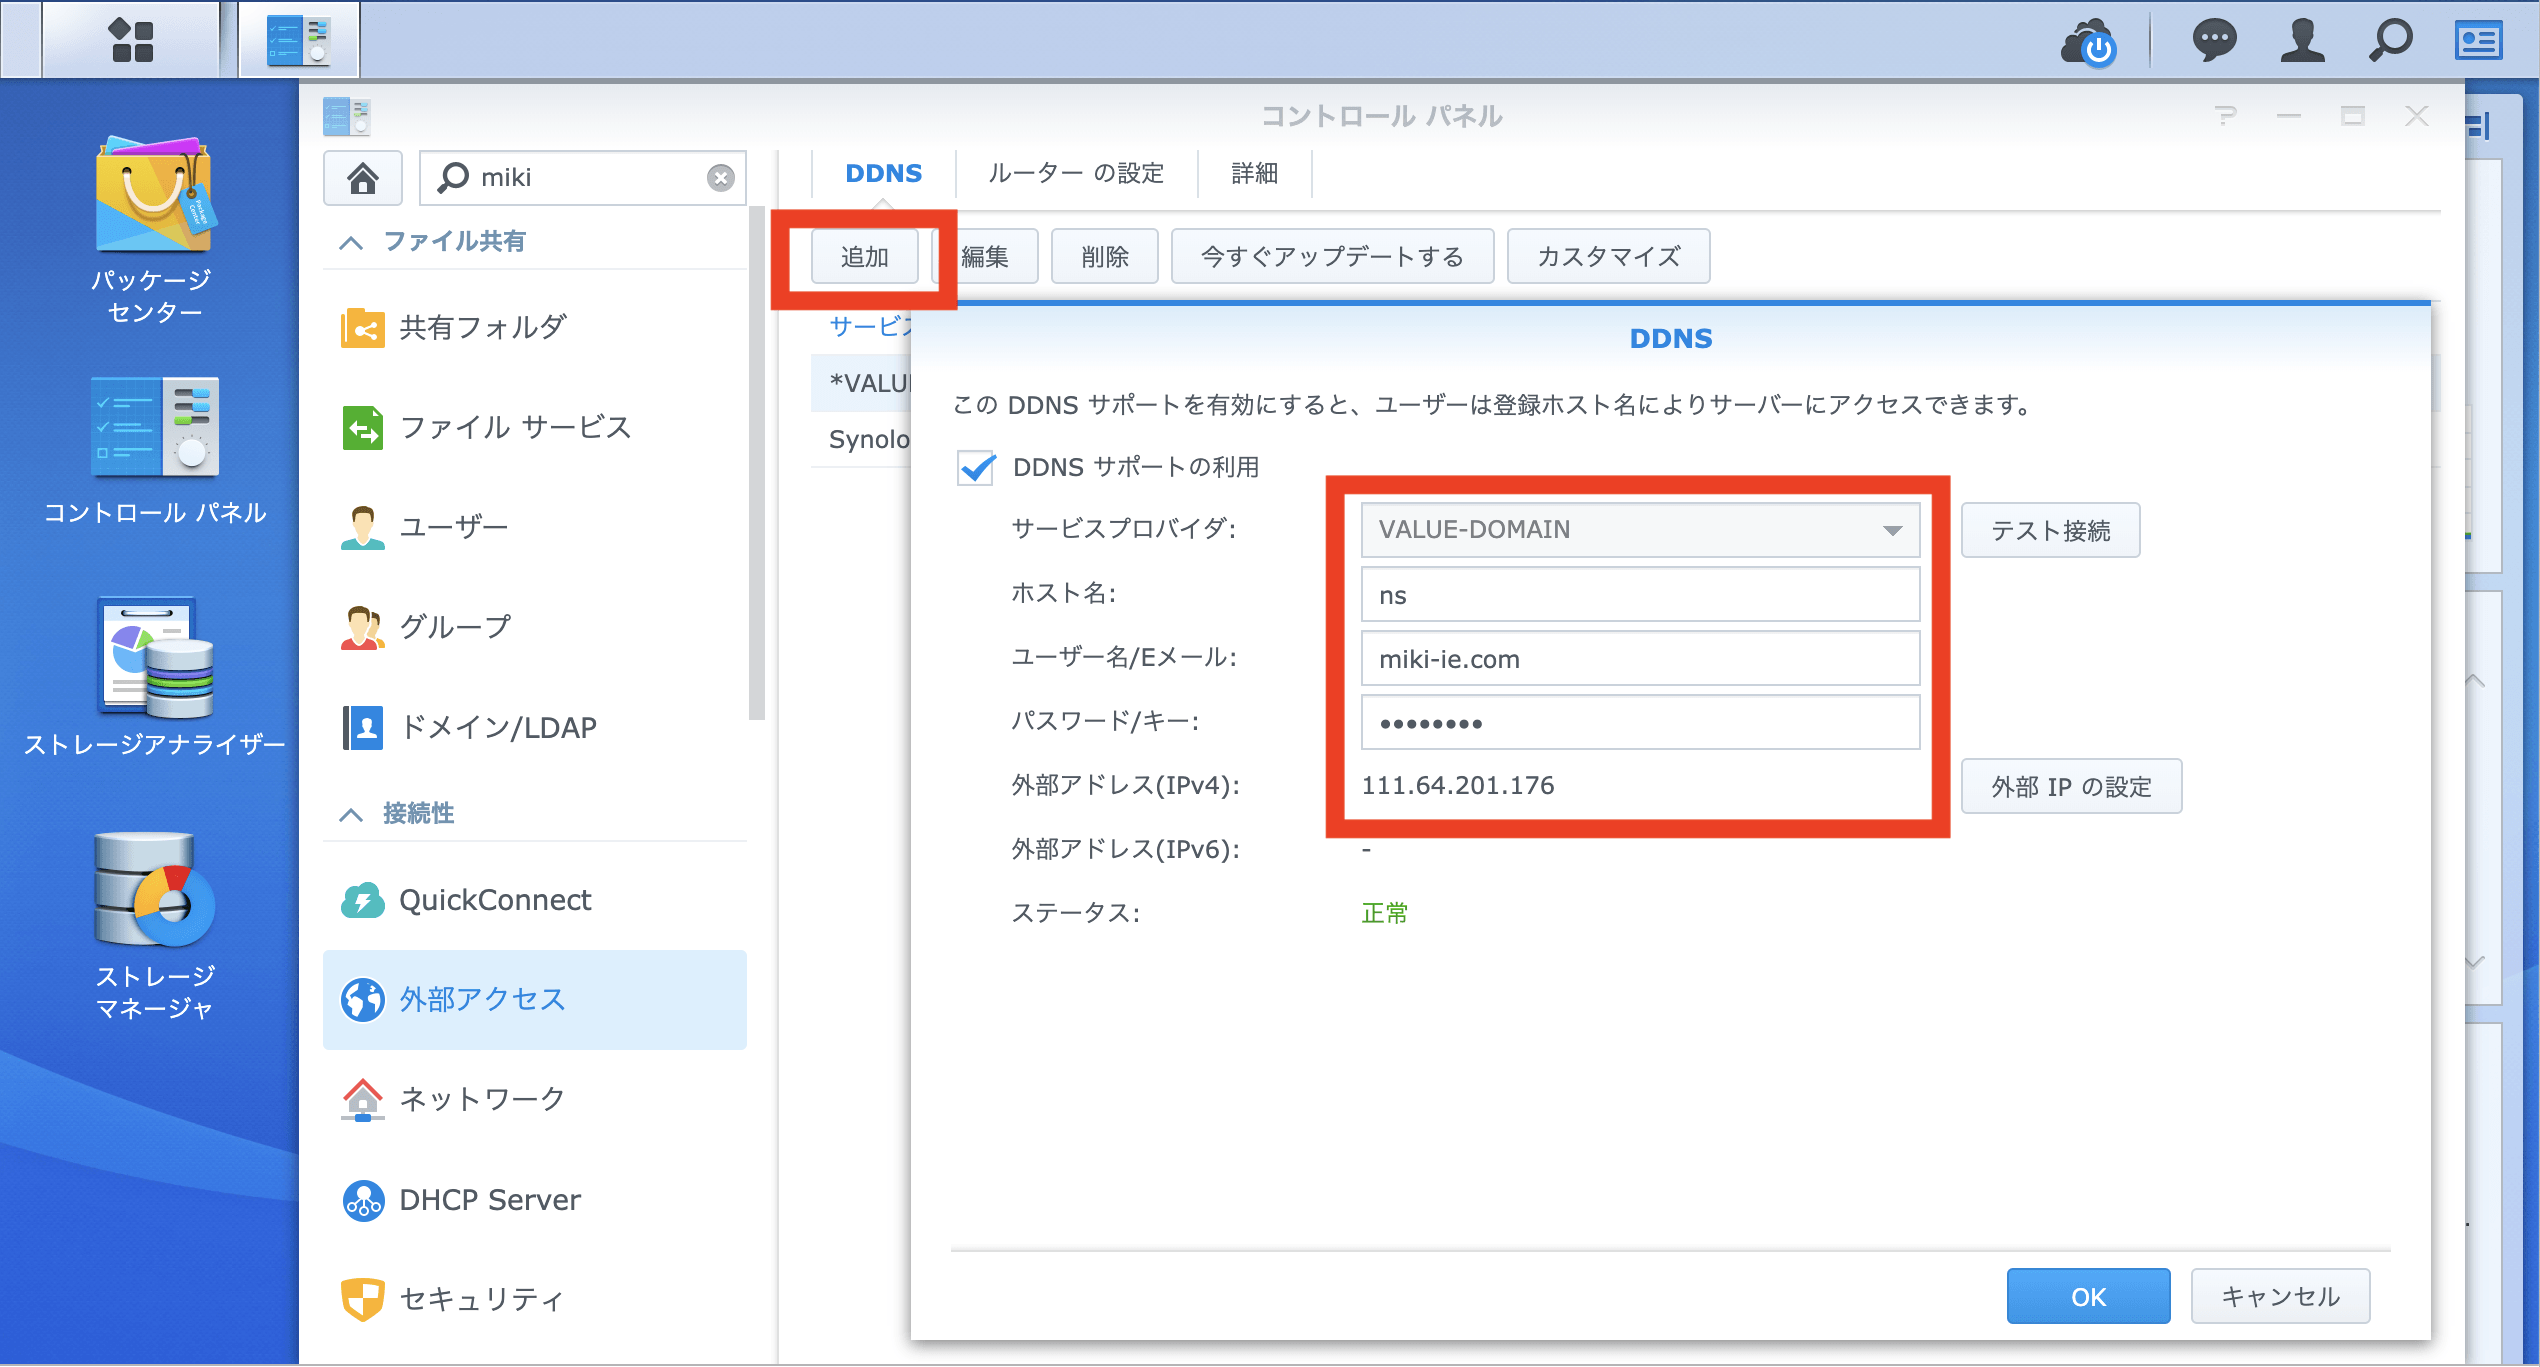
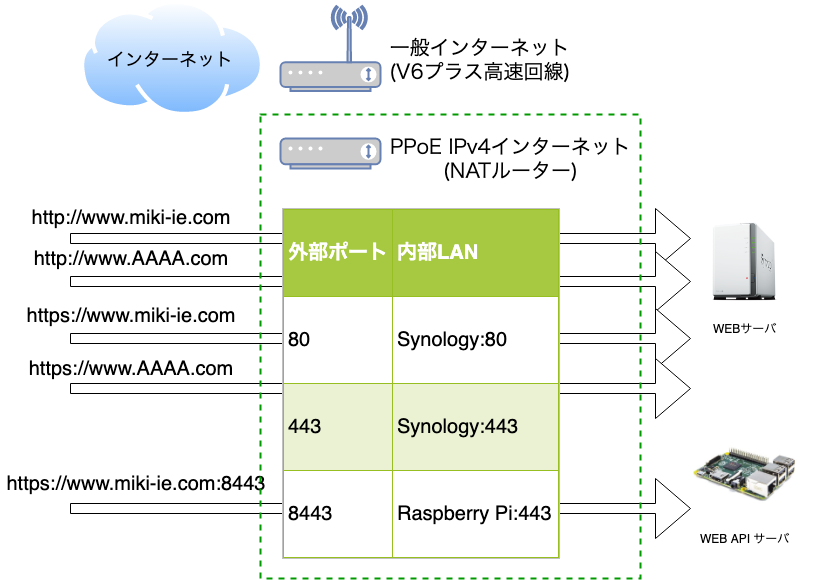
企業向けなどには固定IPアドレスが利用され、DNS(Domain Name System)運用においてもIPアドレスとドメイン名を固定的に長期間結びつけた運用となる。
個人宅など、一般のインターネットプロバイダ(ISP)を利用した際は、インターネットプロバイダより、一時的なIPアドレスが割り当てられる。

よって、通常の自宅環境でドメインを運用した際は、利用するIPアドレスに合わせてDNSレコードを変更する必要があります。
www.miki-ie.com(不変に利用を続けたい) ⇔ Public IPアドレス(ISP接続毎に変わる)

独自ドメイン取得

DDNS向けに無料でドメインを貸してくれるWEBサービスもありますが、永続的な無料での利用などが約束されているわけでもなく、WEBサイトなどを運営する際は、独自ドメインを利用するのも悪くないと考えています。

VALUE-DOMAIN(バリュードメイン)

  • 500種類以上の独自ドメインを取り扱い。
  • 自動更新設定、一括ドメイン取得・更新など運用がしやすい
  • ネームサーバー/DNSレコード設定/Whois代行などドメイン運用の基本機能も標準装備
  • 「バリューサーバー」「コアサーバー」「XREA」などのホスティングとの連携が容易


VALUE-DOMAINでのDDNS利用時のIP更新方法

VALUE-DOMAINで本設定を行う際は、VALUE-DOMAINのポータルサイトよりIP更新時に用いるドメインのパスワードを取得する必要があります。
参考URL:https://www.value-domain.com/ddns.php?action=howto

ツールなどからのアクセス先(HTTP GET/POSTリクエスト)

https://dyn.value-domain.com/cgi-bin/dyn.fcg?d=ドメイン名&p=パスワード&h=ホスト名&i=IPアドレス

パラメータ説明
d更新するドメインを指定します。
例:value-domain.com
p更新するドメインのパスワードを指定します。
例: 1234
h更新するドメインのホスト名を指定します。DNSレコード編集画面のホスト名と全く同じ仕様です。
例: *(全ホスト)、www、指定なしはホスト名なし
i更新するドメインのIPアドレスを指定します。指定しない場合は、自動的に接続者のIPアドレスが設定されます。
aaaaレコードが存在し、IPアドレスがIPv6フォーマットの場合、aaaaレコードのホストがアップデートされます。

SynologyへVALUE-DOMAINのDDNS更新を設定

SynologyへVALUE-DOMAIN向けのプロバイダ登録を実施

「コントロールパネル」「外部アクセス」「DDNS」「カスタマイズ」よりDDNSプロバイダを新規登録します。
Query URLへは、以下を登録し、一部はSynologyの設定画面で設定する設定値を利用するために、準備されている変数を利用します。

  • ユーザー名:__USERNAME__ d=ドメイン名
  •  パスワード:__PASSWORD__ p=パスワード
  •  ホスト名:__HOSTNAME__ 利用しない
  • 外部アドレス:__MYIP__ i=IPアドレス

※ ホスト名(h=ホスト名)は、「 *(全ホスト)」を固定指定。


https://dyn.value-domain.com/cgi-bin/dyn.fcg?d=__USERNAME__&p=__PASSWORD__&h=*&i=__MYIP__

SynologyへVALUE-DOMAIN向けDDNS更新を設定

「コントロールパネル」「外部アクセス」「DDNS」「追加」より作成したサービス・プロバイダVALUE-DOMAINに必要な情報をINPUTします。
※ ホスト名は何を設定しても、実際には「*」となります。このフォームに「*」のしては不可能な仕様となっておりました。


API連携プラットフォーム概要(Overview)

ラズベリーパイ(Raspberry Pi)とNAS(Synology)の使い分け

記載済み記事

ネットワーク構成

SynologyのWEBサーバとRaspberry PiのWEB APIを外部公開にする必要があります。
SynologyとRaspberry Piの両方をWEBサーバーとして、外部公開します。
通常WEBサービスでは、ポート80(http://)と443(https://)が利用されます。
家庭向けの製品では、パケットの到着ポートで、アクセスURLを見て、パケット送付先を振り分けることは出来ないので、2台のWEBサーバを公開する際は、1台を別ポートで運用します。

NAT / Port Forward / Virtual Server設定

インターネット側IP+Port を ローカルネット側IP+Port の転送ルールを設定します。この技術や機能名がNAT、Port ForwardやVirtual Serverと呼ばれております。

パブリック側プライベート側
(グローバルIP)Port:80(Synology プライベートIP)Port:80
(グローバルIP)Port:443(Synology プライベートIP)Port:443
(グローバルIP)Port:8443(Raspberry PiプライベートIP)Port:443

この際に、グローバル側からのRaspberry Piへのアクセス方法は、「https://www.miki.-ie.com:8443」とポート番号を指定したアドレスとなります。

複数DOMAIN(ドメイン)の運用

複数の独自ドメインでWEBサーバを運用します。これは、WEBサーバのVirtual Server機能で実現します。Synologyでは、簡単に設定が可能ですので、設定方法などは割愛します。