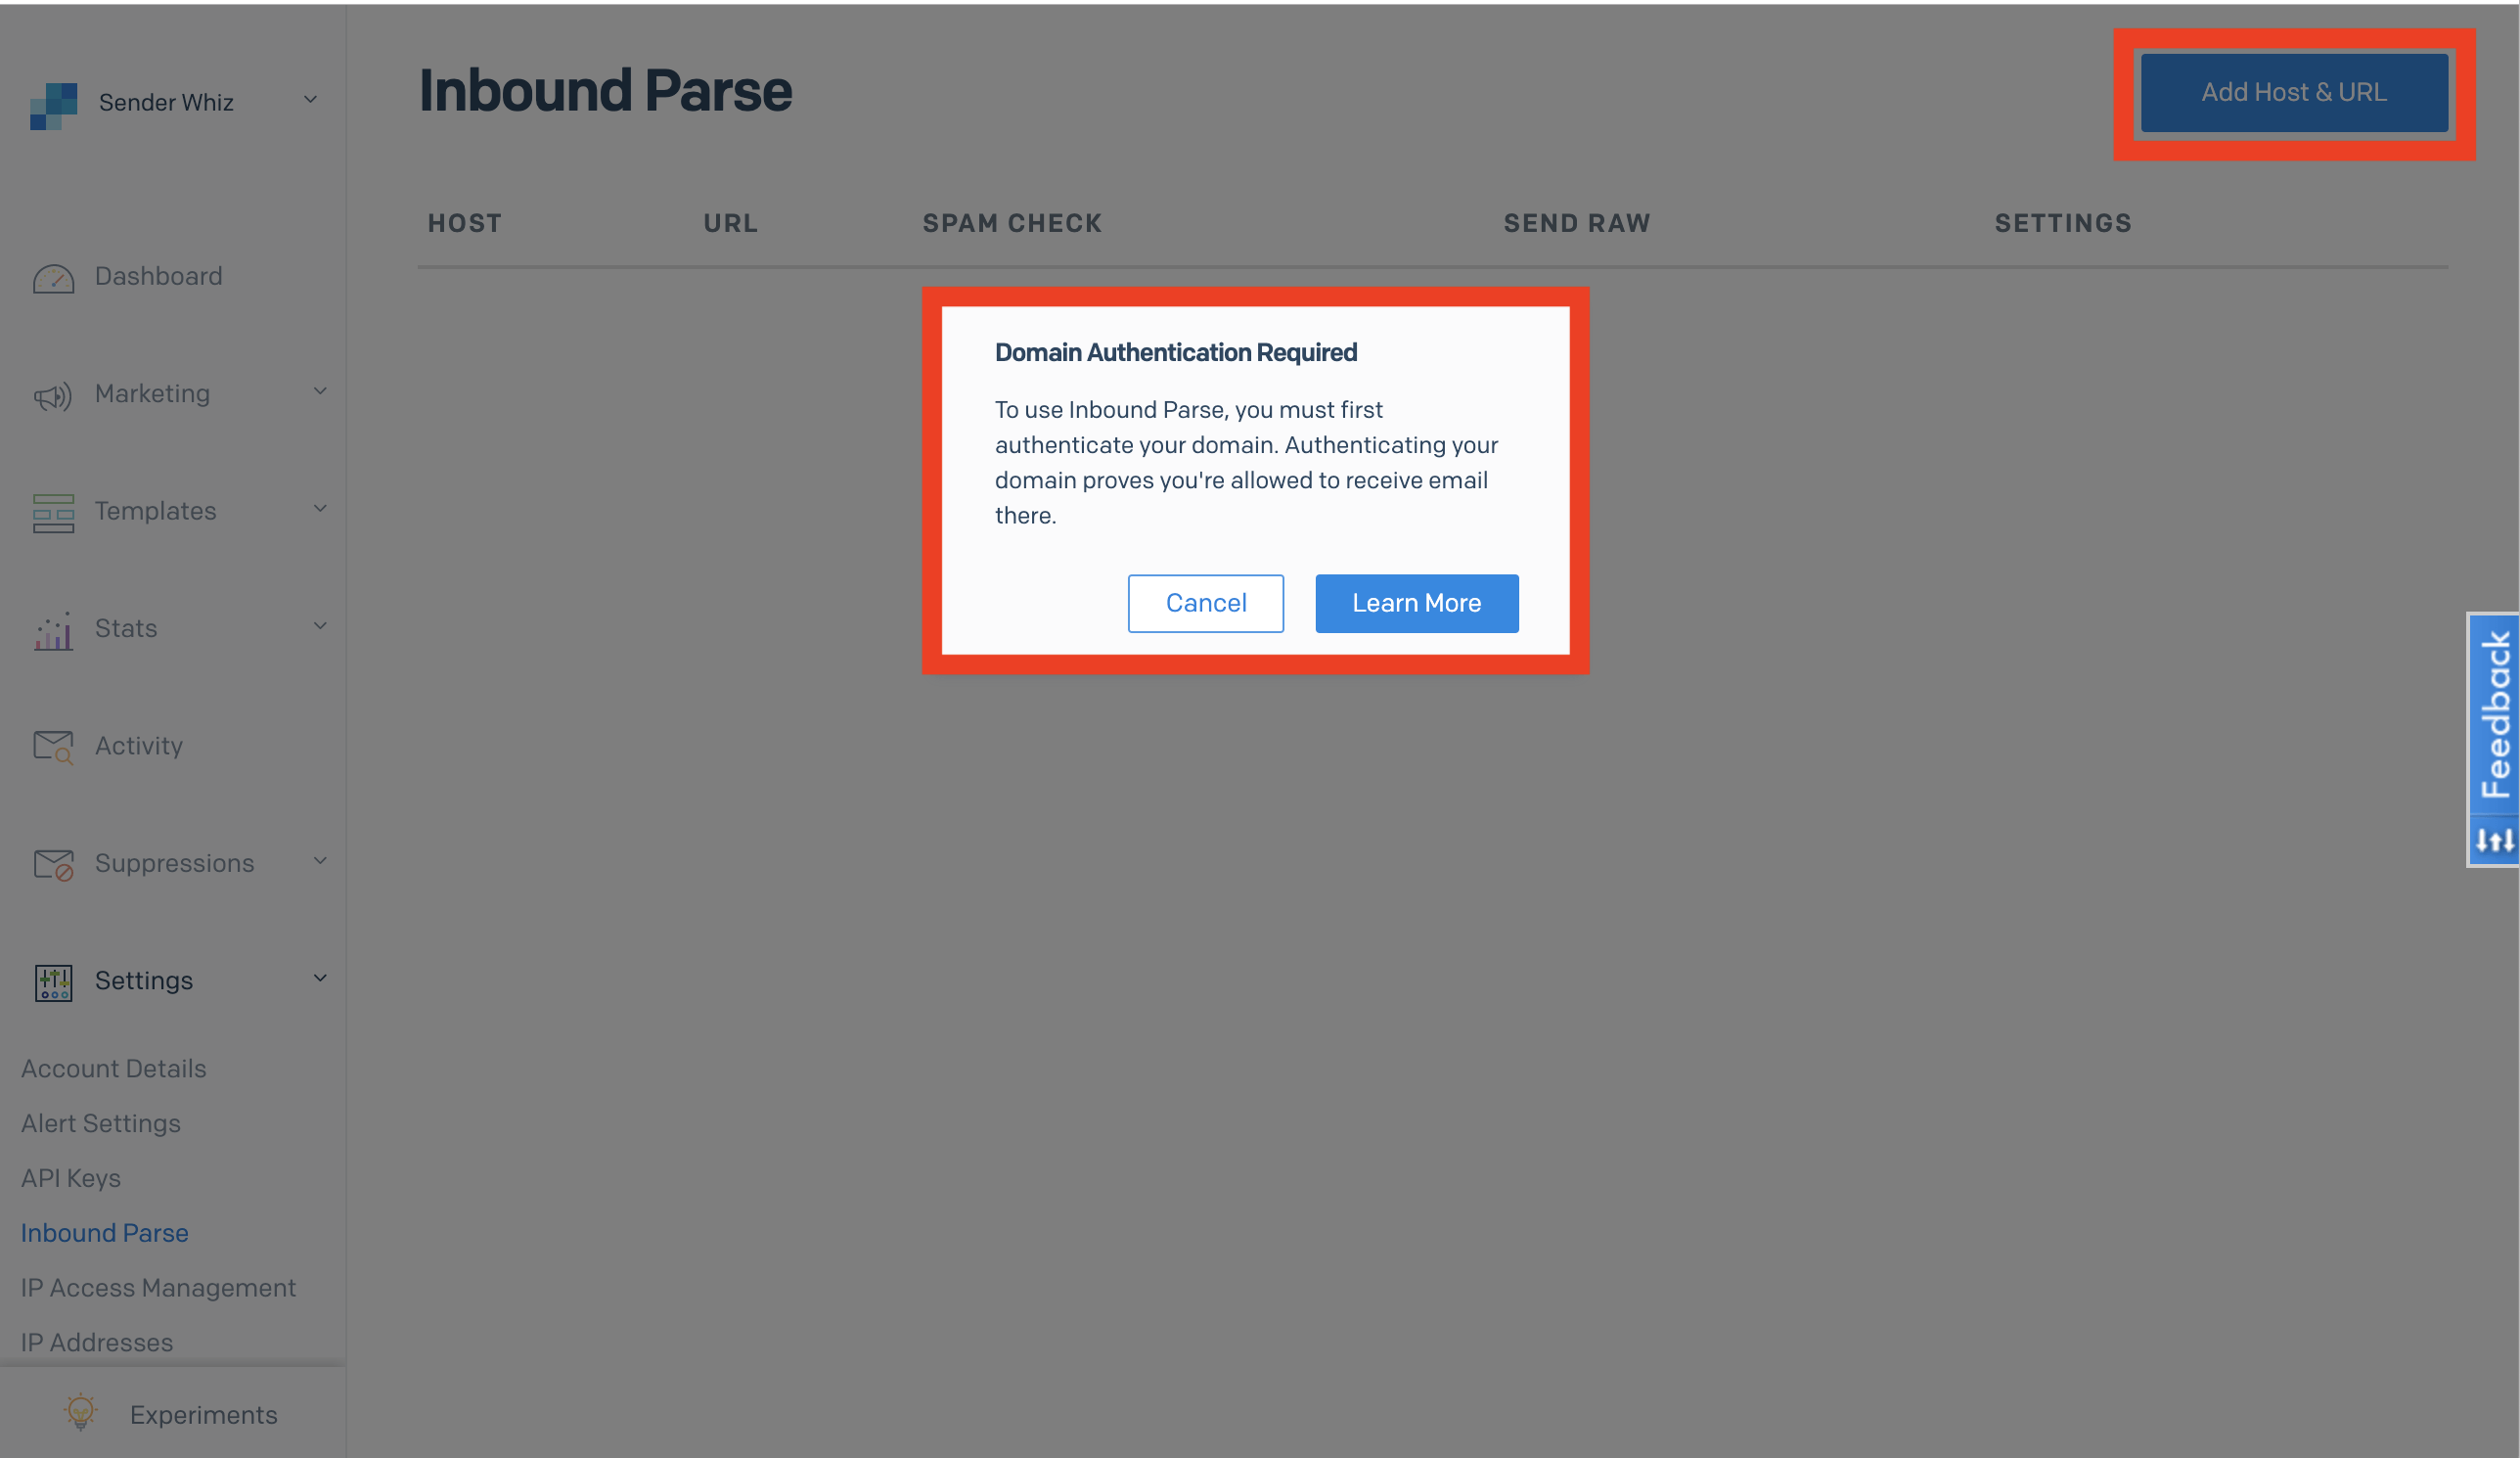
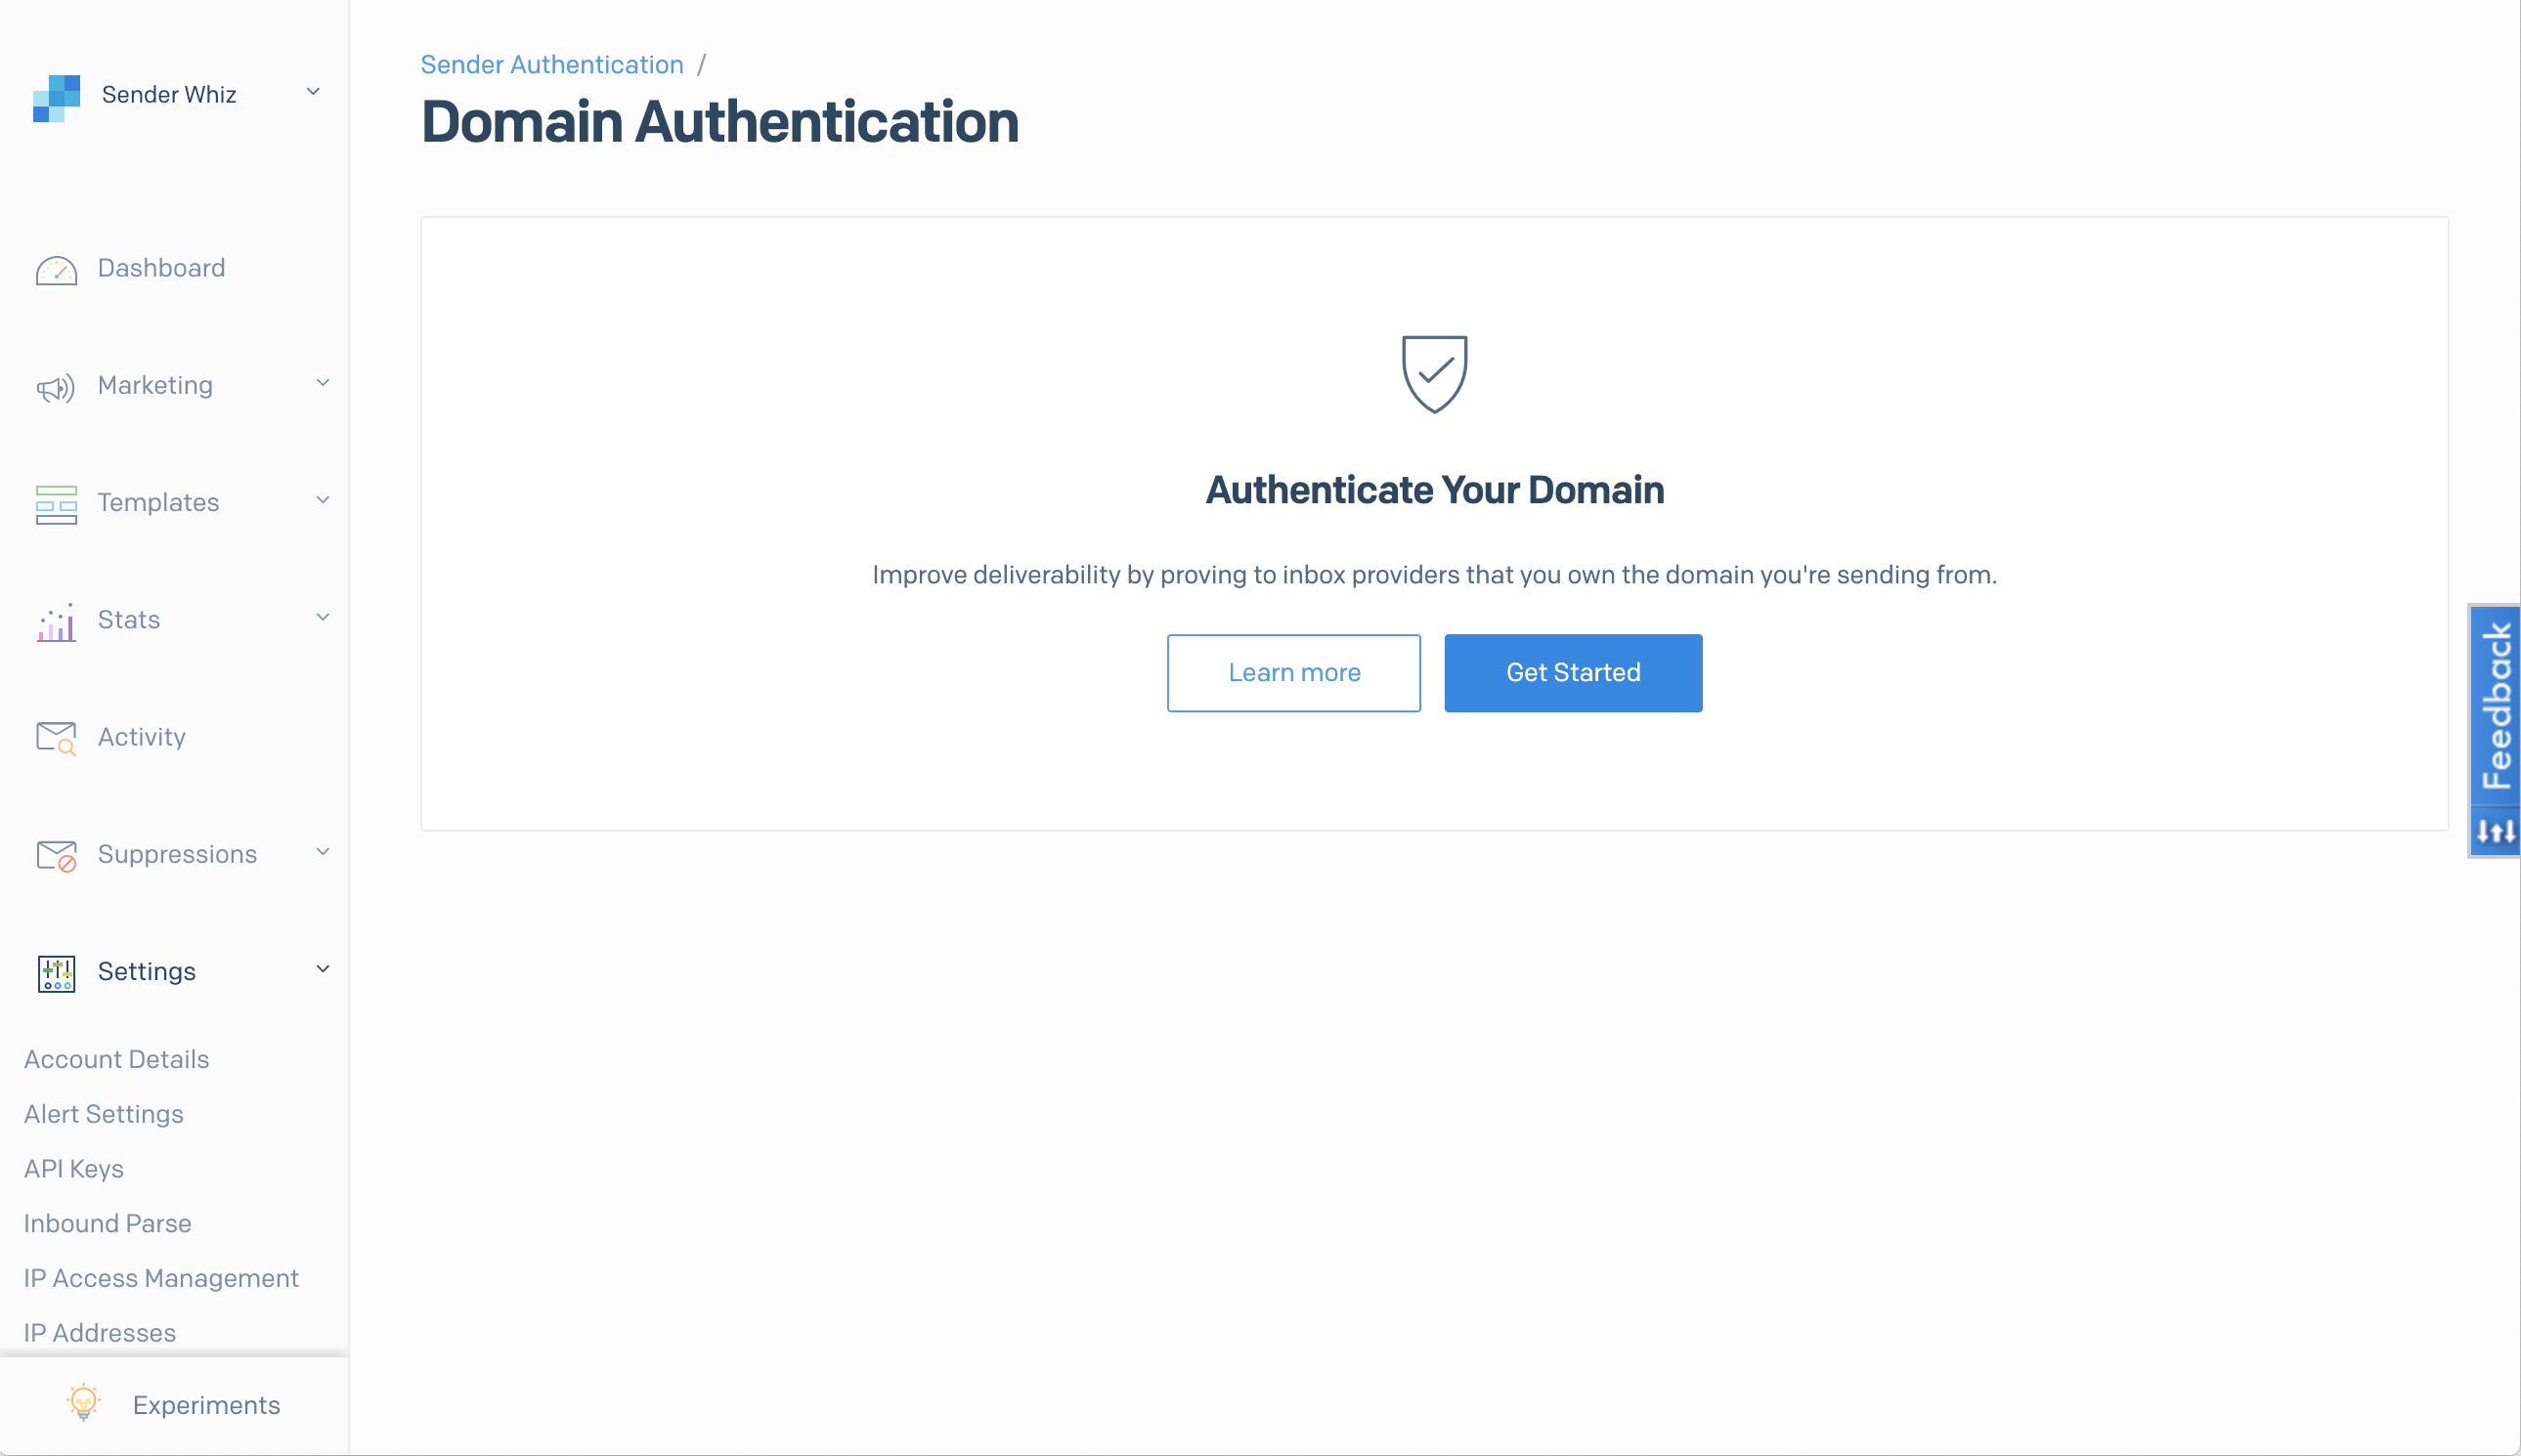
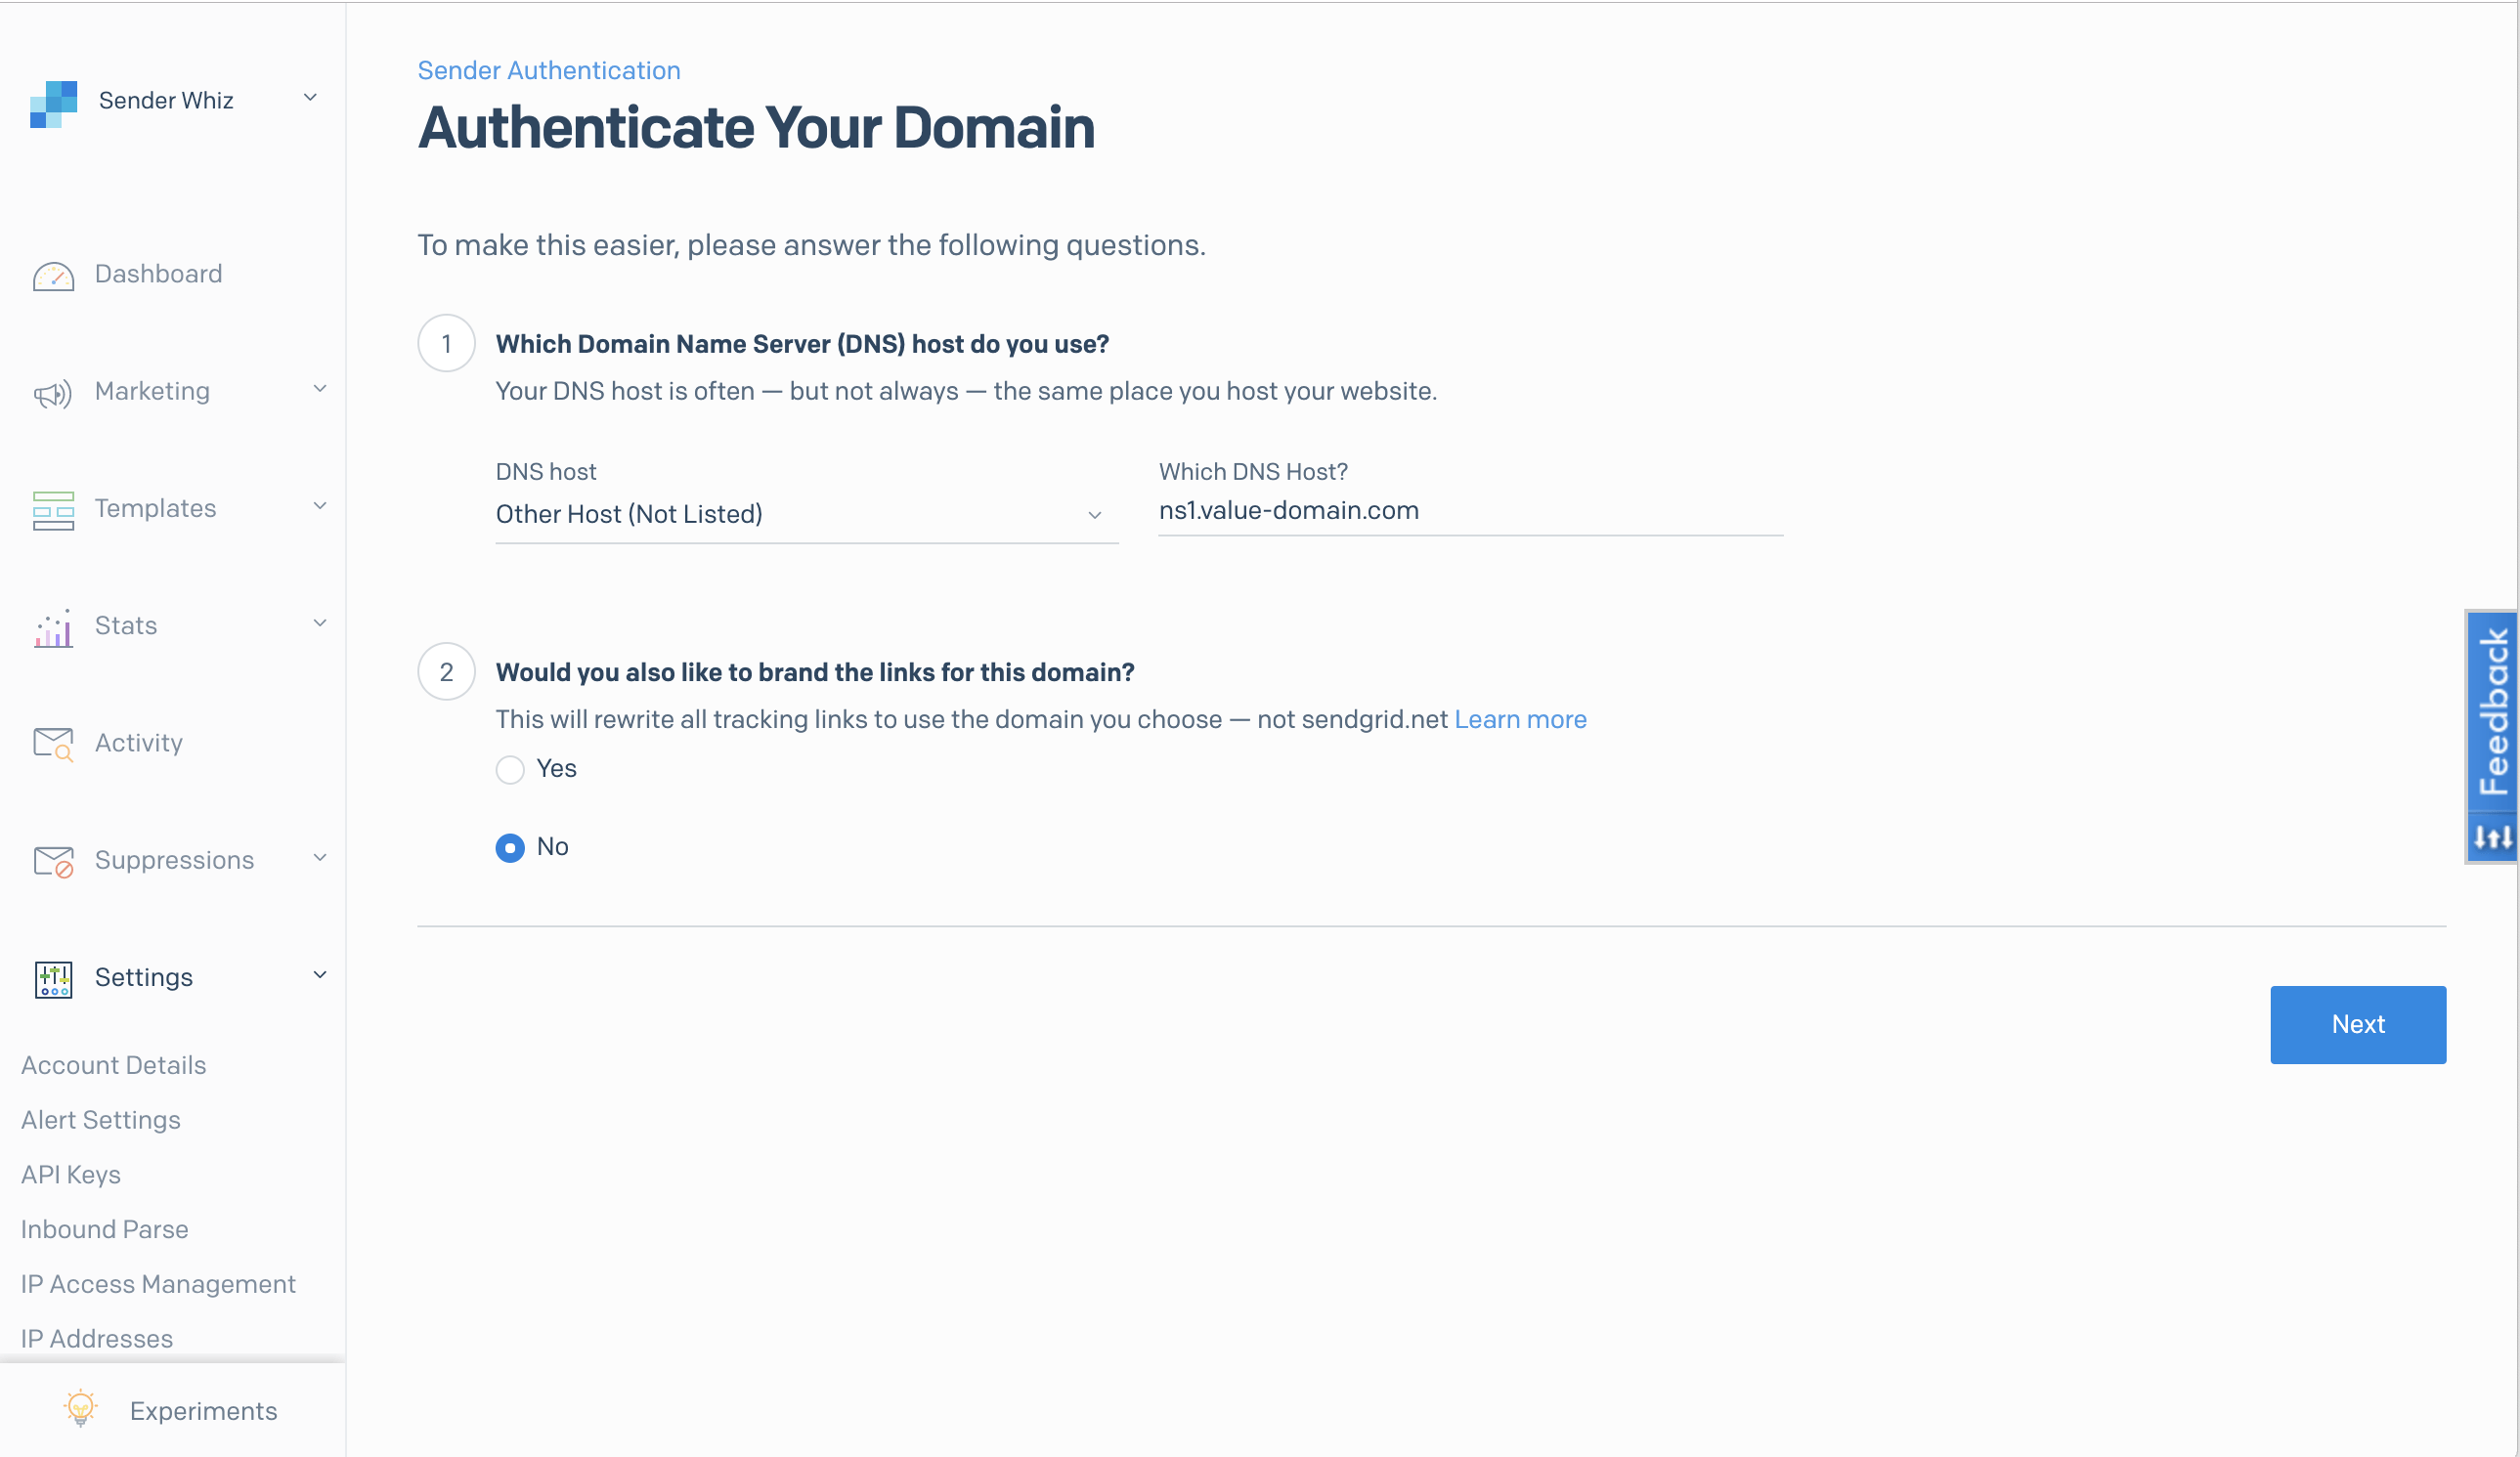
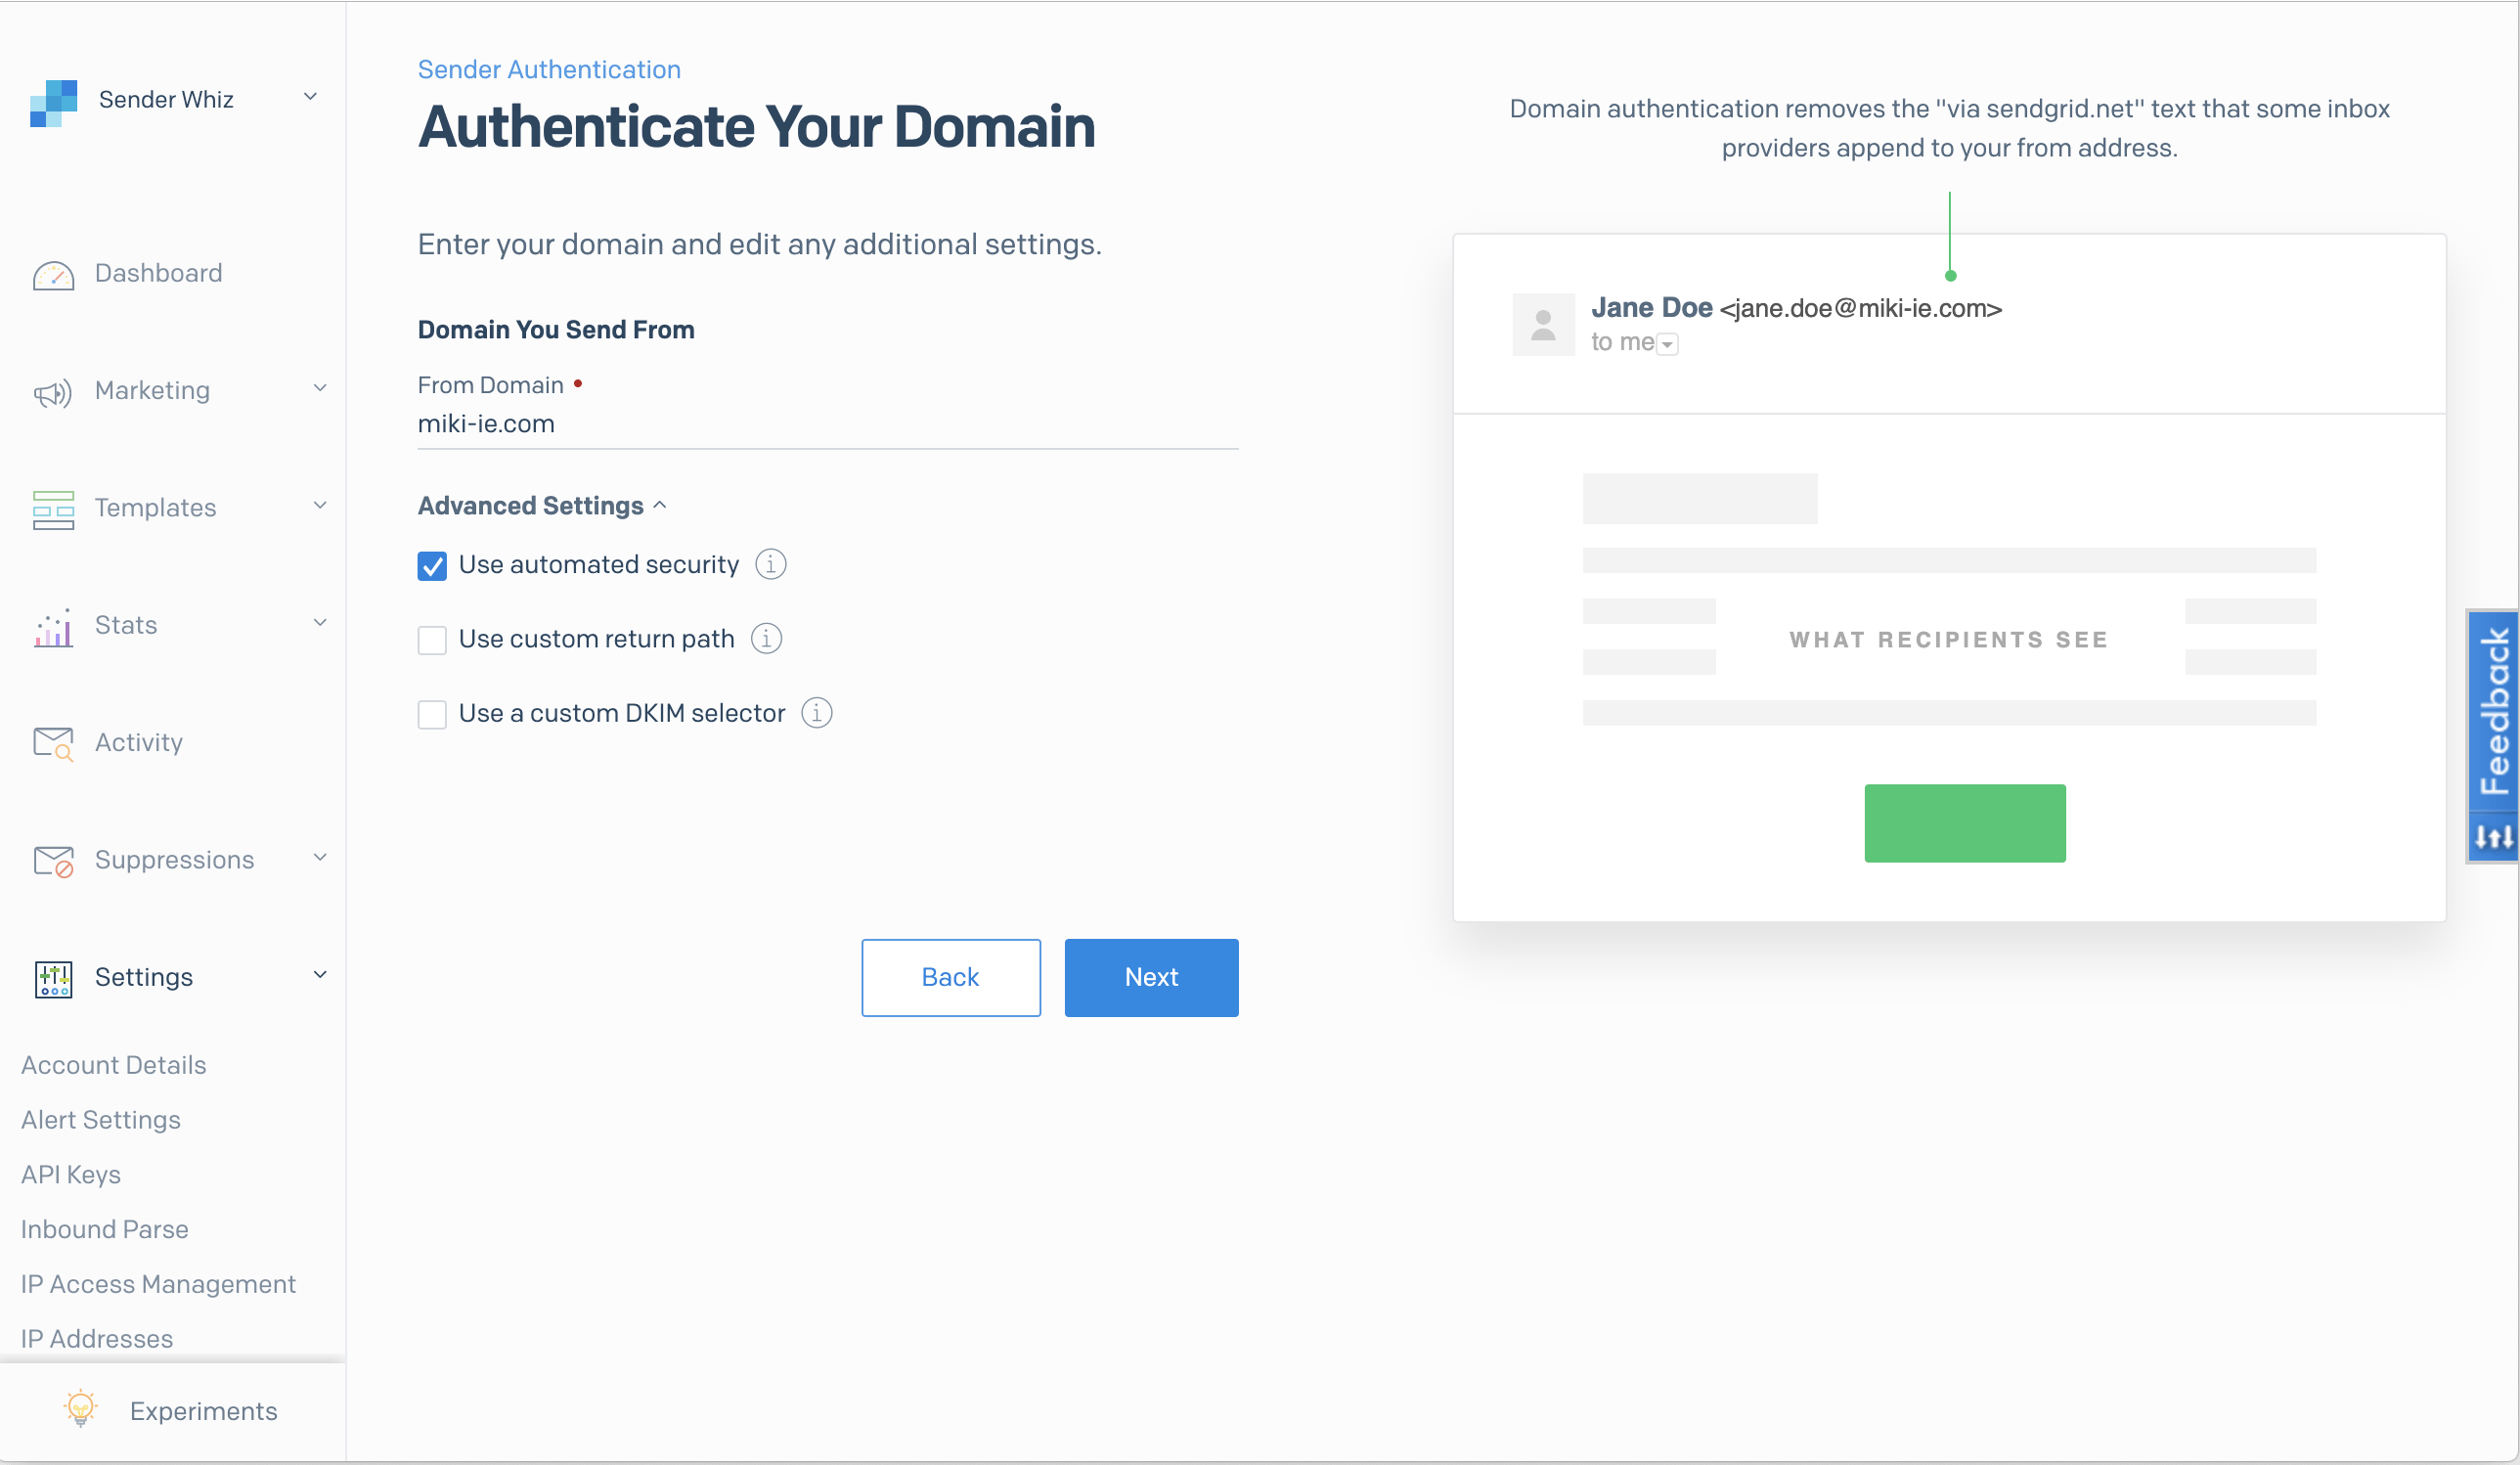
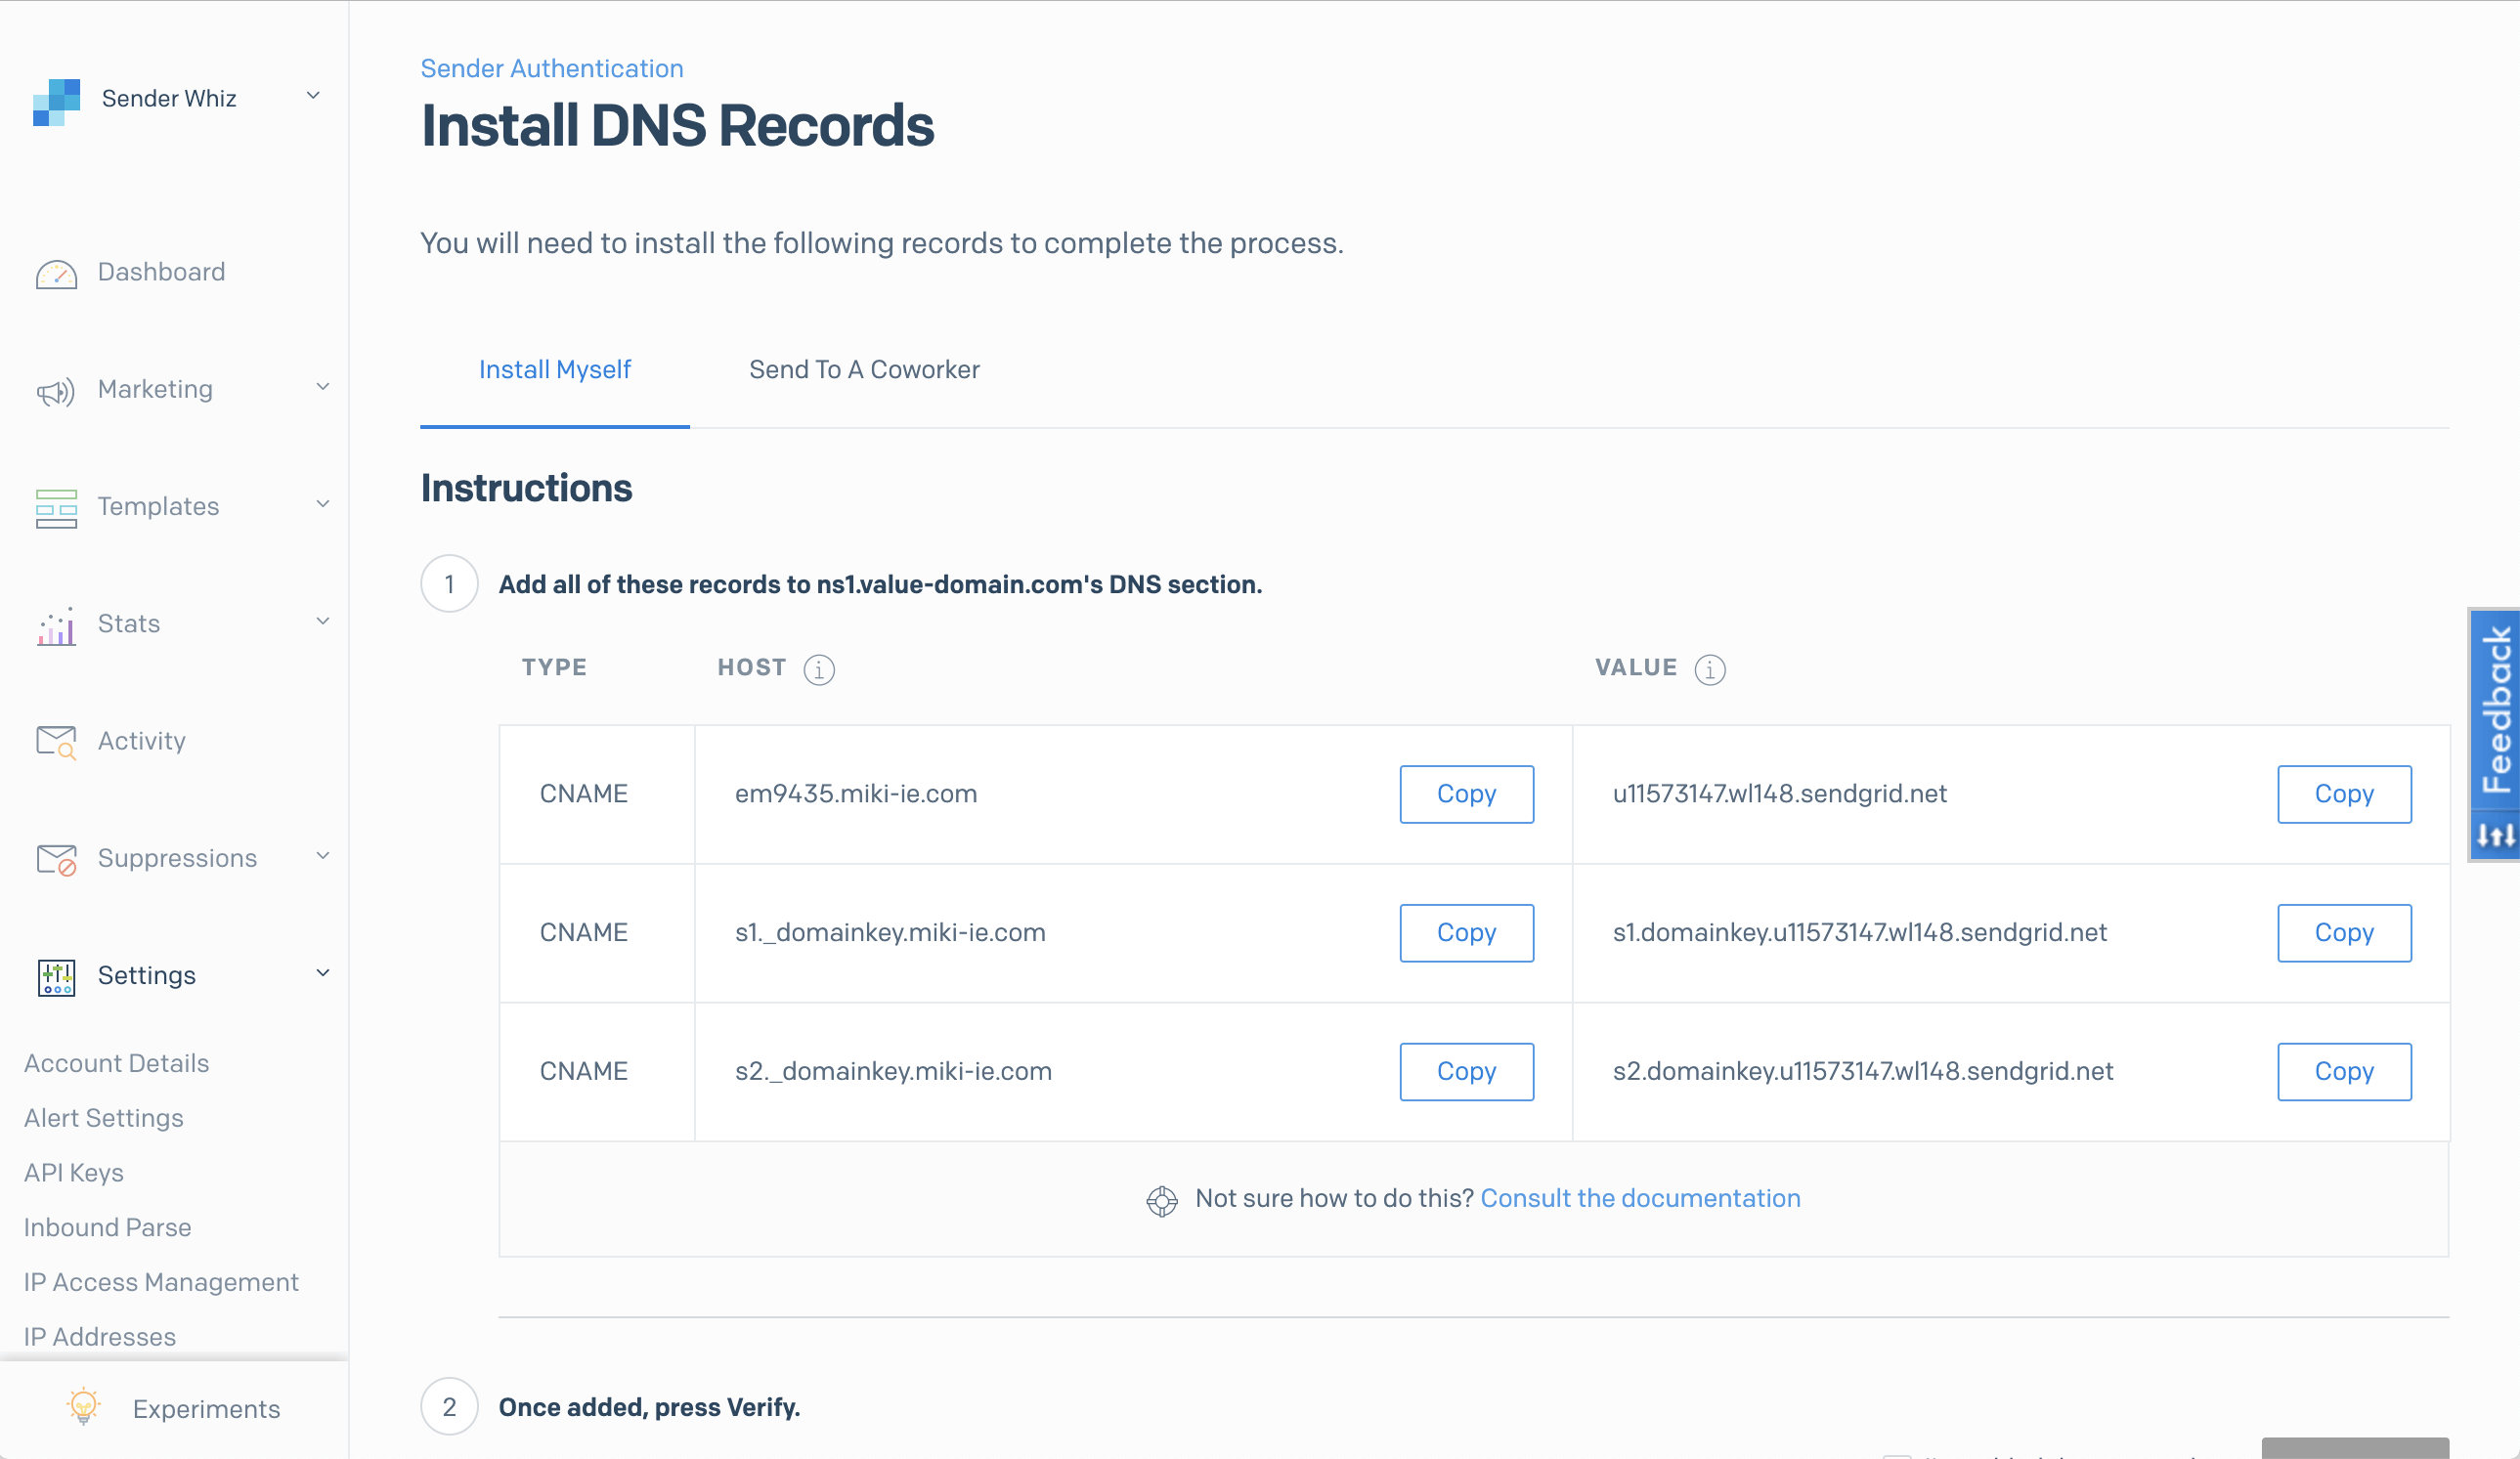
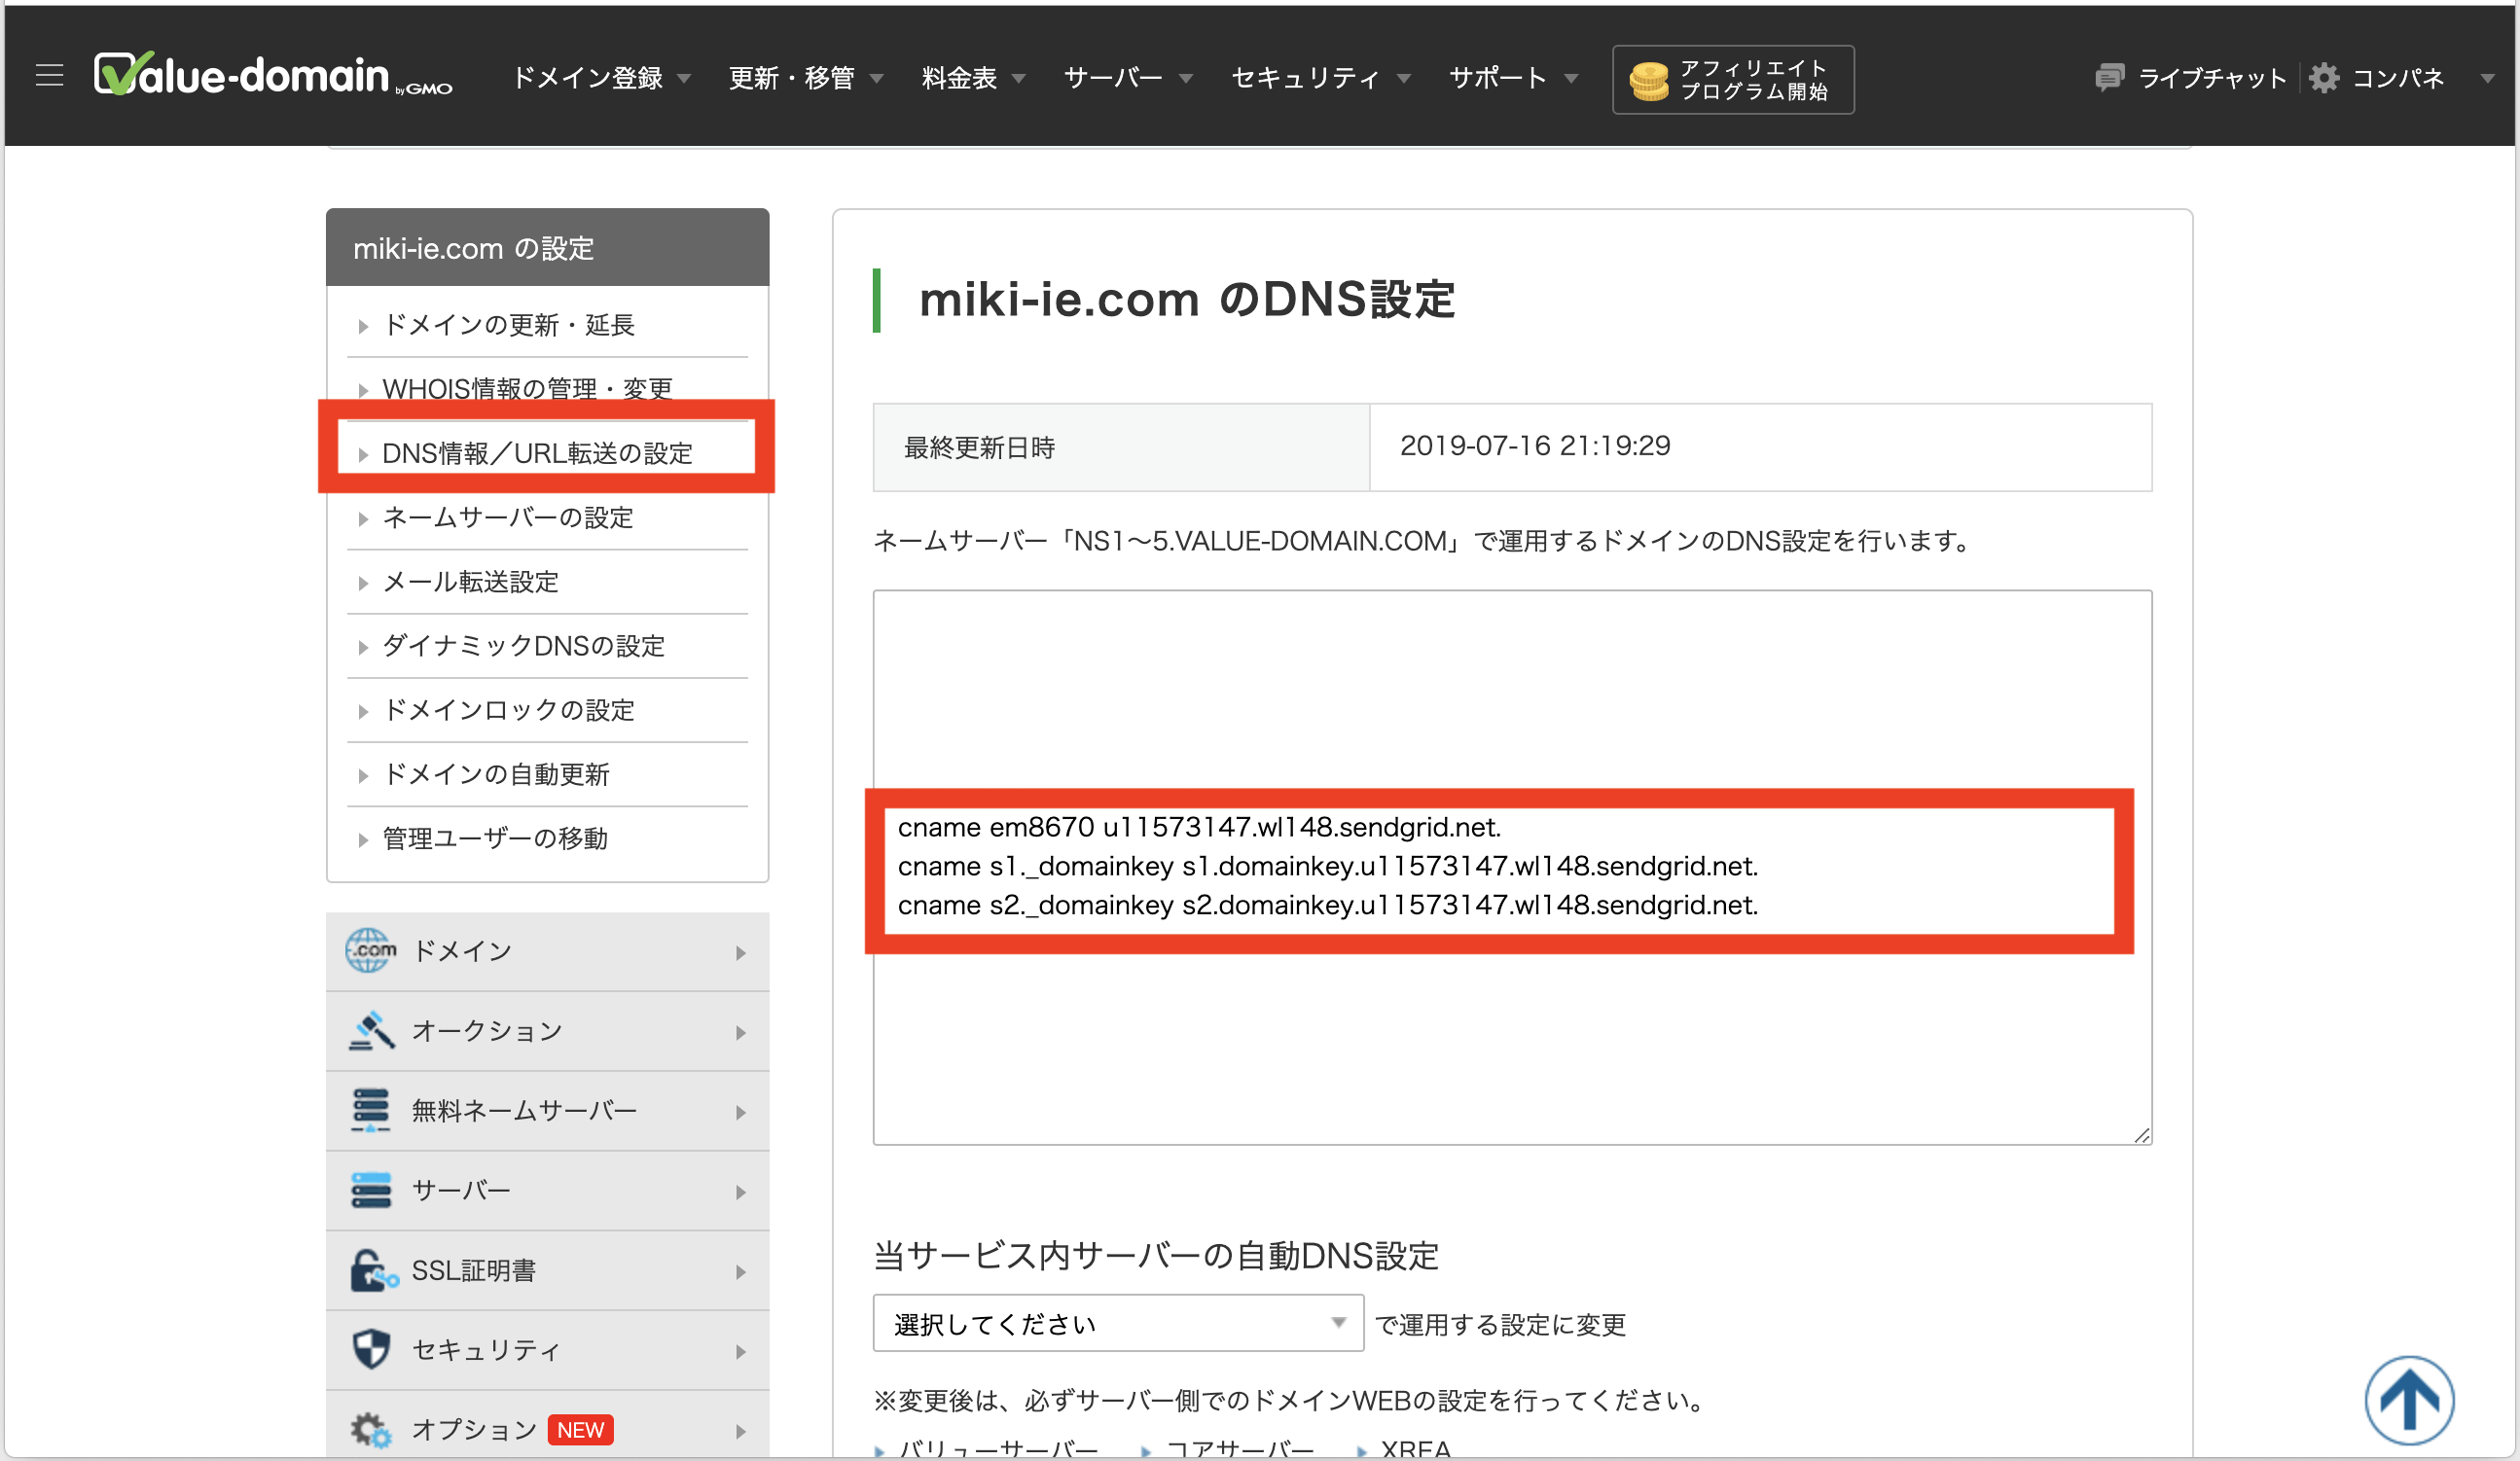
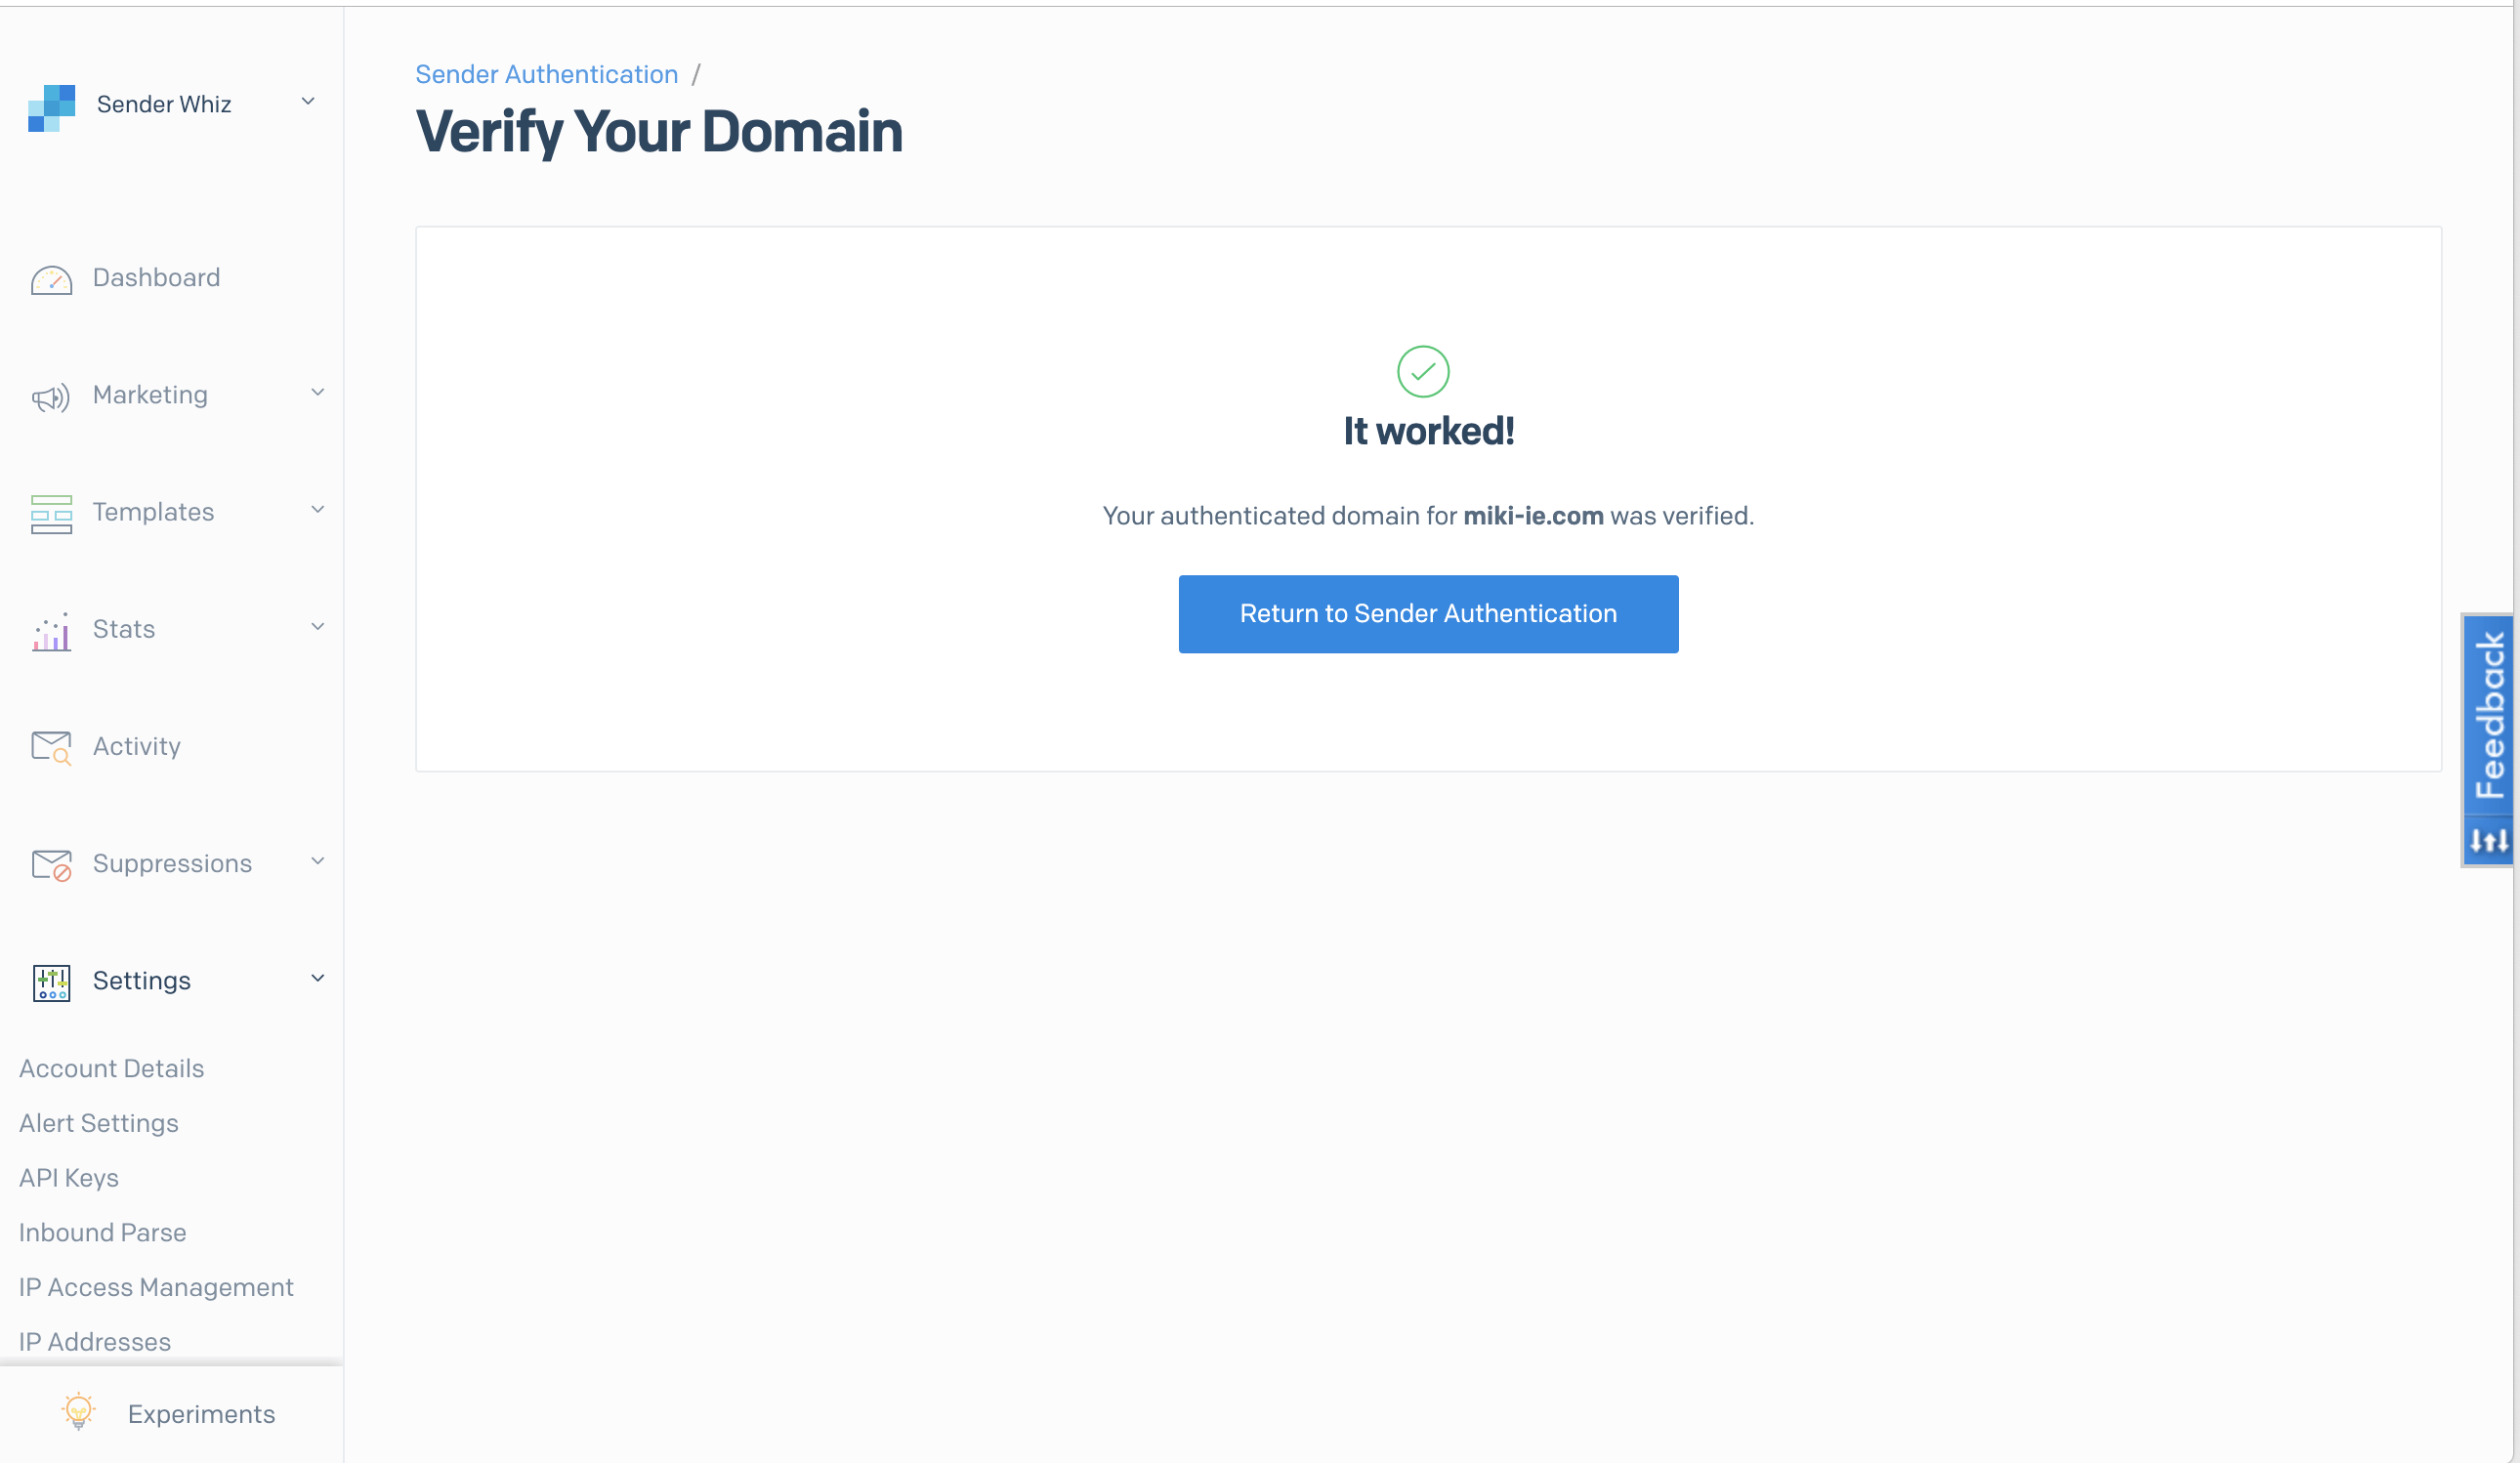
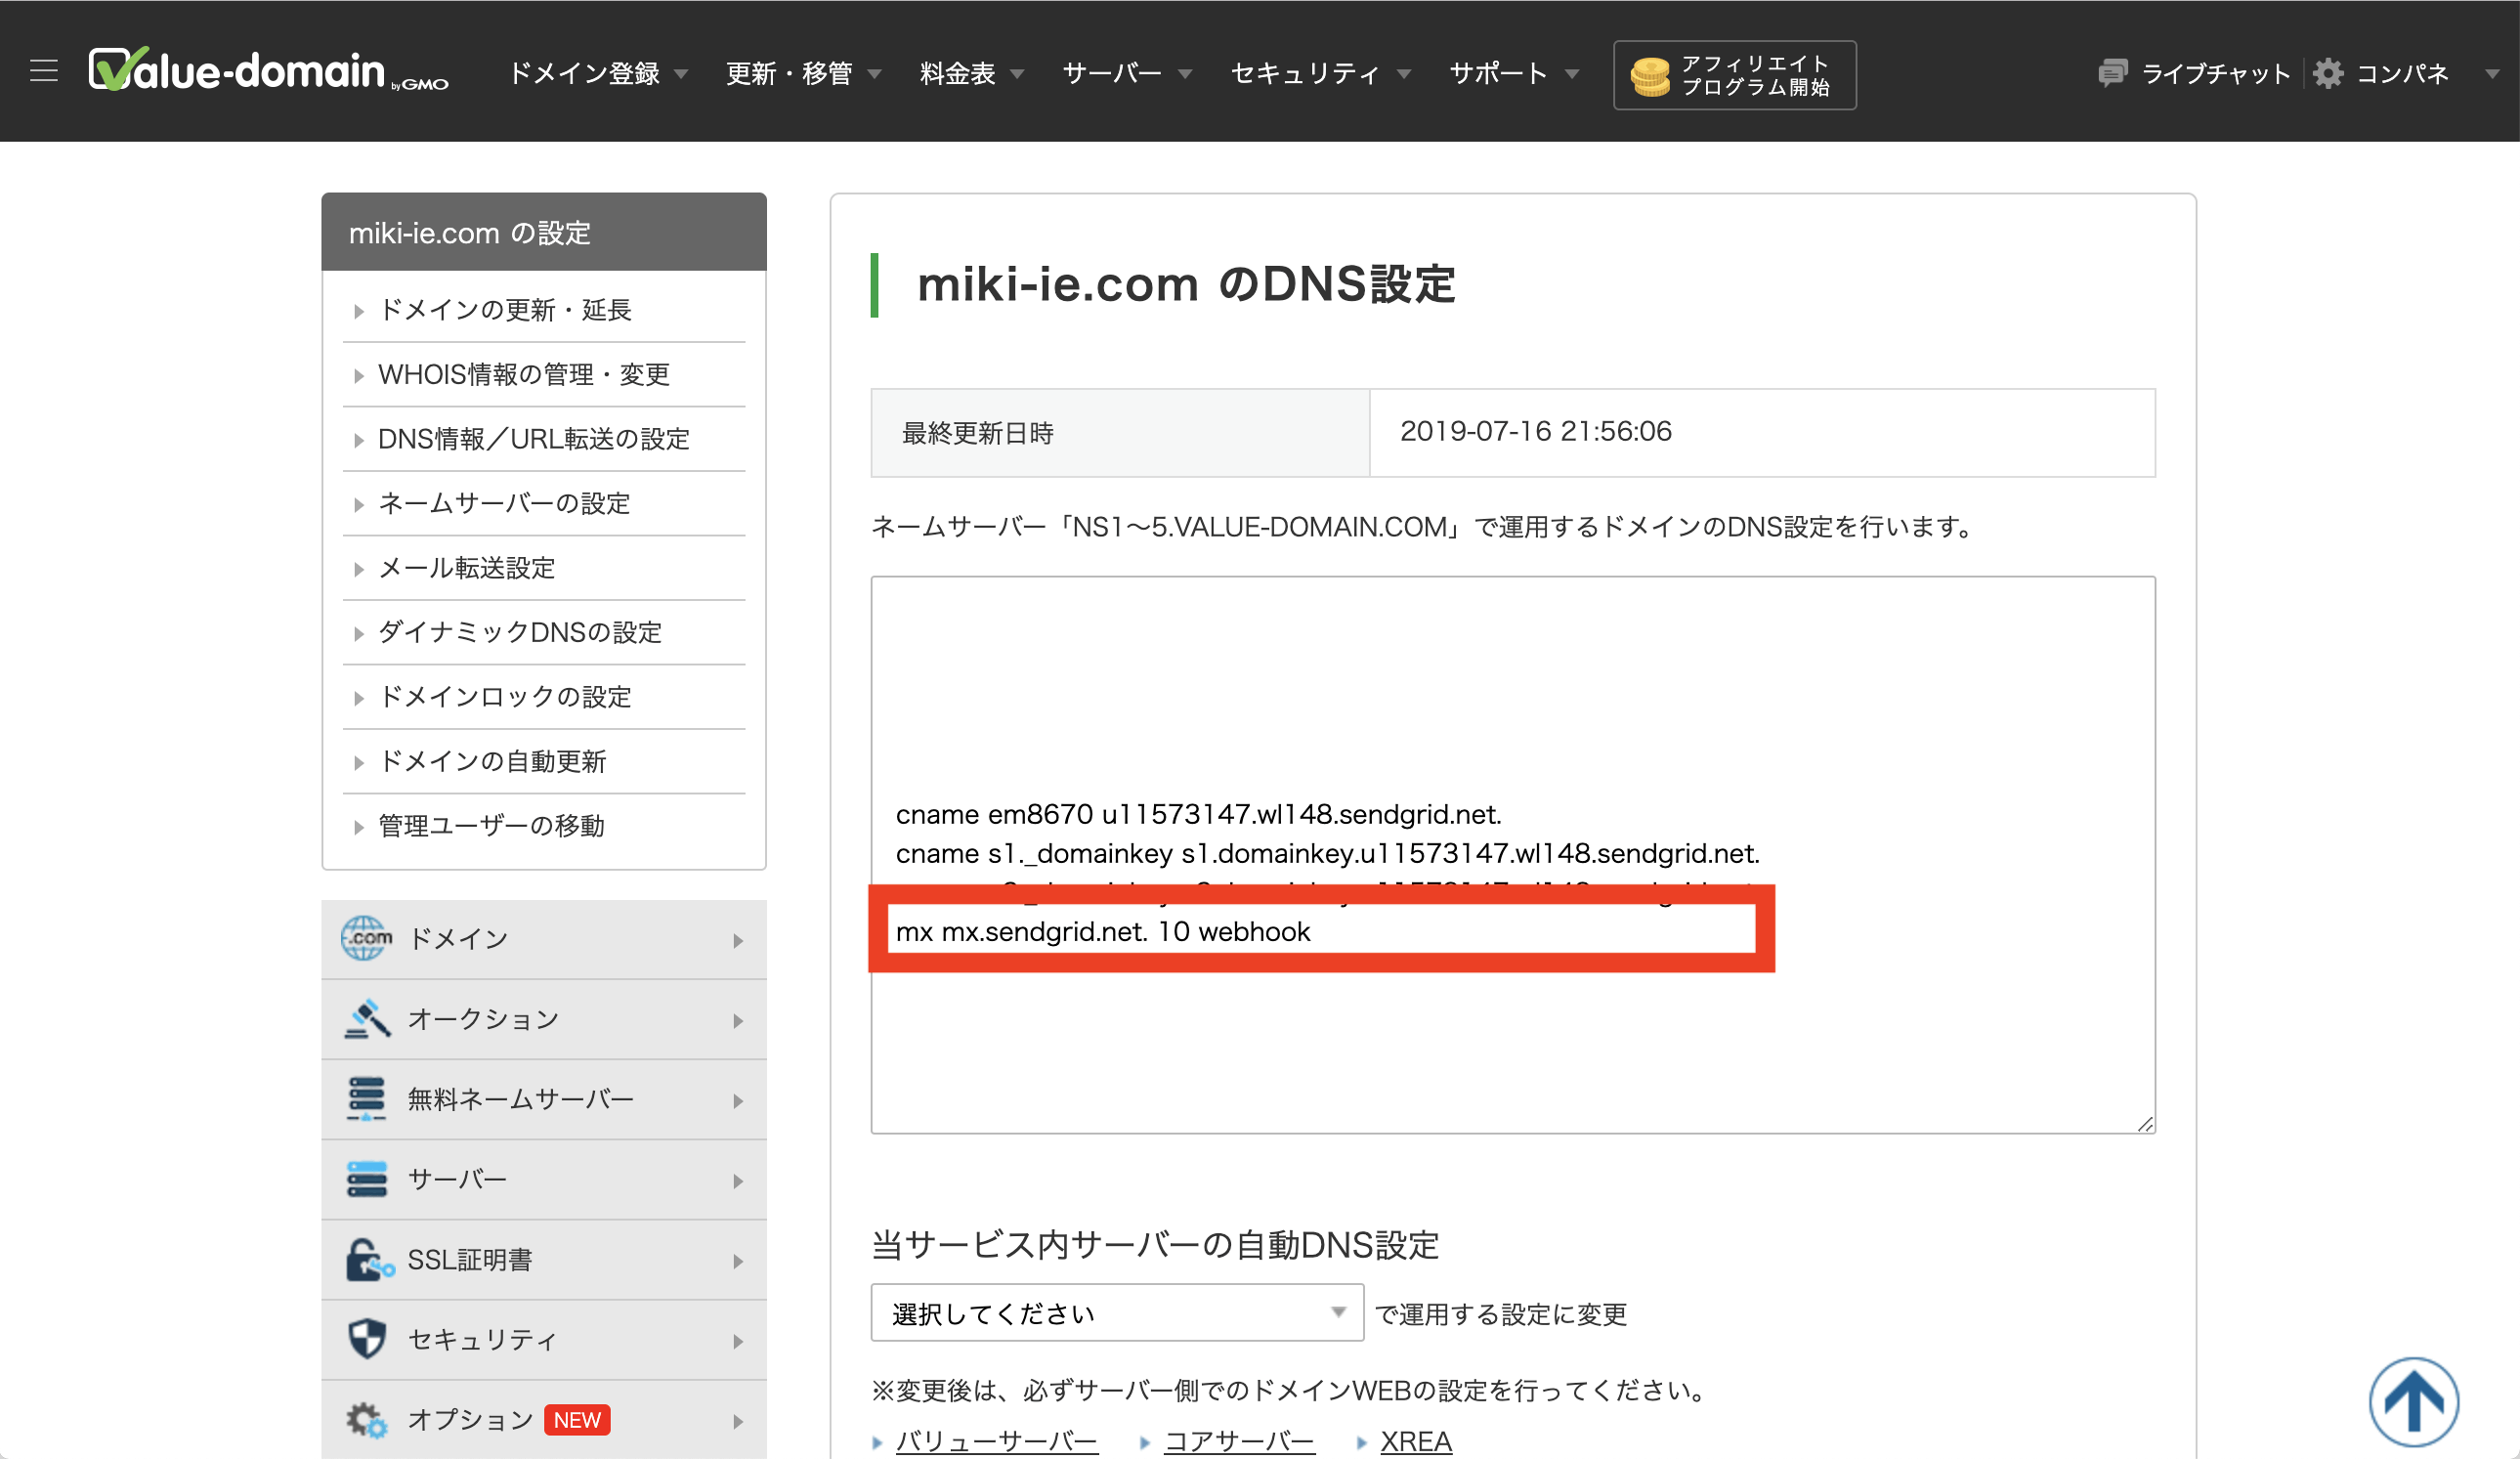
ドメインの認証方法は、利用しているドメインサーバのDNS設定にDNSレコードの追加を行います。SendGridで指定されたDNSレコードを追加する必要があります。SendGrid側でDNS変更を確認し、DNS変更の確認が完了すれば、ドメインの認証が終了します。 ドメイン認証は、SendGridのDomain Authentication(Authenticate Your Domain)のダイアログに従い、Install DNS Recourdsまで進み、登録するDNS情報を入手して下さい。
A string containing the verification results of any DKIM and domain keys signatures in the message.
CONTENT-IDS
A string containing the number of attachments.
TO
Email recipient field, as taken from the message headers.
HTML
HTML body of email. If not set, email did not have an HTML body.
FROM
Email sender, as taken from the message headers.
SENDER_IP
A string of the sender’s ip address.
SPAM_REPORT
Spam Assassin’s spam report.
ENVELOPE
A string containing the SMTP envelope. This will have 2 variables: to, which is a single-element array containing the address that we received the email to, and from, which is the return path for the message.
ATTACHMENTS
Number of attachments included in email.
SUBJECT
Email Subject.
SPAM_SCORE
Spam Assassin’s rating for whether or not this is spam.
ATTACHMENT-INFO
A JSON map where the keys are named attachment{X}. Each attachment key points to a JSON object containing three fields, filename, type, and content-id. The filename field is the name of the file (if it was provided). The type field is the media type of the file. X is the total number of attachments. For example, if the number of attachments is 0, there will be no attachment files. If the number of attachments is 3, parameters attachment1, attachment2, and attachment3 will have file uploads.
CHARSETS
A string containing the character sets of the fields extracted from the message.
SPF
The results of the Sender Policy Framework verification of the message sender and receiving IP address.
[Date] array(16) {
["headers"]=>
string(1970) "Received: by mx0047p1mdw1.sendgrid.net with SMTP id 6WCVv7KAWn Wed, 27 Jul 2016 20:53:06 +0000 (UTC)
Received: from mail-io0-f169.google.com (mail-io0-f169.google.com [209.85.223.169]) by mx0047p1mdw1.sendgrid.net (Postfix) with ESMTPS id AA9FFA817F2 for <example@example.comom>; Wed, 27 Jul 2016 20:53:06 +0000 (UTC)
Received: by mail-io0-f169.google.com with SMTP id b62so81593819iod.3 for <example@example.comom>; Wed, 27 Jul 2016 13:53:06 -0700 (PDT)
DKIM-Signature: v=1; a=rsa-sha256; c=relaxed/relaxed; d=sendgrid.com; s=ga1; h=mime-version:from:date:message-id:subject:to; bh=DpB1CYYeumytcPF3q0Upvx3Sq/oF4ZblEwnuVzFwqGI=; b=GH5YTxjt6r4HoTa+94w6ZGQszFQSgegF+Jlv69YV76OLycJI4Gxdwfh6Wlqfez5yID 5dsWuqaVJZQyMq/Dy/c2gHSqVo60BKG56YrynYeSrMPy8abE/6/muPilYxDoPoEyIr/c UXH5rhOKjmJ7nICKu1o99Tfl0cXyCskE7ERW0=
X-Google-DKIM-Signature: v=1; a=rsa-sha256; c=relaxed/relaxed; d=1e100.net; s=20130820; h=x-gm-message-state:mime-version:from:date:message-id:subject:to; bh=DpB1CYYeumytcPF3q0Upvx3Sq/oF4ZblEwnuVzFwqGI=; b=Sq6LVHbmywBdt3sTBn19U8VOmelfoJltz8IcnvcETZsYwk96RBxN+RKMN5fOZSKw4j 15HrgdIFfyDmp67YK0ygvOITlTvZ6XY5I0PtnvDtAQt79kS3tKjI3QKJoEp/ZjIjSzlL KG7agl6cxFgBbIN0yHWBOvy3O+ZXY8tZdom1yOvULjmjW1U9JkdOs+aJ6zq4qhZX/RM/ tIgLB461eJ5V95iQDDc5Ibj9Cvy4vJfXLQRO0nLVQAT2Yz58tkEO1bDZpWOPAyUNneIL yhIWp+SpbuqhMA68mq0krG1PjmWalUbpVcGJIGuOKB9mQFFo/MqdrUCjvYnyo1jPLPeX psdQ==
X-Gm-Message-State: AEkoousvdxmDoxLlTUYJ1AOmCGJv77xRBBlfKv6YrthH0M2NueMwlOxUD6t8nidE9uonXbdJ/DQy/chmHUnN//a4
X-Received: by 10.107.6.101 with SMTP id 98mr38024553iog.41.1469652785829; Wed, 27 Jul 2016 13:53:05 -0700 (PDT)
MIME-Version: 1.0
Received: by 10.107.48.17 with HTTP; Wed, 27 Jul 2016 13:53:05 -0700 (PDT)
From: Sender Name <example@example.com>
Date: Wed, 27 Jul 2016 14:53:05 -0600
Message-ID: <CAN_P_JMvV7ZpAQhOnDienypLrJmuhN=LQWweu4yScw4jQyXY2w@mail.gmail.com>
Subject: Different File Types
To: example@example.comom
Content-Type: multipart/mixed; boundary=001a113f8ad03e85160538a4343c
"
["dkim"]=>
string(22) "{@sendgrid.com : pass}"
["content-ids"]=>
string(37) "{"ii_1562e2169c132d83":"attachment1"}"
["to"]=>
string(26) "example@example.comom"
["html"]=>
string(479) "<div dir="ltr">Here's an email with multiple attachments<div><br></div><div><img src="cid:ii_1562e2169c132d83" alt="Inline image 1" width="455" height="544"><br clear="all"><div><br></div>-- <br><div class="gmail_signature" data-smartmail="gmail_signature"><div dir="ltr"><img src="https://sendgrid.com/brand/sg-logo-email.png" width="96" height="17"><br><div><br></div></div></div>
</div></div>
"
["from"]=>
string(33) "Sender Name example@example.com"
["text"]=>
string(139) "Here's an email with multiple attachments
"
["sender_ip"]=>
string(14) "209.85.223.169"
["spam_report"]=>
string(844) "Spam detection software, running on the system "mx0047p1mdw1.sendgrid.net", has
identified this incoming email as possible spam. The original message
has been attached to this so you can view it (if it isn't spam) or label
similar future email. If you have any questions, see
@@CONTACT_ADDRESS@@ for details.
Content preview: Here's an email with multiple attachments [image: Inline image
1] -- [...]
Content analysis details: (2.6 points, 5.0 required)
pts rule name description
---- ---------------------- --------------------------------------------------
0.8 HTML_IMAGE_RATIO_02 BODY: HTML has a low ratio of text to image area
0.0 HTML_MESSAGE BODY: HTML included in message
1.8 HTML_IMAGE_ONLY_08 BODY: HTML: images with 400-800 bytes of words
0.0 T_MIME_NO_TEXT No text body parts
"
["envelope"]=>
string(66) "{"to":["example@example.comom"],"from":"example@example.com"}"
["attachments"]=>
string(1) "2"
["subject"]=>
string(20) "Different File Types"
["spam_score"]=>
string(5) "2.597"
["attachment-info"]=>
string(287) "{"attachment2":{"filename":"DockMcWordface.docx","name":"DockMcWordface.docx","type":"application/vnd.openxmlformats-officedocument.wordprocessingml.document"},"attachment1":{"filename":"MG_2359.jpg","name":"_MG_2359.jpg","type":"image/jpeg","content-id":"ii_1562e2169c132d83"}}"
["charsets"]=>
string(77) "{"to":"UTF-8","html":"UTF-8","subject":"UTF-8","from":"UTF-8","text":"UTF-8"}"
["SPF"]=>
string(4) "pass"
}
<?php
/*************************************************************************
 * sendgrid-api (MAIN)
 * Home Tools for private. Using IFTTT and Google Home etc
 *
 * PHP 5 or later
 *
 * @category  Home IoT
 * @author    Miki
 * @url       https://www.miki-ie.com/
 * @copyright 2019 (c) MIKI-IE All rights Reserved.
 * @license   https://opensource.org/licenses/mit-license.html MIT License
 * @version   1.0
*************************************************************************/
//ログのファイル名
define("SENDGRID_API_LOG_NAME","sendgrid");
//DB
define("DB_HOST","@IP_Adress@:@Port@");
define("DB_USER","@User@");
define("DB_PASS","@Password@");
define("DB_DBNAME","@DB_Name@");
define("DB_TABLENAME1","@TableName1@");
define("DB_TABLENAME2","@TableName2@");


function addDBRecord($table, $datetime, $value1) {
    $mysqli = new mysqli(DB_HOST, DB_USER, DB_PASS, DB_DBNAME);

    if (mysqli_connect_errno()) {
        logger("Connect failed: ".mysqli_connect_error(),"ERROR");
        exit();
	}

	if (!$mysqli->set_charset("utf8")) {
        logger("Error loading character set utf8: ".$mysqli->error,"ERROR");
		exit();
	}

	switch ($table) {
		case DB_TABLENAME1:
			// SQL(INSERT)を作成
			$sql = "INSERT INTO $table (
				DATETIME, COUNT
				) VALUES (
				'$datetime', $value1
				)";
			break;
		//addDBRecord(DB_TABLENAME2, $datetime_text, $state_text);
		case DB_TABLENAME2:
		// SQL(INSERT)を作成
		$str = mb_convert_encoding($value1, "UTF-8");
		$sql = "INSERT INTO $table (
			DATETIME2, STATE
			) VALUES (
				'$datetime', N'$str'
			)";
		break;
		default:
			logger("Internal DB Tabel Name Error. table:{$table}","ERROR");
	}

	if (!$mysqli->query($sql)) {
        logger("SQL query error Errormessage: ".$mysqli->error,"ERROR");
	}

	$mysqli->close();
}

function logger($text, $level) {
	$datetime = date('Y-m-d H:i:s');
	$date = date('Ym');
	$file_name = __DIR__ . "/log/".SENDGRID_API_LOG_NAME."-{$date}.log";
	$text = "{$datetime} [{$level}] {$text}" . PHP_EOL;
	echo $text;
	if(!(file_exists($file_name))){
		touch($file_name);
		chmod($file_name, 0777);
	}
	return error_log(print_r($text, TRUE), 3, $file_name);
}

$post_from = $_POST['from'];
$post_charsets = $_POST['charsets'];
$post_charsets_array = json_decode($post_charsets, true);
$post_charsets_all = print_r($post_charsets_array, true);
$post_encode_subject = mb_convert_encoding($_POST['subject'], "UTF-8", $post_charsets_array["subject"]);
$post_encode_subject = preg_replace('/[\x00-\x1F\x7F]/', '', $post_encode_subject);
$post_encode_text = mb_convert_encoding($_POST['text'], "UTF-8", $post_charsets_array["text"]);
$post_encode_text = preg_replace('/[\x00-\x1F\x7F]/', '', $post_encode_text);
logger("mb_convert_encoding, post_subject : {$post_encode_subject}","DEBUG");
logger("mb_convert_encoding, post_text : {$post_encode_text}","DEBUG");

$text_substr = mb_substr($post_text, 0, 15);
logger("Start sendgrid: key={$key} , from={$post_from} , subject={$post_subject} , text={$text_substr}","INFO");

if(isset($_POST['from'])) {
	switch ($post_from) {
	case 'aaa1@bbb.ccc': //メール受信内容に合わせて個別処理。以下はメール本文から文字列切り出しを実施
		$start = mb_strpos($post_text, "時刻:");
		$datetime_text = mb_substr($post_text, $start + 4, 19,"utf-8");
		logger("Start CAM-A7DE datetime : {$datetime_text}","INFO");
		addDBRecord(DB_TABLENAME1, $datetime_text, 1);
		break;
	case 'aaa2@bbb.ccc': //メール受信内容に合わせて個別処理。以下はメール本文から文字列切り出しを実施
		$datetime_text = mb_substr($post_text, 0, 16,"utf-8");
		$temp_text = mb_substr($post_text, 18);
		$end_point = mb_strpos($temp_text, "。");
		$state_text = mb_substr($temp_text, 0, $end_point,"utf-8");
		logger("end_point : {$end_point} ,state : {$state_text}","DEBUG");
		logger("Start CSP-Security datetime : {$datetime_text} state : {$state_text}","INFO");
		addDBRecord(DB_TABLENAME2, $datetime_text, $state_text);
		break;
	default:
		logger("This is private API. (in Default)","ERROR");
	}
}else{
	logger("This is private API. (in else)","ERROR");
}

?>
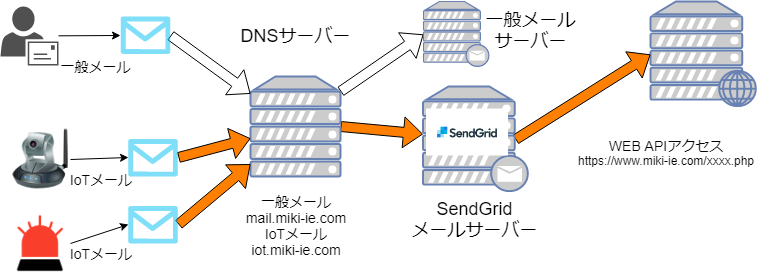
Inbound Email Parse WebhookのPOST情報
HEADERS
The raw headers of the email.
DKIM
A string containing the verification results of any DKIM and domain keys signatures in the message.
CONTENT-IDS
A string containing the number of attachments.
TO
Email recipient field, as taken from the message headers.
HTML
HTML body of email. If not set, email did not have an HTML body.
FROM
Email sender, as taken from the message headers.
SENDER_IP
A string of the sender’s ip address.
SPAM_REPORT
Spam Assassin’s spam report.
ENVELOPE
A string containing the SMTP envelope. This will have 2 variables: to, which is a single-element array containing the address that we received the email to, and from, which is the return path for the message.
ATTACHMENTS
Number of attachments included in email.
SUBJECT
Email Subject.
SPAM_SCORE
Spam Assassin’s rating for whether or not this is spam.
ATTACHMENT-INFO
A JSON map where the keys are named attachment{X}. Each attachment key points to a JSON object containing three fields, filename, type, and content-id. The filename field is the name of the file (if it was provided). The type field is the media type of the file. X is the total number of attachments. For example, if the number of attachments is 0, there will be no attachment files. If the number of attachments is 3, parameters attachment1, attachment2, and attachment3 will have file uploads.
CHARSETS
A string containing the character sets of the fields extracted from the message.
SPF
The results of the Sender Policy Framework verification of the message sender and receiving IP address.
[Date] array(16) {
["headers"]=>
string(1970) "Received: by mx0047p1mdw1.sendgrid.net with SMTP id 6WCVv7KAWn Wed, 27 Jul 2016 20:53:06 +0000 (UTC)
Received: from mail-io0-f169.google.com (mail-io0-f169.google.com [209.85.223.169]) by mx0047p1mdw1.sendgrid.net (Postfix) with ESMTPS id AA9FFA817F2 for <example@example.comom>; Wed, 27 Jul 2016 20:53:06 +0000 (UTC)
Received: by mail-io0-f169.google.com with SMTP id b62so81593819iod.3 for <example@example.comom>; Wed, 27 Jul 2016 13:53:06 -0700 (PDT)
DKIM-Signature: v=1; a=rsa-sha256; c=relaxed/relaxed; d=sendgrid.com; s=ga1; h=mime-version:from:date:message-id:subject:to; bh=DpB1CYYeumytcPF3q0Upvx3Sq/oF4ZblEwnuVzFwqGI=; b=GH5YTxjt6r4HoTa+94w6ZGQszFQSgegF+Jlv69YV76OLycJI4Gxdwfh6Wlqfez5yID 5dsWuqaVJZQyMq/Dy/c2gHSqVo60BKG56YrynYeSrMPy8abE/6/muPilYxDoPoEyIr/c UXH5rhOKjmJ7nICKu1o99Tfl0cXyCskE7ERW0=
X-Google-DKIM-Signature: v=1; a=rsa-sha256; c=relaxed/relaxed; d=1e100.net; s=20130820; h=x-gm-message-state:mime-version:from:date:message-id:subject:to; bh=DpB1CYYeumytcPF3q0Upvx3Sq/oF4ZblEwnuVzFwqGI=; b=Sq6LVHbmywBdt3sTBn19U8VOmelfoJltz8IcnvcETZsYwk96RBxN+RKMN5fOZSKw4j 15HrgdIFfyDmp67YK0ygvOITlTvZ6XY5I0PtnvDtAQt79kS3tKjI3QKJoEp/ZjIjSzlL KG7agl6cxFgBbIN0yHWBOvy3O+ZXY8tZdom1yOvULjmjW1U9JkdOs+aJ6zq4qhZX/RM/ tIgLB461eJ5V95iQDDc5Ibj9Cvy4vJfXLQRO0nLVQAT2Yz58tkEO1bDZpWOPAyUNneIL yhIWp+SpbuqhMA68mq0krG1PjmWalUbpVcGJIGuOKB9mQFFo/MqdrUCjvYnyo1jPLPeX psdQ==
X-Gm-Message-State: AEkoousvdxmDoxLlTUYJ1AOmCGJv77xRBBlfKv6YrthH0M2NueMwlOxUD6t8nidE9uonXbdJ/DQy/chmHUnN//a4
X-Received: by 10.107.6.101 with SMTP id 98mr38024553iog.41.1469652785829; Wed, 27 Jul 2016 13:53:05 -0700 (PDT)
MIME-Version: 1.0
Received: by 10.107.48.17 with HTTP; Wed, 27 Jul 2016 13:53:05 -0700 (PDT)
From: Sender Name <example@example.com>
Date: Wed, 27 Jul 2016 14:53:05 -0600
Message-ID: <CAN_P_JMvV7ZpAQhOnDienypLrJmuhN=LQWweu4yScw4jQyXY2w@mail.gmail.com>
Subject: Different File Types
To: example@example.comom
Content-Type: multipart/mixed; boundary=001a113f8ad03e85160538a4343c
"
["dkim"]=>
string(22) "{@sendgrid.com : pass}"
["content-ids"]=>
string(37) "{"ii_1562e2169c132d83":"attachment1"}"
["to"]=>
string(26) "example@example.comom"
["html"]=>
string(479) "<div dir="ltr">Here's an email with multiple attachments<div><br></div><div><img src="cid:ii_1562e2169c132d83" alt="Inline image 1" width="455" height="544"><br clear="all"><div><br></div>-- <br><div class="gmail_signature" data-smartmail="gmail_signature"><div dir="ltr"><img src="https://sendgrid.com/brand/sg-logo-email.png" width="96" height="17"><br><div><br></div></div></div>
</div></div>
"
["from"]=>
string(33) "Sender Name example@example.com"
["text"]=>
string(139) "Here's an email with multiple attachments
"
["sender_ip"]=>
string(14) "209.85.223.169"
["spam_report"]=>
string(844) "Spam detection software, running on the system "mx0047p1mdw1.sendgrid.net", has
identified this incoming email as possible spam. The original message
has been attached to this so you can view it (if it isn't spam) or label
similar future email. If you have any questions, see
@@CONTACT_ADDRESS@@ for details.
Content preview: Here's an email with multiple attachments [image: Inline image
1] -- [...]
Content analysis details: (2.6 points, 5.0 required)
pts rule name description
---- ---------------------- --------------------------------------------------
0.8 HTML_IMAGE_RATIO_02 BODY: HTML has a low ratio of text to image area
0.0 HTML_MESSAGE BODY: HTML included in message
1.8 HTML_IMAGE_ONLY_08 BODY: HTML: images with 400-800 bytes of words
0.0 T_MIME_NO_TEXT No text body parts
"
["envelope"]=>
string(66) "{"to":["example@example.comom"],"from":"example@example.com"}"
["attachments"]=>
string(1) "2"
["subject"]=>
string(20) "Different File Types"
["spam_score"]=>
string(5) "2.597"
["attachment-info"]=>
string(287) "{"attachment2":{"filename":"DockMcWordface.docx","name":"DockMcWordface.docx","type":"application/vnd.openxmlformats-officedocument.wordprocessingml.document"},"attachment1":{"filename":"MG_2359.jpg","name":"_MG_2359.jpg","type":"image/jpeg","content-id":"ii_1562e2169c132d83"}}"
["charsets"]=>
string(77) "{"to":"UTF-8","html":"UTF-8","subject":"UTF-8","from":"UTF-8","text":"UTF-8"}"
["SPF"]=>
string(4) "pass"
}
Raspberry Piでない環境で利用したことのあるSleniumの導入を行いました。 各種WEBツールの自動操作(スクレイピング)などが出来ると、更に自宅IoTの幅が広がると思い、導入してみましたが、「Raspberry Pi 3 Model B+」のCPUが1.2GHz、4コアのBroadcom BCM2837から1.4GHz駆動4コアのBCM2837B0は、32bitでありchromedriverの導入方法が限られ、高い信頼性で動作する状態まで構築出来ておりません。とりあえず動作しますが、信頼性が低いです。(数回に1回は失敗します)
pi@raspberrypi:~ $ cat /proc/cpuinfo
processor	: 0
model name	: ARMv7 Processor rev 4 (v7l)
BogoMIPS	: 38.40
Features	: half thumb fastmult vfp edsp neon vfpv3 tls vfpv4 idiva idivt vfpd32 lpae evtstrm crc32
CPU implementer	: 0x41
CPU architecture: 7
CPU variant	: 0x0
CPU part	: 0xd03
CPU revision	: 4

processor	: 1
model name	: ARMv7 Processor rev 4 (v7l)
BogoMIPS	: 38.40
Features	: half thumb fastmult vfp edsp neon vfpv3 tls vfpv4 idiva idivt vfpd32 lpae evtstrm crc32
CPU implementer	: 0x41
CPU architecture: 7
CPU variant	: 0x0
CPU part	: 0xd03
CPU revision	: 4

processor	: 2
model name	: ARMv7 Processor rev 4 (v7l)
BogoMIPS	: 38.40
Features	: half thumb fastmult vfp edsp neon vfpv3 tls vfpv4 idiva idivt vfpd32 lpae evtstrm crc32
CPU implementer	: 0x41
CPU architecture: 7
CPU variant	: 0x0
CPU part	: 0xd03
CPU revision	: 4

processor	: 3
model name	: ARMv7 Processor rev 4 (v7l)
BogoMIPS	: 38.40
Features	: half thumb fastmult vfp edsp neon vfpv3 tls vfpv4 idiva idivt vfpd32 lpae evtstrm crc32
CPU implementer	: 0x41
CPU architecture: 7
CPU variant	: 0x0
CPU part	: 0xd03
CPU revision	: 4

Hardware	: BCM2835
Revision	: a020d3
Serial		: 00000000e63ad038
pi@raspberrypi:~ $ cat /etc/debian_version
10.0
pi@raspberrypi:~ $ uname -a
Linux raspberrypi 4.19.57-v7+ #1244 SMP Thu Jul 4 18:45:25 BST 2019 armv7l GNU/Linux
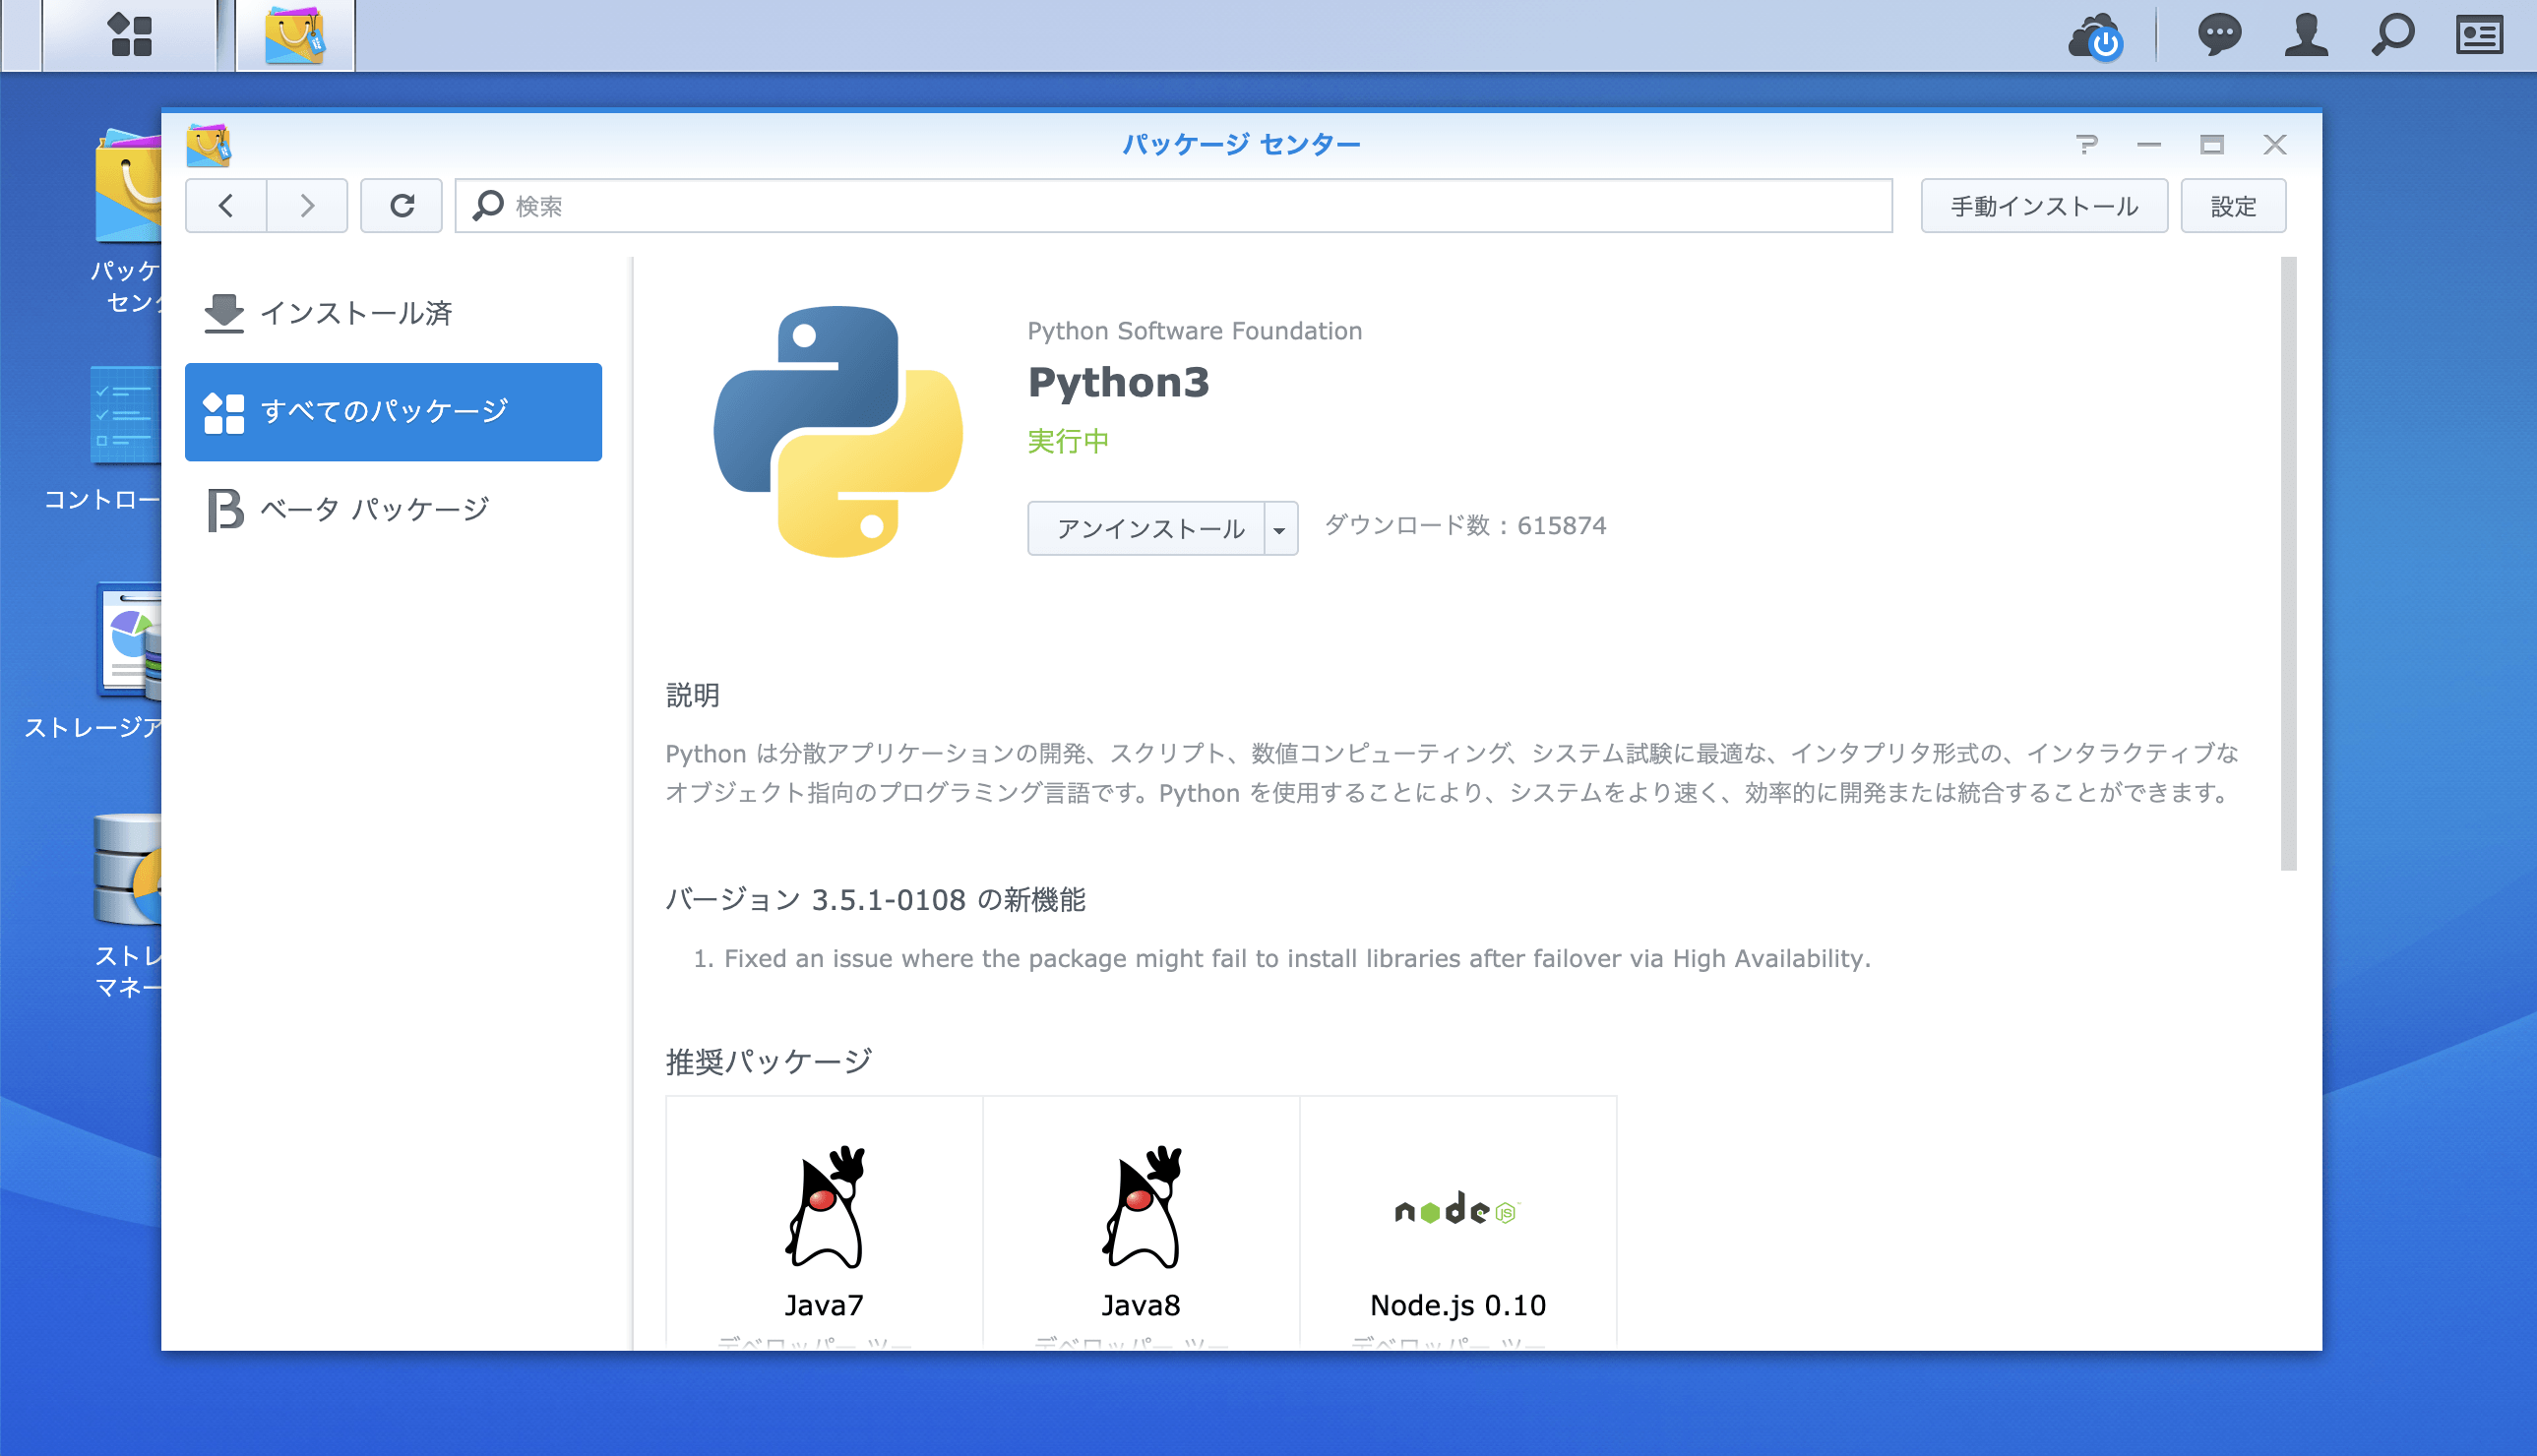
@Synology:~$ sudo curl -k https://bootstrap.pypa.io/get-pip.py | sudo python3
Password:
  % Total    % Received % Xferd  Average Speed   Time    Time     Time  Current
                                 Dload  Upload   Total   Spent    Left  Speed
100 1669k  100 1669k    0     0  2403k      0 --:--:-- --:--:-- --:--:-- 2405k
Collecting pip
  Downloading https://files.pythonhosted.org/packages/5c/e0/be401c003291b56efc55aeba6a80ab790d3d4cece2778288d65323009420/pip-19.1.1-py2.py3-none-any.whl (1.4MB)
     |████████████████████████████████| 1.4MB 1.3MB/s
Collecting setuptools
  Downloading https://files.pythonhosted.org/packages/ec/51/f45cea425fd5cb0b0380f5b0f048ebc1da5b417e48d304838c02d6288a1e/setuptools-41.0.1-py2.py3-none-any.whl (575kB)
     |████████████████████████████████| 583kB 7.2MB/s
Collecting wheel
  Downloading https://files.pythonhosted.org/packages/bb/10/44230dd6bf3563b8f227dbf344c908d412ad2ff48066476672f3a72e174e/wheel-0.33.4-py2.py3-none-any.whl
Installing collected packages: pip, setuptools, wheel
  WARNING: The script wheel is installed in '/volume1/@appstore/py3k/usr/local/bin' which is not on PATH.
  Consider adding this directory to PATH or, if you prefer to suppress this warning, use --no-warn-script-location.
Successfully installed pip-19.1.1 setuptools-41.0.1 wheel-0.33.4
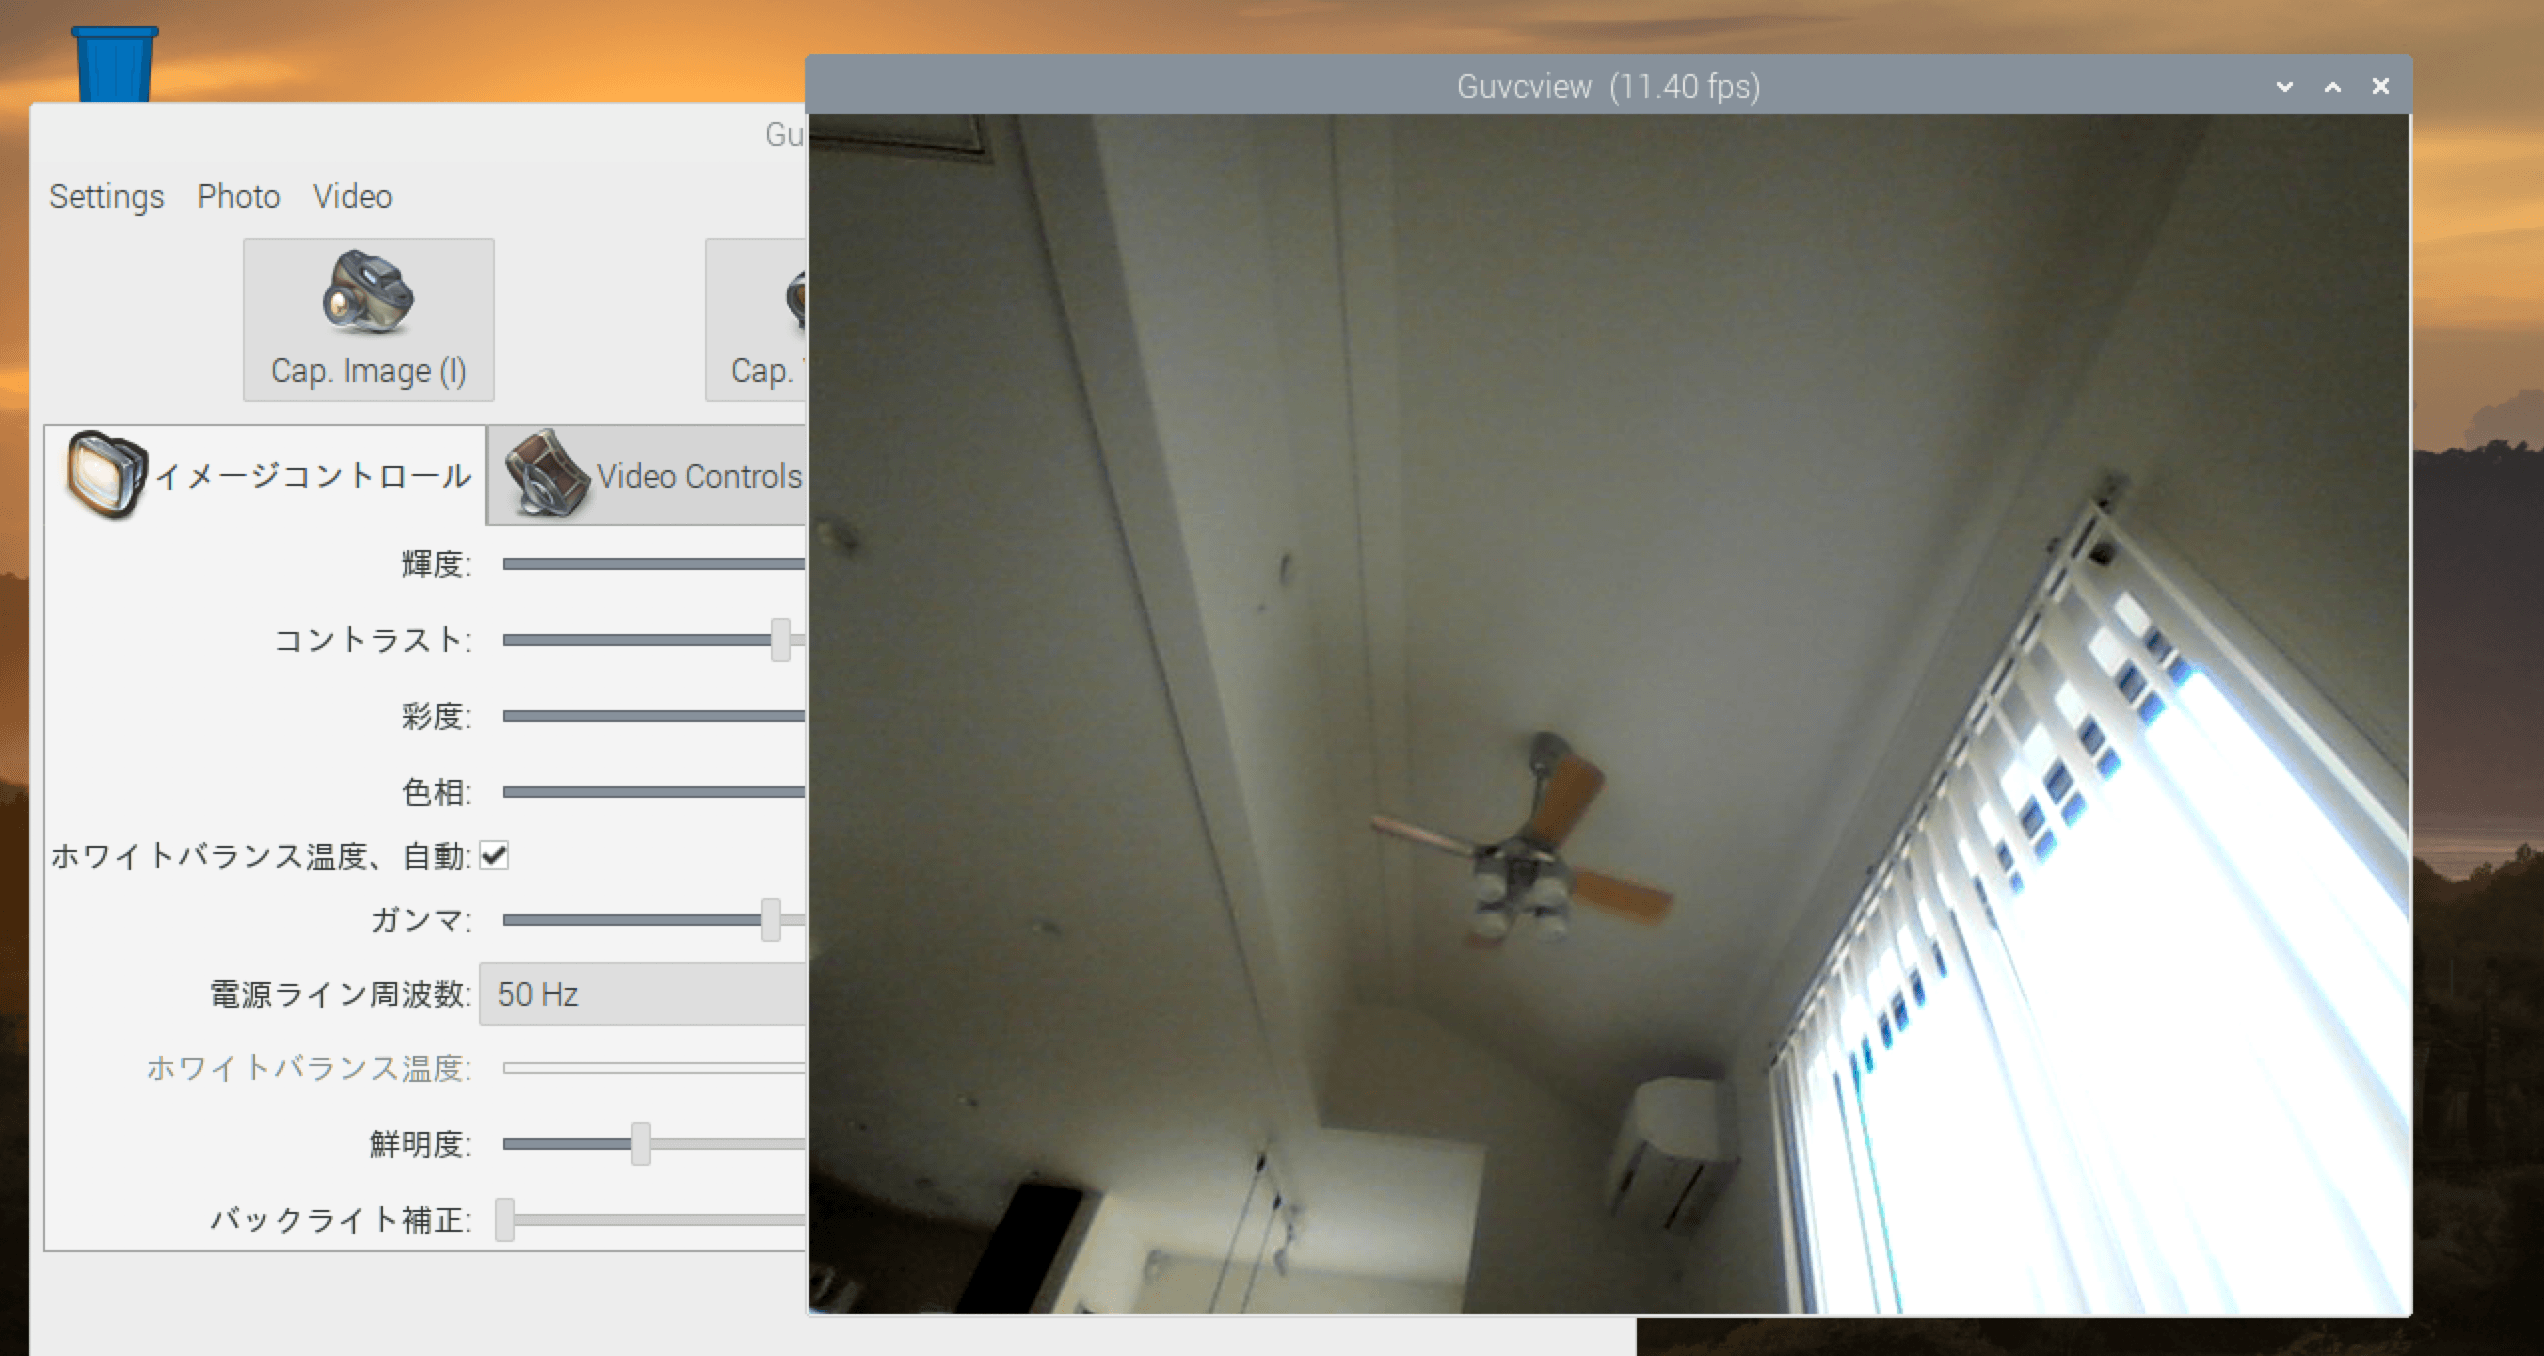
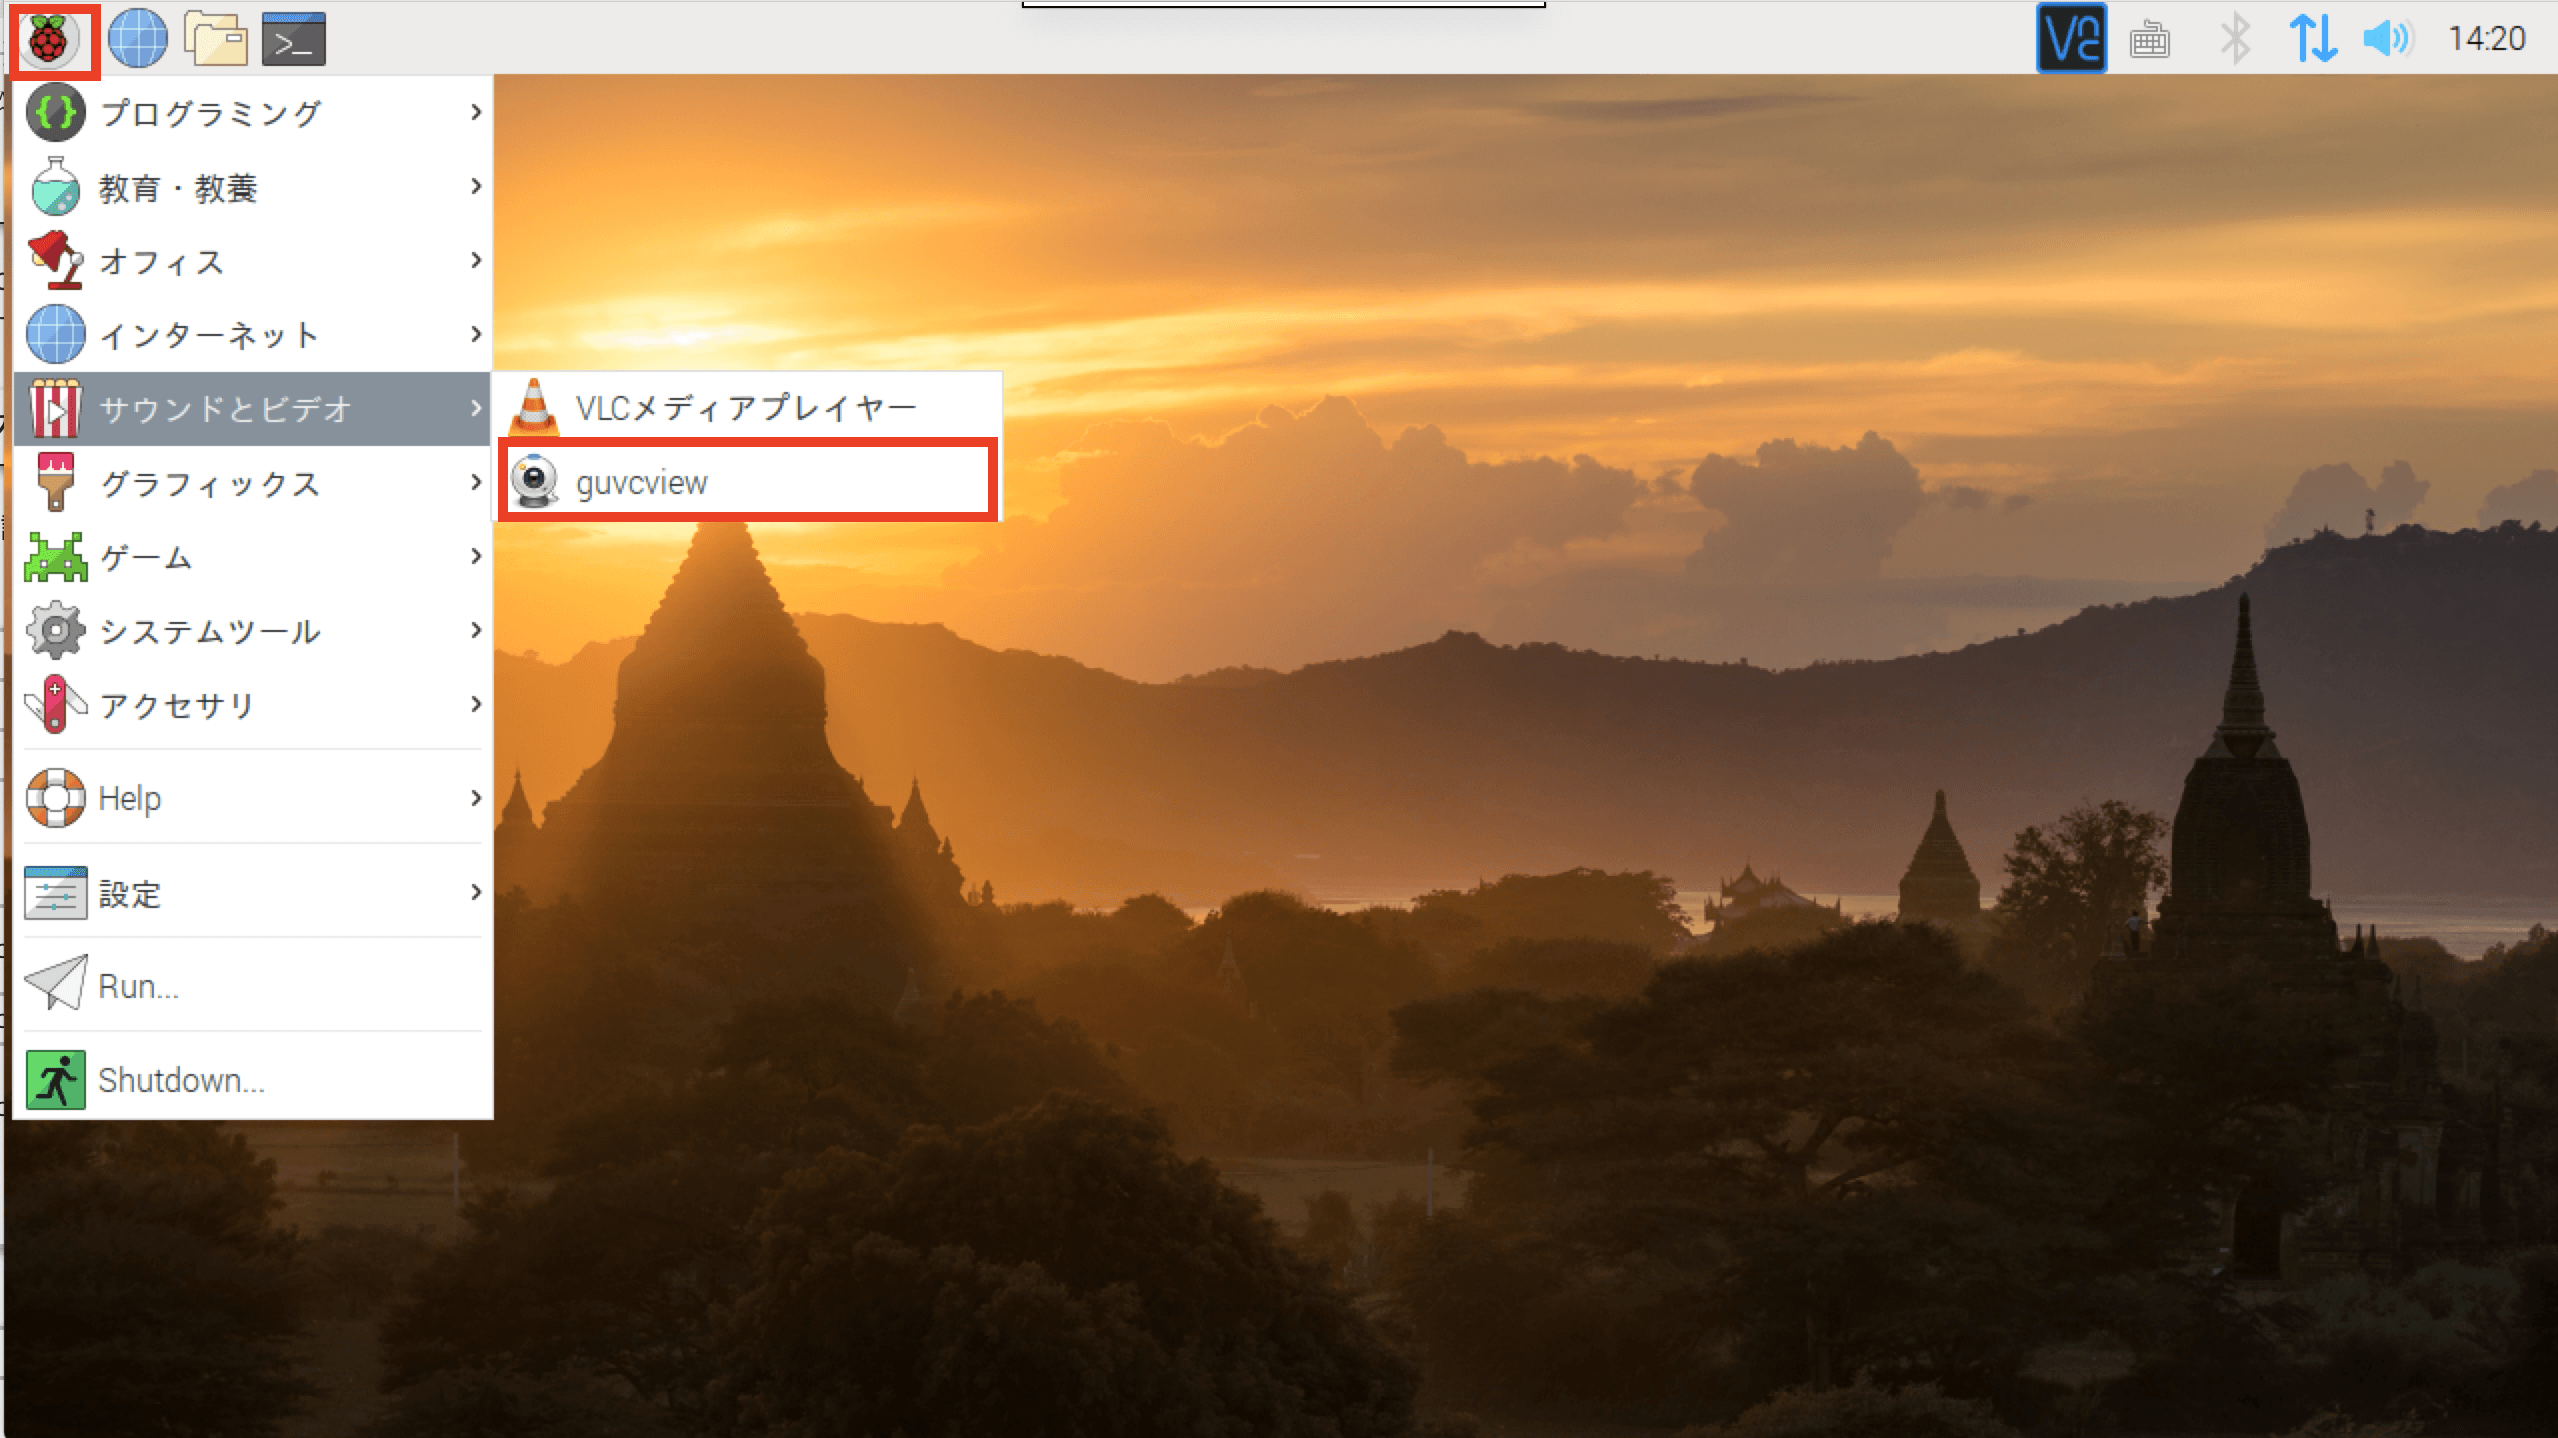
@raspberrypi:~ $ lsusb
Bus 001 Device 004: ID 0458:708c KYE Systems Corp. (Mouse Systems) Genius WideCam F100
Bus 001 Device 005: ID 0424:7800 Standard Microsystems Corp.
Bus 001 Device 003: ID 0424:2514 Standard Microsystems Corp. USB 2.0 Hub
Bus 001 Device 002: ID 0424:2514 Standard Microsystems Corp. USB 2.0 Hub
Bus 001 Device 001: ID 1d6b:0002 Linux Foundation 2.0 root hub
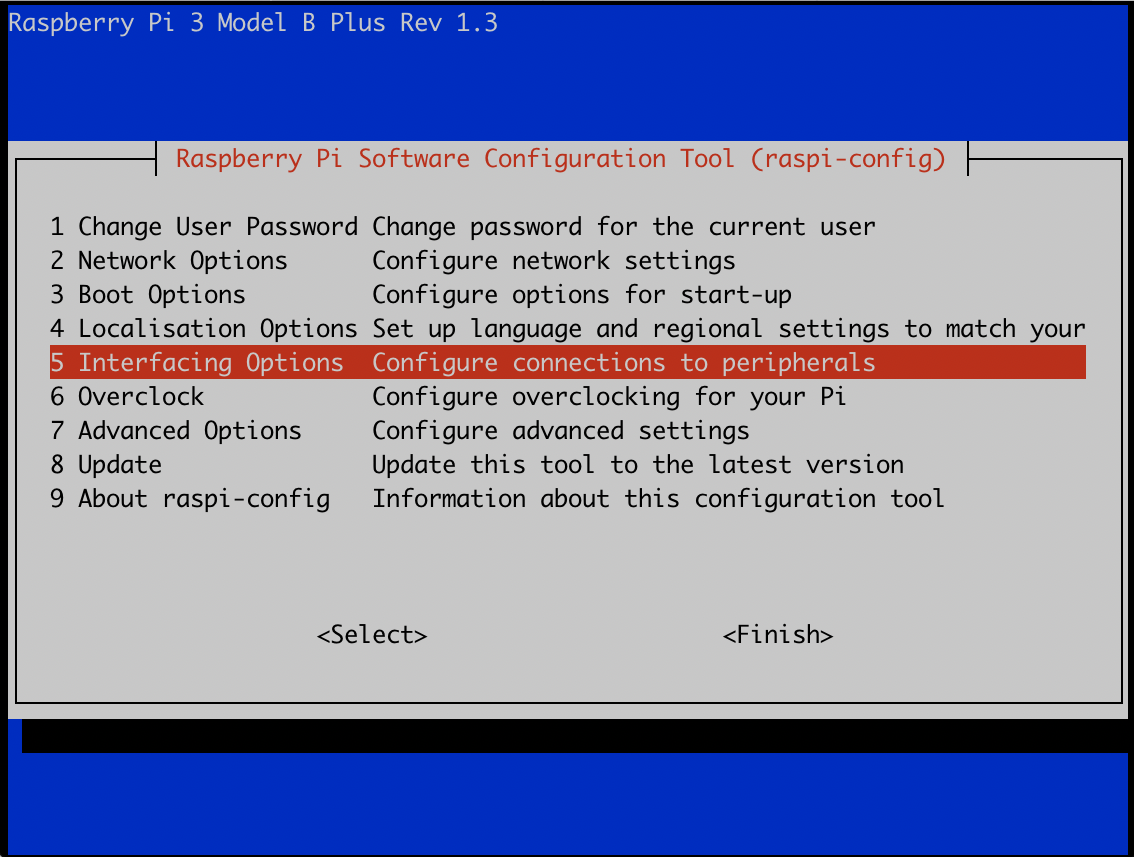
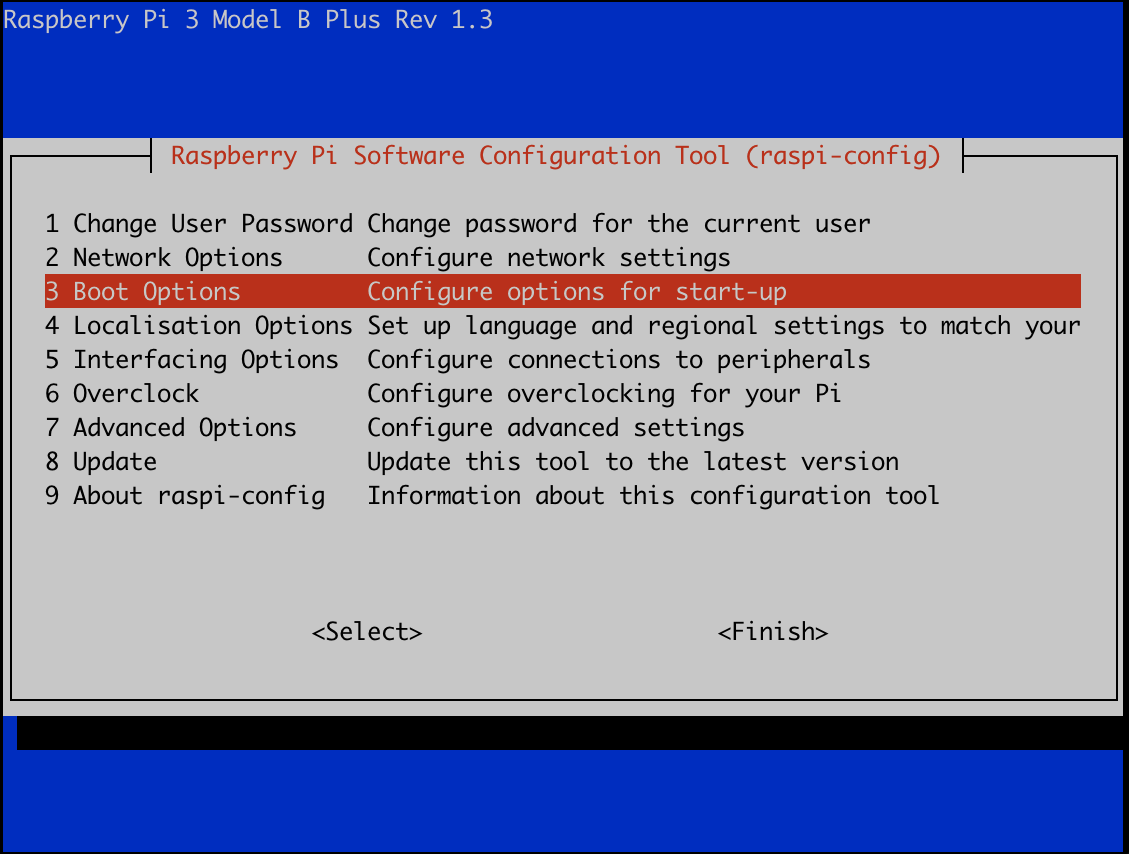
Raspberry Pi の「raspi-config」コマンドで、「Raspberry Pi Software Configuration Tool (raspi - config)」を開きます。画面には、Raspberry Pi 3 Model B Plus Rev 1.3が表示されています。
sudo raspi-config
「5 Interfacing Options Configure connections to peripherals」を選択します。
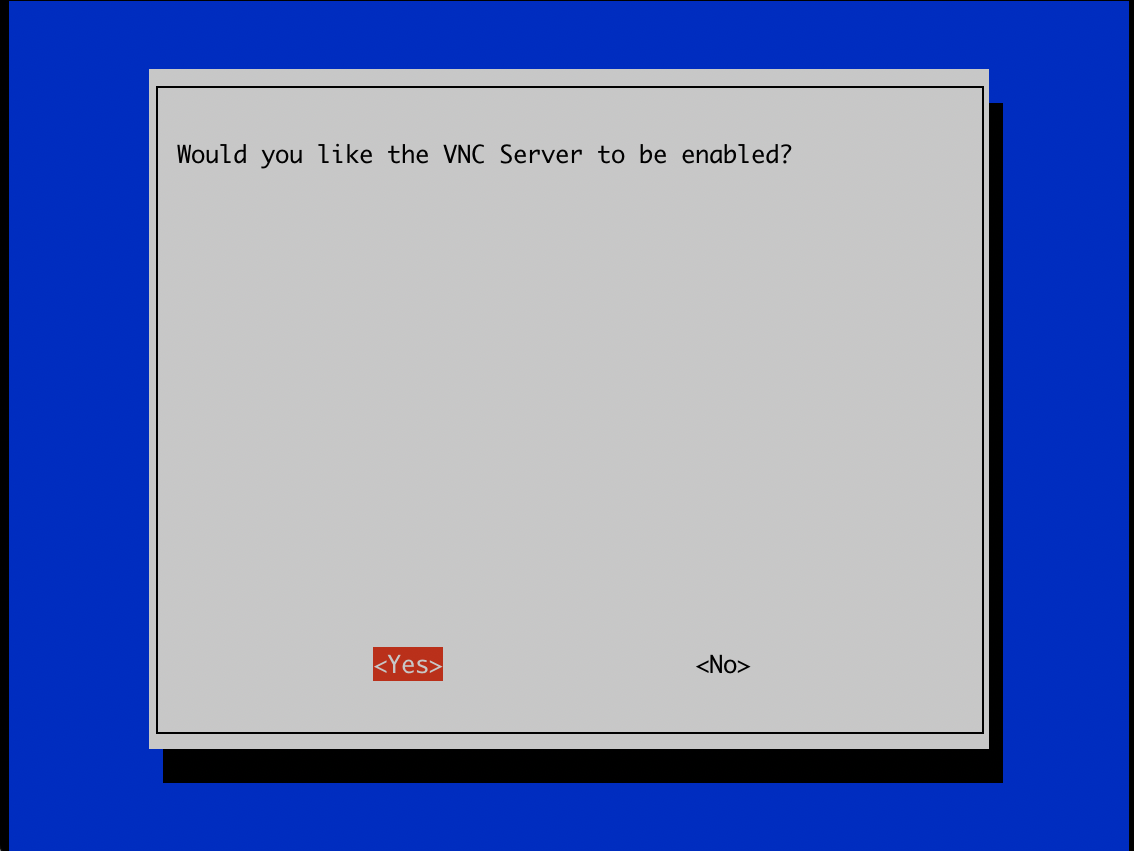
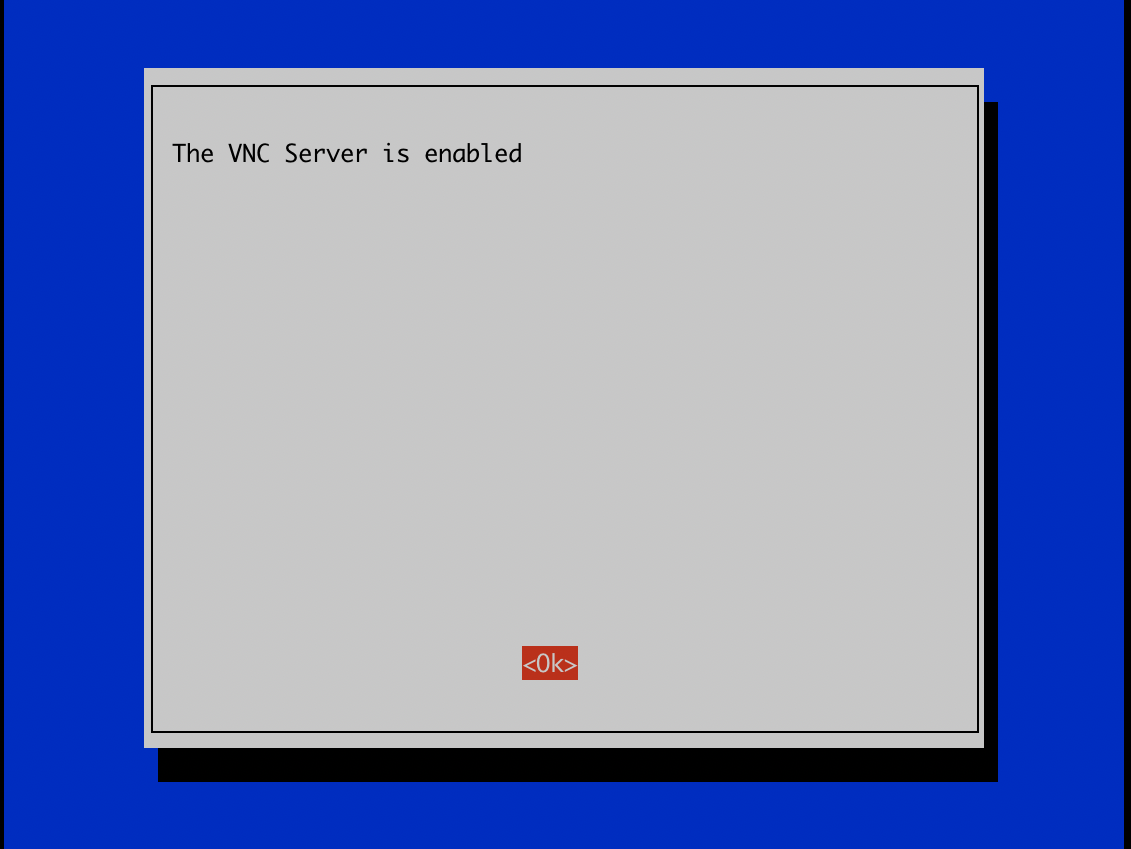
「P3 VNC Enable/Disable graphical remote access to your Pi using RealVNC」を選択し、VNCサーバをEnable(有効化)します。
「xrdp」および「remmina」導入
@raspberrypi: $ sudo apt-get install xrdp
[sudo] password for:
Reading package lists... Done
Building dependency tree
Reading state information... Done
The following packages were automatically installed and are no longer required:
libboost-system1.62.0 libboost-thread1.62.0
Use 'sudo apt autoremove' to remove them.
The following additional packages will be installed:
libglu1-mesa x11-apps x11-session-utils xbitmaps xfonts-75dpi xfonts-base
xfonts-scalable xorg xorg-docs-core xorgxrdp
Suggested packages:
mesa-utils xorg-docs x11-xfs-utils guacamole xrdp-pulseaudio-installer
The following NEW packages will be installed:
libglu1-mesa x11-apps x11-session-utils xbitmaps xfonts-75dpi xfonts-base
xfonts-scalable xorg xorg-docs-core xorgxrdp xrdp
0 upgraded, 11 newly installed, 0 to remove and 1 not upgraded.
Need to get 11.0 MB of archives.
After this operation, 17.8 MB of additional disk space will be used.
Do you want to continue? [Y/n]
@raspberrypi: $ sudo apt-get install remmina
Reading package lists... Done
Building dependency tree
Reading state information... Done
The following packages were automatically installed and are no longer required:
libboost-system1.62.0 libboost-thread1.62.0
Use 'sudo apt autoremove' to remove them.
The following additional packages will be installed:
libavahi-ui-gtk3-0 libayatana-appindicator3-1 libayatana-ido3-0.4-0
libayatana-indicator3-7 libdbusmenu-glib4 libdbusmenu-gtk3-4
libfreerdp-client2-2 libfreerdp2-2 libssh-4 libvncclient1 libwinpr2-2
remmina-common remmina-plugin-rdp remmina-plugin-secret remmina-plugin-vnc
Suggested packages:
freerdp2-x11 remmina-plugin-exec remmina-plugin-nx remmina-plugin-spice
remmina-plugin-telepathy remmina-plugin-xdmcp
The following NEW packages will be installed:
libavahi-ui-gtk3-0 libayatana-appindicator3-1 libayatana-ido3-0.4-0
libayatana-indicator3-7 libdbusmenu-glib4 libdbusmenu-gtk3-4
libfreerdp-client2-2 libfreerdp2-2 libssh-4 libvncclient1 libwinpr2-2
remmina remmina-common remmina-plugin-rdp remmina-plugin-secret
remmina-plugin-vnc
0 upgraded, 16 newly installed, 0 to remove and 1 not upgraded.
Need to get 3274 kB of archives.
After this operation, 8144 kB of additional disk space will be used.
Do you want to continue? [Y/n]
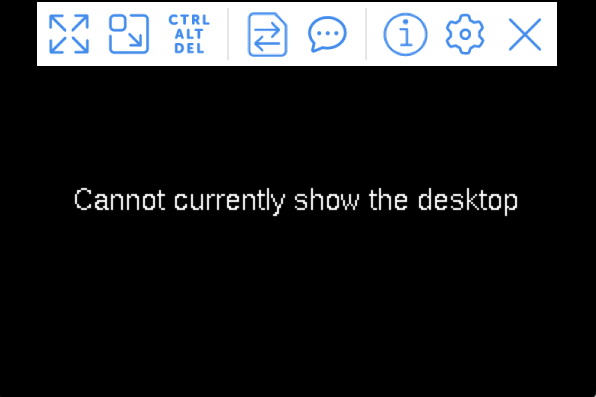
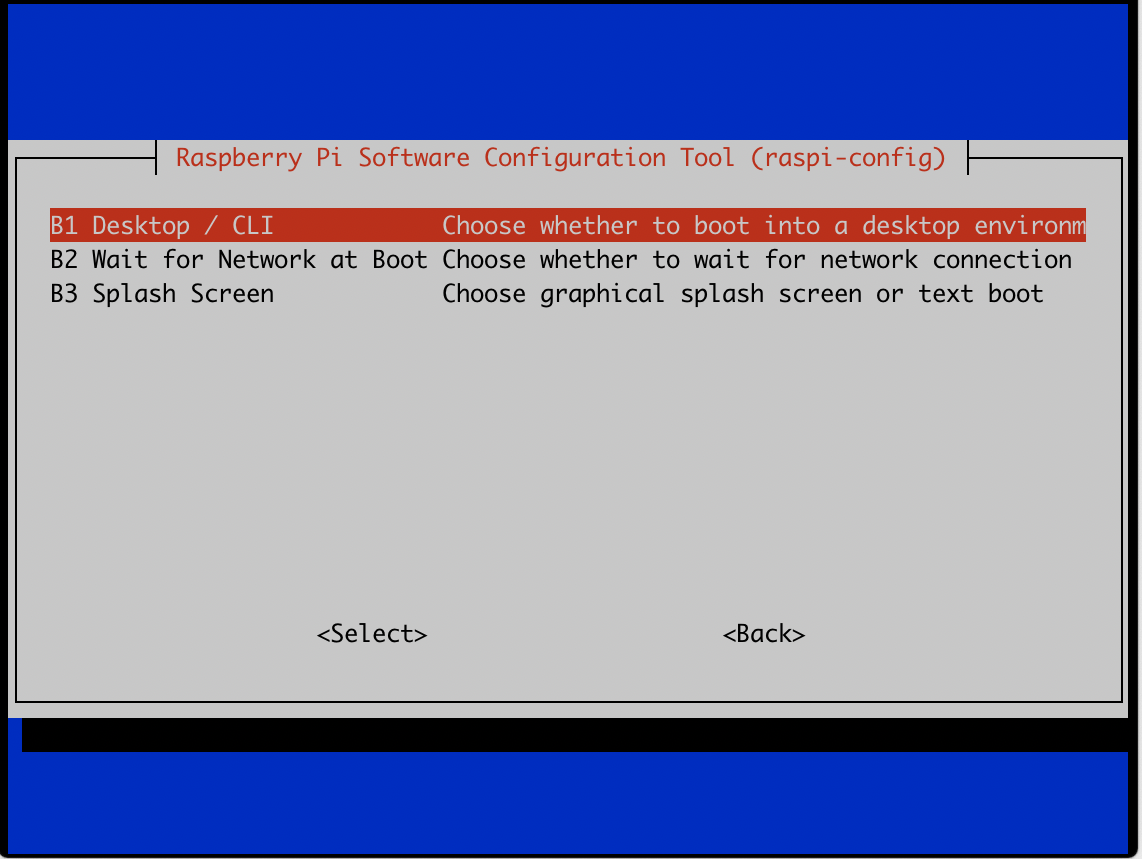
トラブルシュート(Cannot currently show the desktop)
インストール時のブートオプションで、Text Consoleを選択していたのが原因で、VNCクライントからアクセスした際に「Cannot currently show the desktop」と表示され、VNC経由でのRaspberry Piにアクセスが出来ませんでした。
「raspi-config」でRaspberry Pi Software Configuration Tool(raspi - config)を起動します
「3 Boot Options Configure options for start-up」を選択します
「B1 Desktop /CLI Choose whether to boot into a desktop enviroment or the command line」を選択します
「B3 Desktop Desktop GUI, requiring user to login」を選択肢、GUIモードで起動するように変更します。
rsync  version 3.1.3  protocol version 31
Copyright (C) 1996-2018 by Andrew Tridgell, Wayne Davison, and others.
Web site: http://rsync.samba.org/
Capabilities:
    64-bit files, 64-bit inums, 32-bit timestamps, 64-bit long ints,
    socketpairs, hardlinks, symlinks, IPv6, batchfiles, inplace,
    append, ACLs, xattrs, iconv, symtimes, prealloc

rsync comes with ABSOLUTELY NO WARRANTY.  This is free software, and you
are welcome to redistribute it under certain conditions.  See the GNU
General Public Licence for details.

rsync is a file transfer program capable of efficient remote update
via a fast differencing algorithm.

Usage: rsync [OPTION]... SRC [SRC]... DEST
  or   rsync [OPTION]... SRC [SRC]... [USER@]HOST:DEST
  or   rsync [OPTION]... SRC [SRC]... [USER@]HOST::DEST
  or   rsync [OPTION]... SRC [SRC]... rsync://[USER@]HOST[:PORT]/DEST
  or   rsync [OPTION]... [USER@]HOST:SRC [DEST]
  or   rsync [OPTION]... [USER@]HOST::SRC [DEST]
  or   rsync [OPTION]... rsync://[USER@]HOST[:PORT]/SRC [DEST]
The ':' usages connect via remote shell, while '::' & 'rsync://' usages connect
to an rsync daemon, and require SRC or DEST to start with a module name.

Options
 -v, --verbose               increase verbosity
     --info=FLAGS            fine-grained informational verbosity
     --debug=FLAGS           fine-grained debug verbosity
     --msgs2stderr           special output handling for debugging
 -q, --quiet                 suppress non-error messages
     --no-motd               suppress daemon-mode MOTD (see manpage caveat)
 -c, --checksum              skip based on checksum, not mod-time & size
 -a, --archive               archive mode; equals -rlptgoD (no -H,-A,-X)
     --no-OPTION             turn off an implied OPTION (e.g. --no-D)
 -r, --recursive             recurse into directories
 -R, --relative              use relative path names
     --no-implied-dirs       don't send implied dirs with --relative
 -b, --backup                make backups (see --suffix & --backup-dir)
     --backup-dir=DIR        make backups into hierarchy based in DIR
     --suffix=SUFFIX         set backup suffix (default ~ w/o --backup-dir)
 -u, --update                skip files that are newer on the receiver
     --inplace               update destination files in-place (SEE MAN PAGE)
     --append                append data onto shorter files
     --append-verify         like --append, but with old data in file checksum
 -d, --dirs                  transfer directories without recursing
 -l, --links                 copy symlinks as symlinks
 -L, --copy-links            transform symlink into referent file/dir
     --copy-unsafe-links     only "unsafe" symlinks are transformed
     --safe-links            ignore symlinks that point outside the source tree
     --munge-links           munge symlinks to make them safer (but unusable)
 -k, --copy-dirlinks         transform symlink to a dir into referent dir
 -K, --keep-dirlinks         treat symlinked dir on receiver as dir
 -H, --hard-links            preserve hard links
 -p, --perms                 preserve permissions
 -E, --executability         preserve the file's executability
     --chmod=CHMOD           affect file and/or directory permissions
 -A, --acls                  preserve ACLs (implies --perms)
 -X, --xattrs                preserve extended attributes
 -o, --owner                 preserve owner (super-user only)
 -g, --group                 preserve group
     --devices               preserve device files (super-user only)
     --copy-devices          copy device contents as regular file
     --specials              preserve special files
 -D                          same as --devices --specials
 -t, --times                 preserve modification times
 -O, --omit-dir-times        omit directories from --times
 -J, --omit-link-times       omit symlinks from --times
     --super                 receiver attempts super-user activities
     --fake-super            store/recover privileged attrs using xattrs
 -S, --sparse                turn sequences of nulls into sparse blocks
     --preallocate           allocate dest files before writing them
 -n, --dry-run               perform a trial run with no changes made
 -W, --whole-file            copy files whole (without delta-xfer algorithm)
     --checksum-choice=STR   choose the checksum algorithms
 -x, --one-file-system       don't cross filesystem boundaries
 -B, --block-size=SIZE       force a fixed checksum block-size
 -e, --rsh=COMMAND           specify the remote shell to use
     --rsync-path=PROGRAM    specify the rsync to run on the remote machine
     --existing              skip creating new files on receiver
     --ignore-existing       skip updating files that already exist on receiver
     --remove-source-files   sender removes synchronized files (non-dirs)
     --del                   an alias for --delete-during
     --delete                delete extraneous files from destination dirs
     --delete-before         receiver deletes before transfer, not during
     --delete-during         receiver deletes during the transfer
     --delete-delay          find deletions during, delete after
     --delete-after          receiver deletes after transfer, not during
     --delete-excluded       also delete excluded files from destination dirs
     --ignore-missing-args   ignore missing source args without error
     --delete-missing-args   delete missing source args from destination
     --ignore-errors         delete even if there are I/O errors
     --force                 force deletion of directories even if not empty
     --max-delete=NUM        don't delete more than NUM files
     --max-size=SIZE         don't transfer any file larger than SIZE
     --min-size=SIZE         don't transfer any file smaller than SIZE
     --partial               keep partially transferred files
     --partial-dir=DIR       put a partially transferred file into DIR
     --delay-updates         put all updated files into place at transfer's end
 -m, --prune-empty-dirs      prune empty directory chains from the file-list
     --numeric-ids           don't map uid/gid values by user/group name
     --usermap=STRING        custom username mapping
     --groupmap=STRING       custom groupname mapping
     --chown=USER:GROUP      simple username/groupname mapping
     --timeout=SECONDS       set I/O timeout in seconds
     --contimeout=SECONDS    set daemon connection timeout in seconds
 -I, --ignore-times          don't skip files that match in size and mod-time
 -M, --remote-option=OPTION  send OPTION to the remote side only
     --size-only             skip files that match in size
 -@, --modify-window=NUM     set the accuracy for mod-time comparisons
 -T, --temp-dir=DIR          create temporary files in directory DIR
 -y, --fuzzy                 find similar file for basis if no dest file
     --compare-dest=DIR      also compare destination files relative to DIR
     --copy-dest=DIR         ... and include copies of unchanged files
     --link-dest=DIR         hardlink to files in DIR when unchanged
 -z, --compress              compress file data during the transfer
     --compress-level=NUM    explicitly set compression level
     --skip-compress=LIST    skip compressing files with a suffix in LIST
 -C, --cvs-exclude           auto-ignore files the same way CVS does
 -f, --filter=RULE           add a file-filtering RULE
 -F                          same as --filter='dir-merge /.rsync-filter'
                             repeated: --filter='- .rsync-filter'
     --exclude=PATTERN       exclude files matching PATTERN
     --exclude-from=FILE     read exclude patterns from FILE
     --include=PATTERN       don't exclude files matching PATTERN
     --include-from=FILE     read include patterns from FILE
     --files-from=FILE       read list of source-file names from FILE
 -0, --from0                 all *-from/filter files are delimited by 0s
 -s, --protect-args          no space-splitting; only wildcard special-chars
     --address=ADDRESS       bind address for outgoing socket to daemon
     --port=PORT             specify double-colon alternate port number
     --sockopts=OPTIONS      specify custom TCP options
     --blocking-io           use blocking I/O for the remote shell
     --stats                 give some file-transfer stats
 -8, --8-bit-output          leave high-bit chars unescaped in output
 -h, --human-readable        output numbers in a human-readable format
     --progress              show progress during transfer
 -P                          same as --partial --progress
 -i, --itemize-changes       output a change-summary for all updates
     --out-format=FORMAT     output updates using the specified FORMAT
     --log-file=FILE         log what we're doing to the specified FILE
     --log-file-format=FMT   log updates using the specified FMT
     --password-file=FILE    read daemon-access password from FILE
     --list-only             list the files instead of copying them
     --bwlimit=RATE          limit socket I/O bandwidth
     --stop-at=y-m-dTh:m     Stop rsync at year-month-dayThour:minute
     --time-limit=MINS       Stop rsync after MINS minutes have elapsed
     --outbuf=N|L|B          set output buffering to None, Line, or Block
     --write-batch=FILE      write a batched update to FILE
     --only-write-batch=FILE like --write-batch but w/o updating destination
     --read-batch=FILE       read a batched update from FILE
     --protocol=NUM          force an older protocol version to be used
     --iconv=CONVERT_SPEC    request charset conversion of filenames
     --checksum-seed=NUM     set block/file checksum seed (advanced)
     --noatime               do not alter atime when opening source files
 -4, --ipv4                  prefer IPv4
 -6, --ipv6                  prefer IPv6
     --version               print version number
(-h) --help                  show this help (-h is --help only if used alone)

Use "rsync --daemon --help" to see the daemon-mode command-line options.
Please see the rsync(1) and rsyncd.conf(5) man pages for full documentation.
See http://rsync.samba.org/ for updates, bug reports, and answers
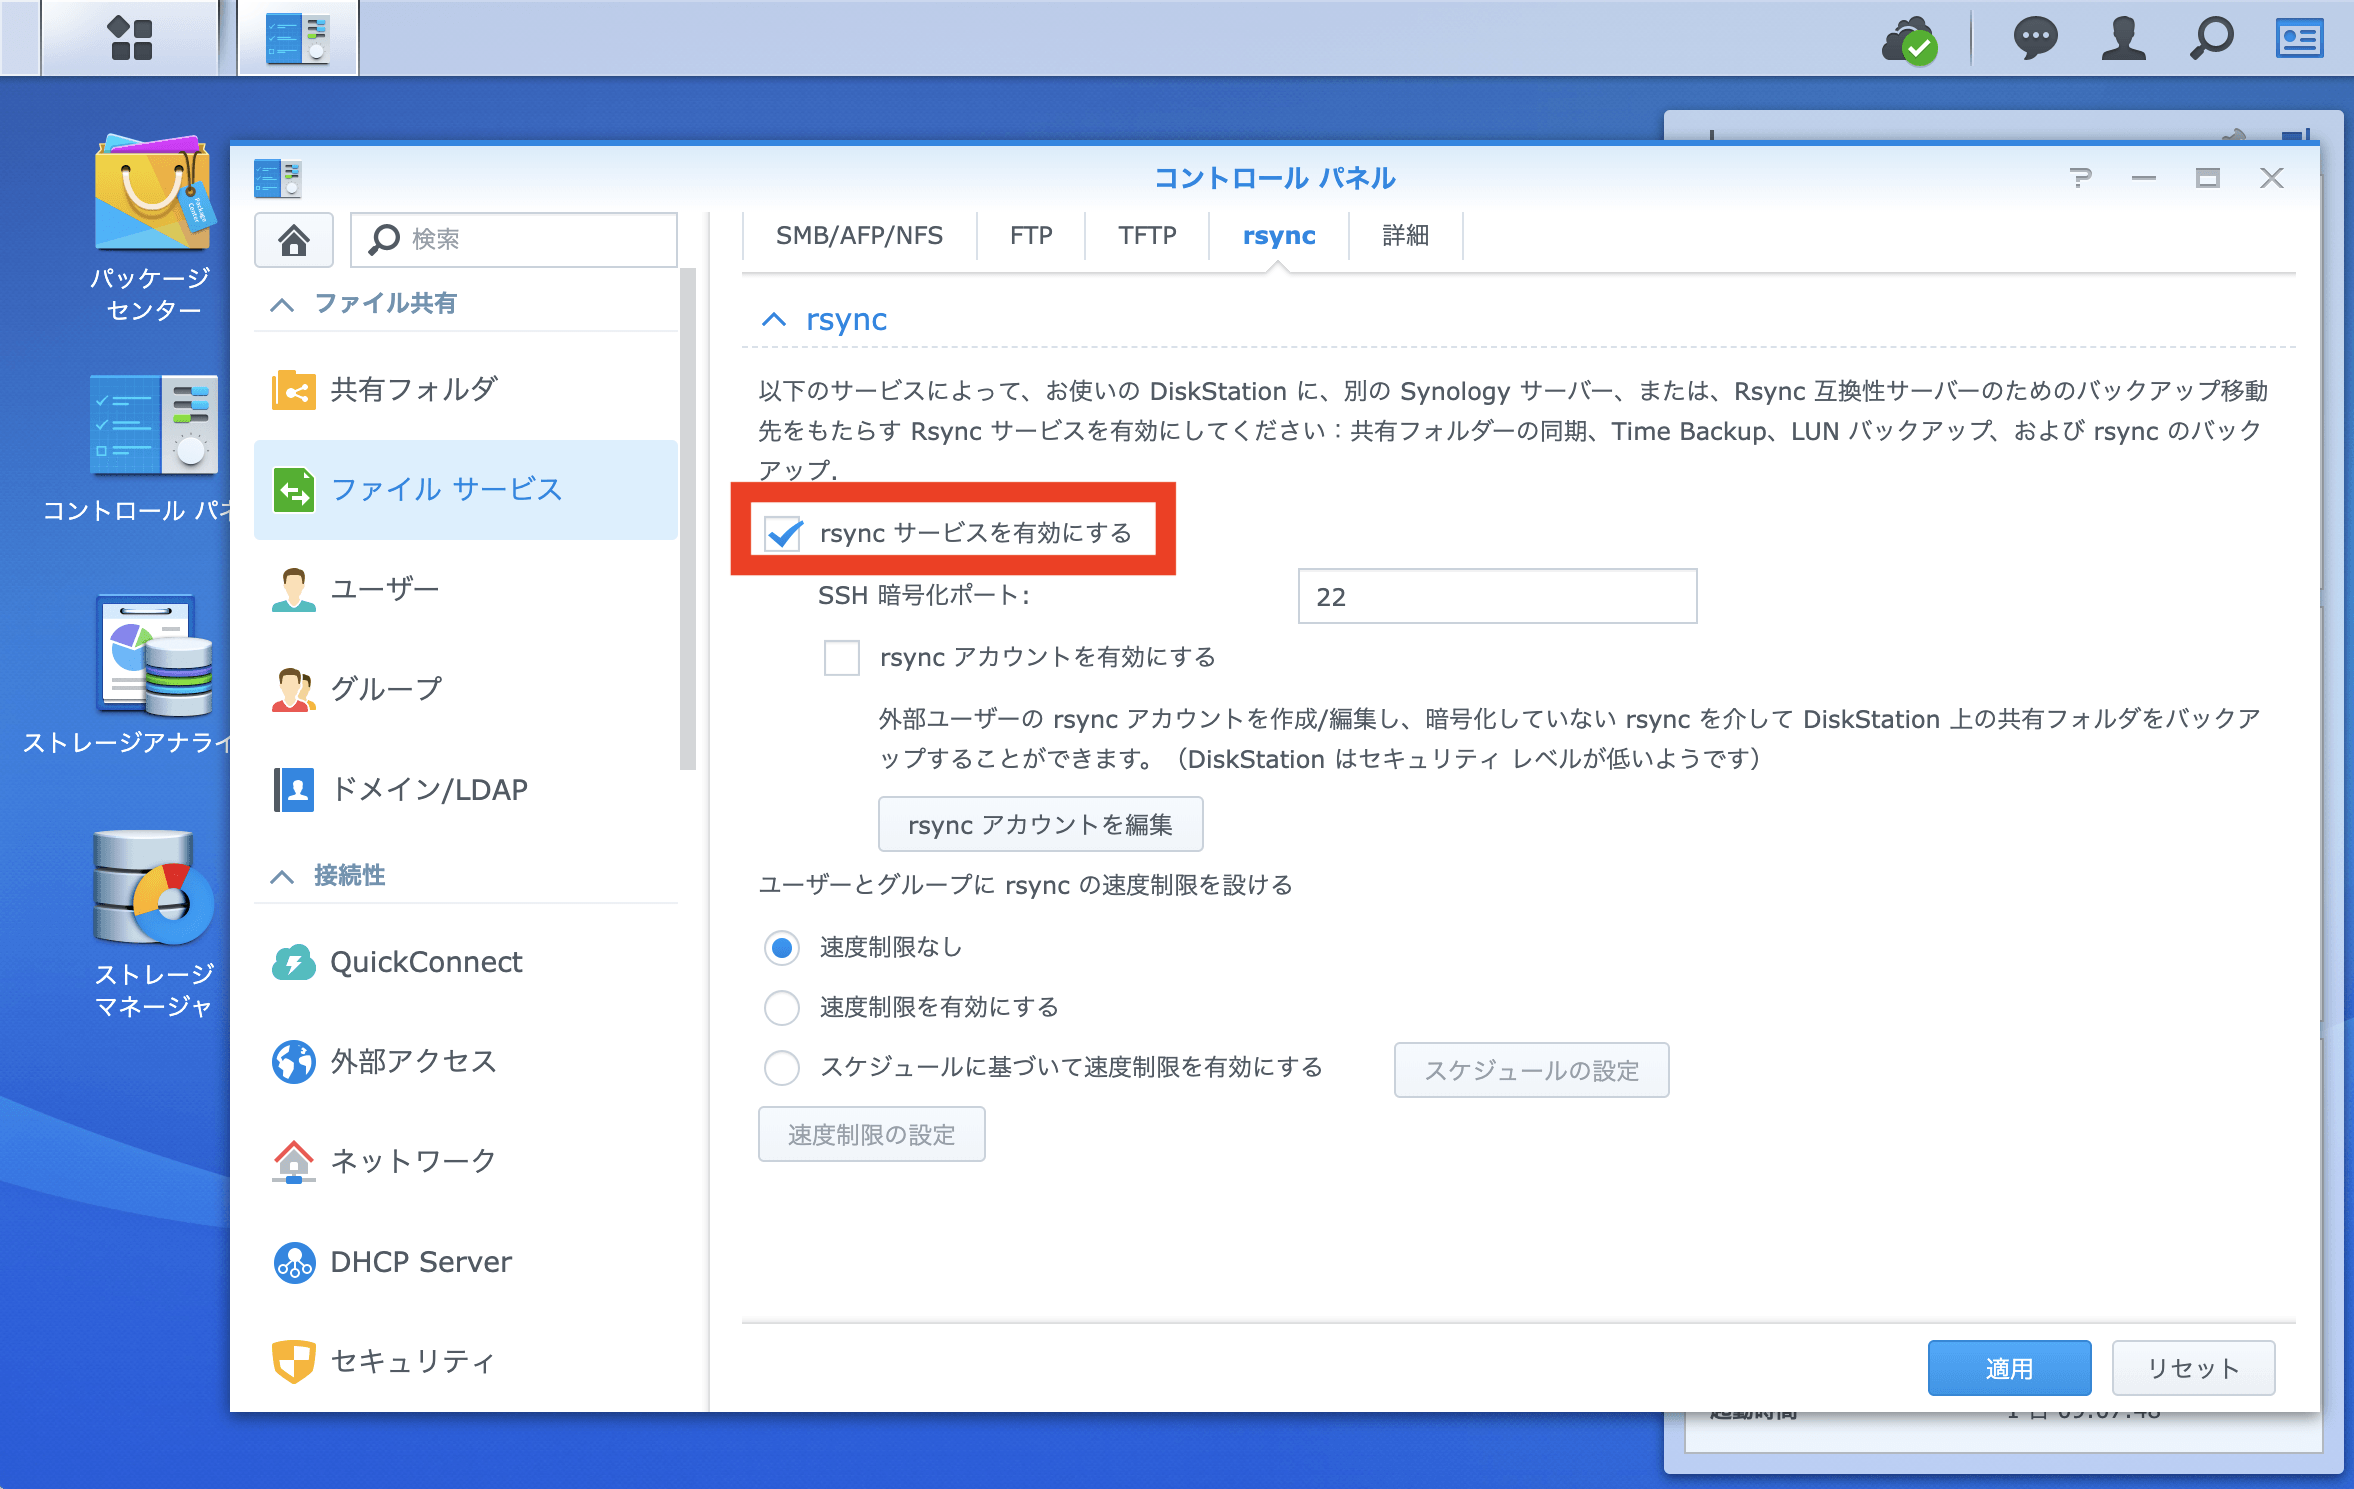
@raspberrypi:~ $ sudo apt-get install nfs-common
[sudo] password for:
nfs-common is already the newest version (1:1.3.4-2.5).
0 upgraded, 0 newly installed, 0 to remove and 26 not upgraded.
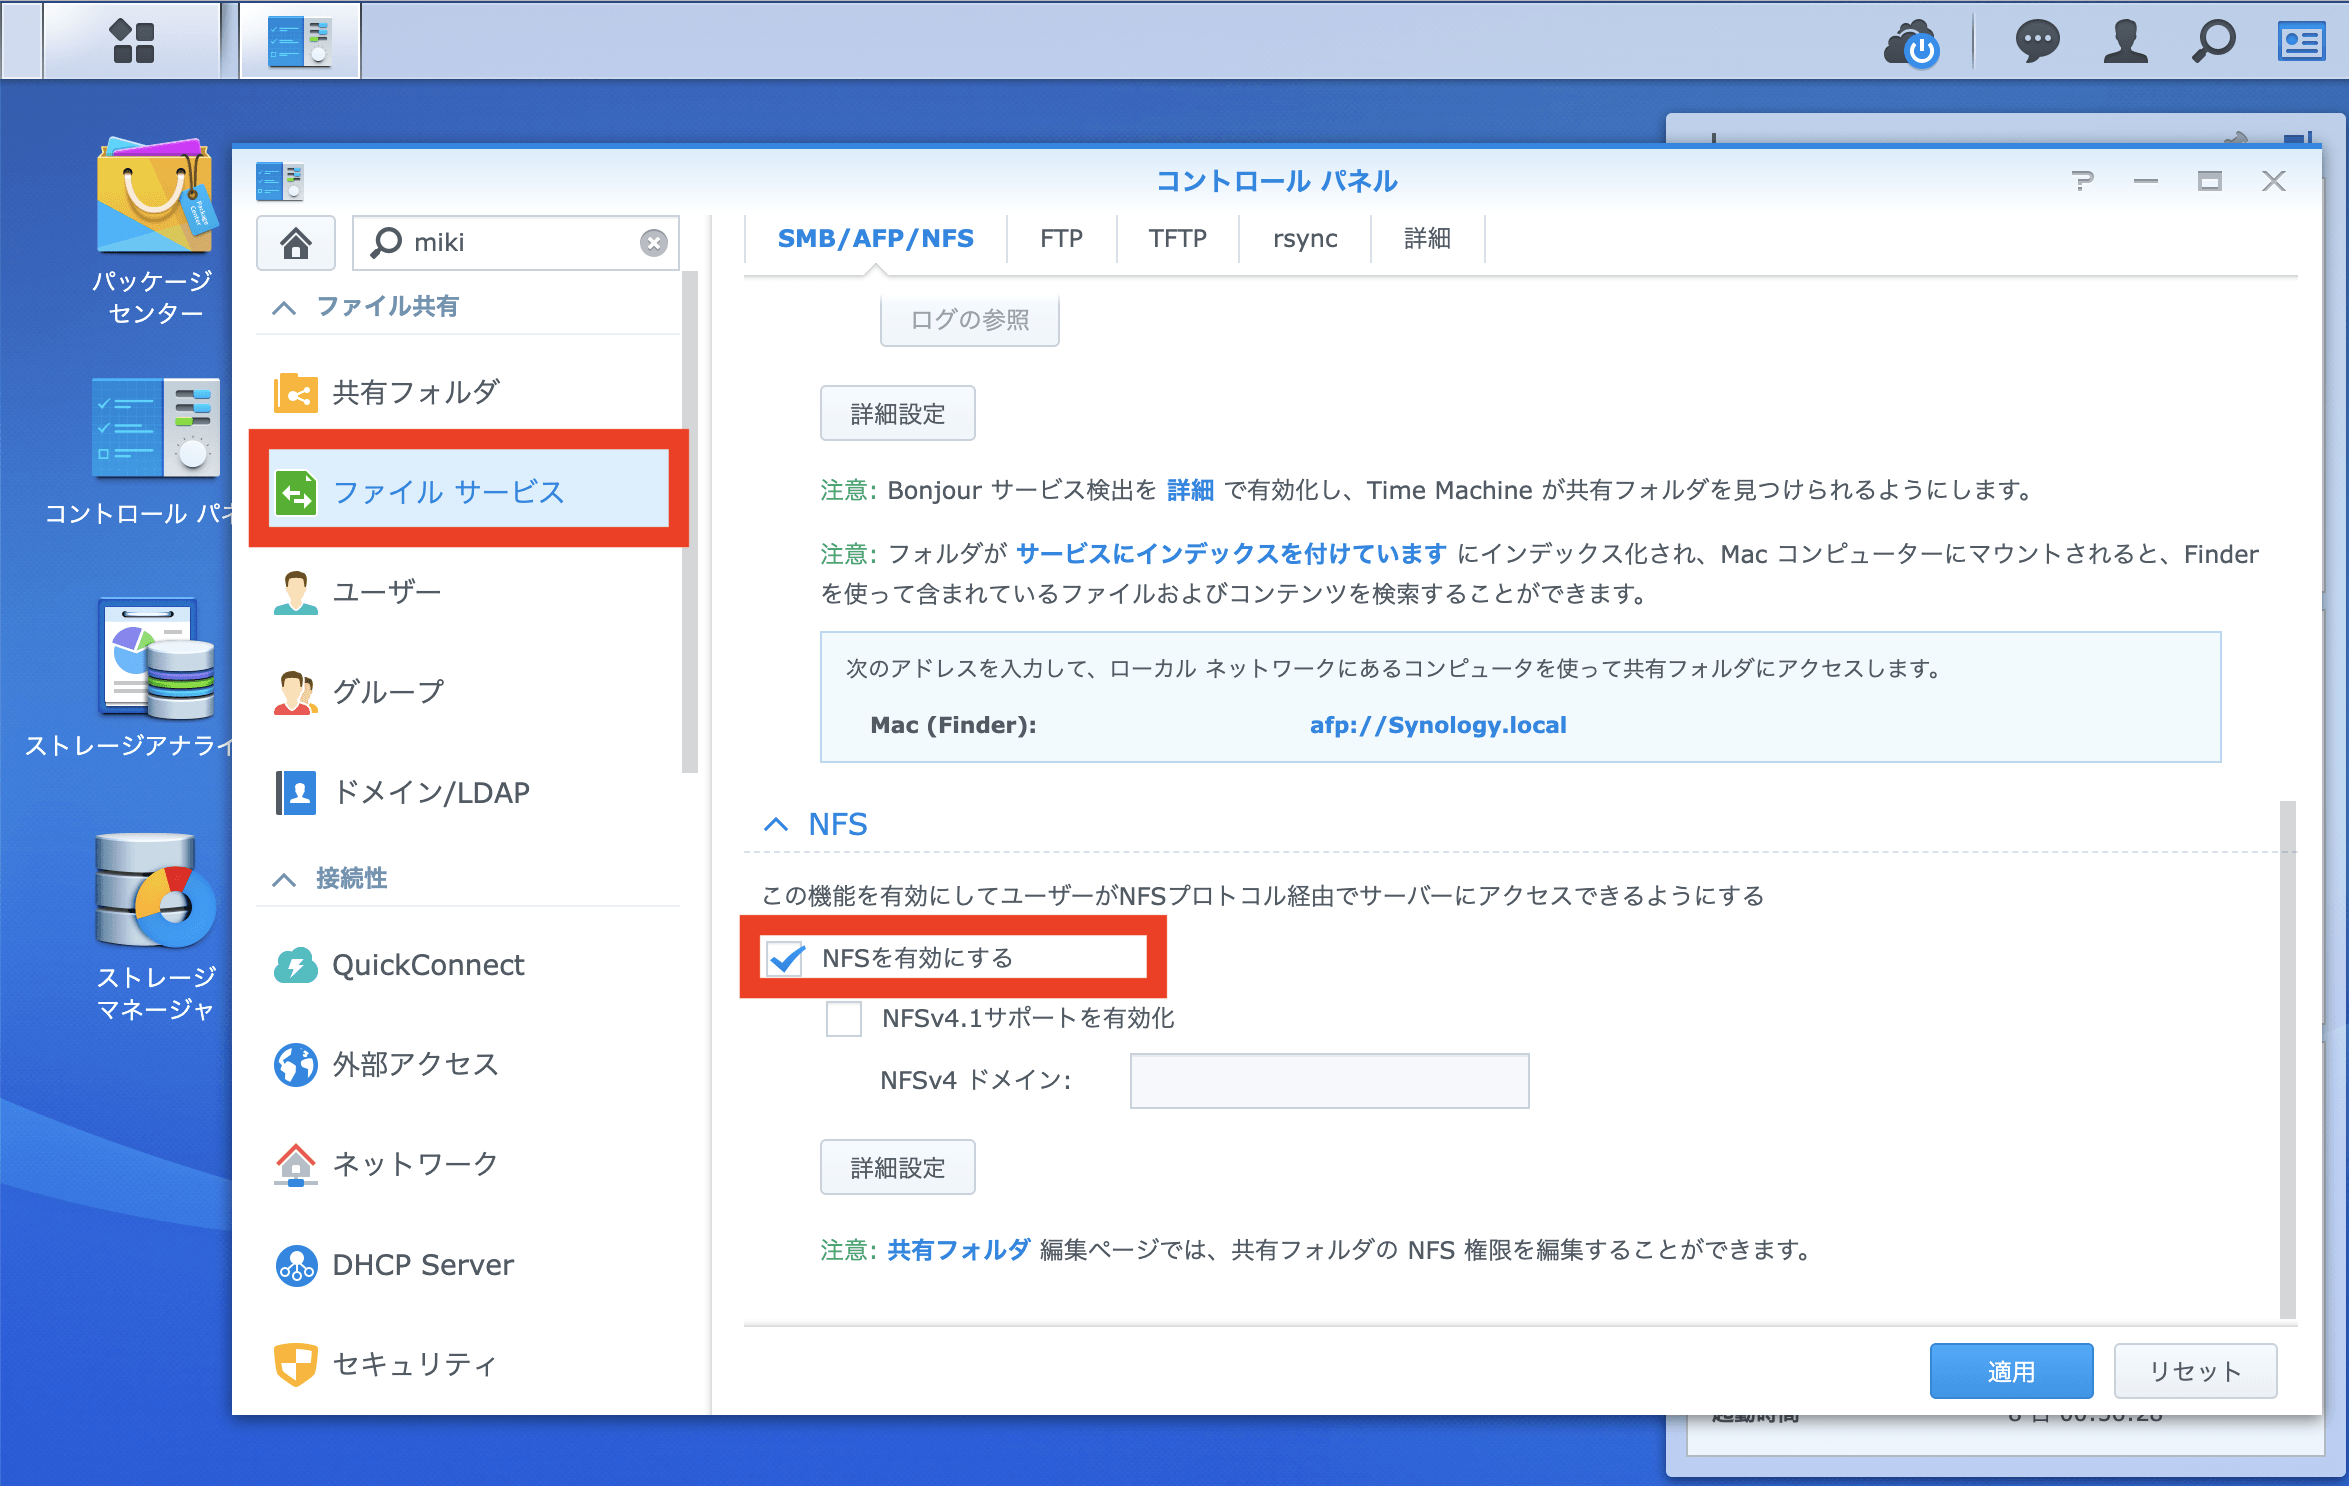
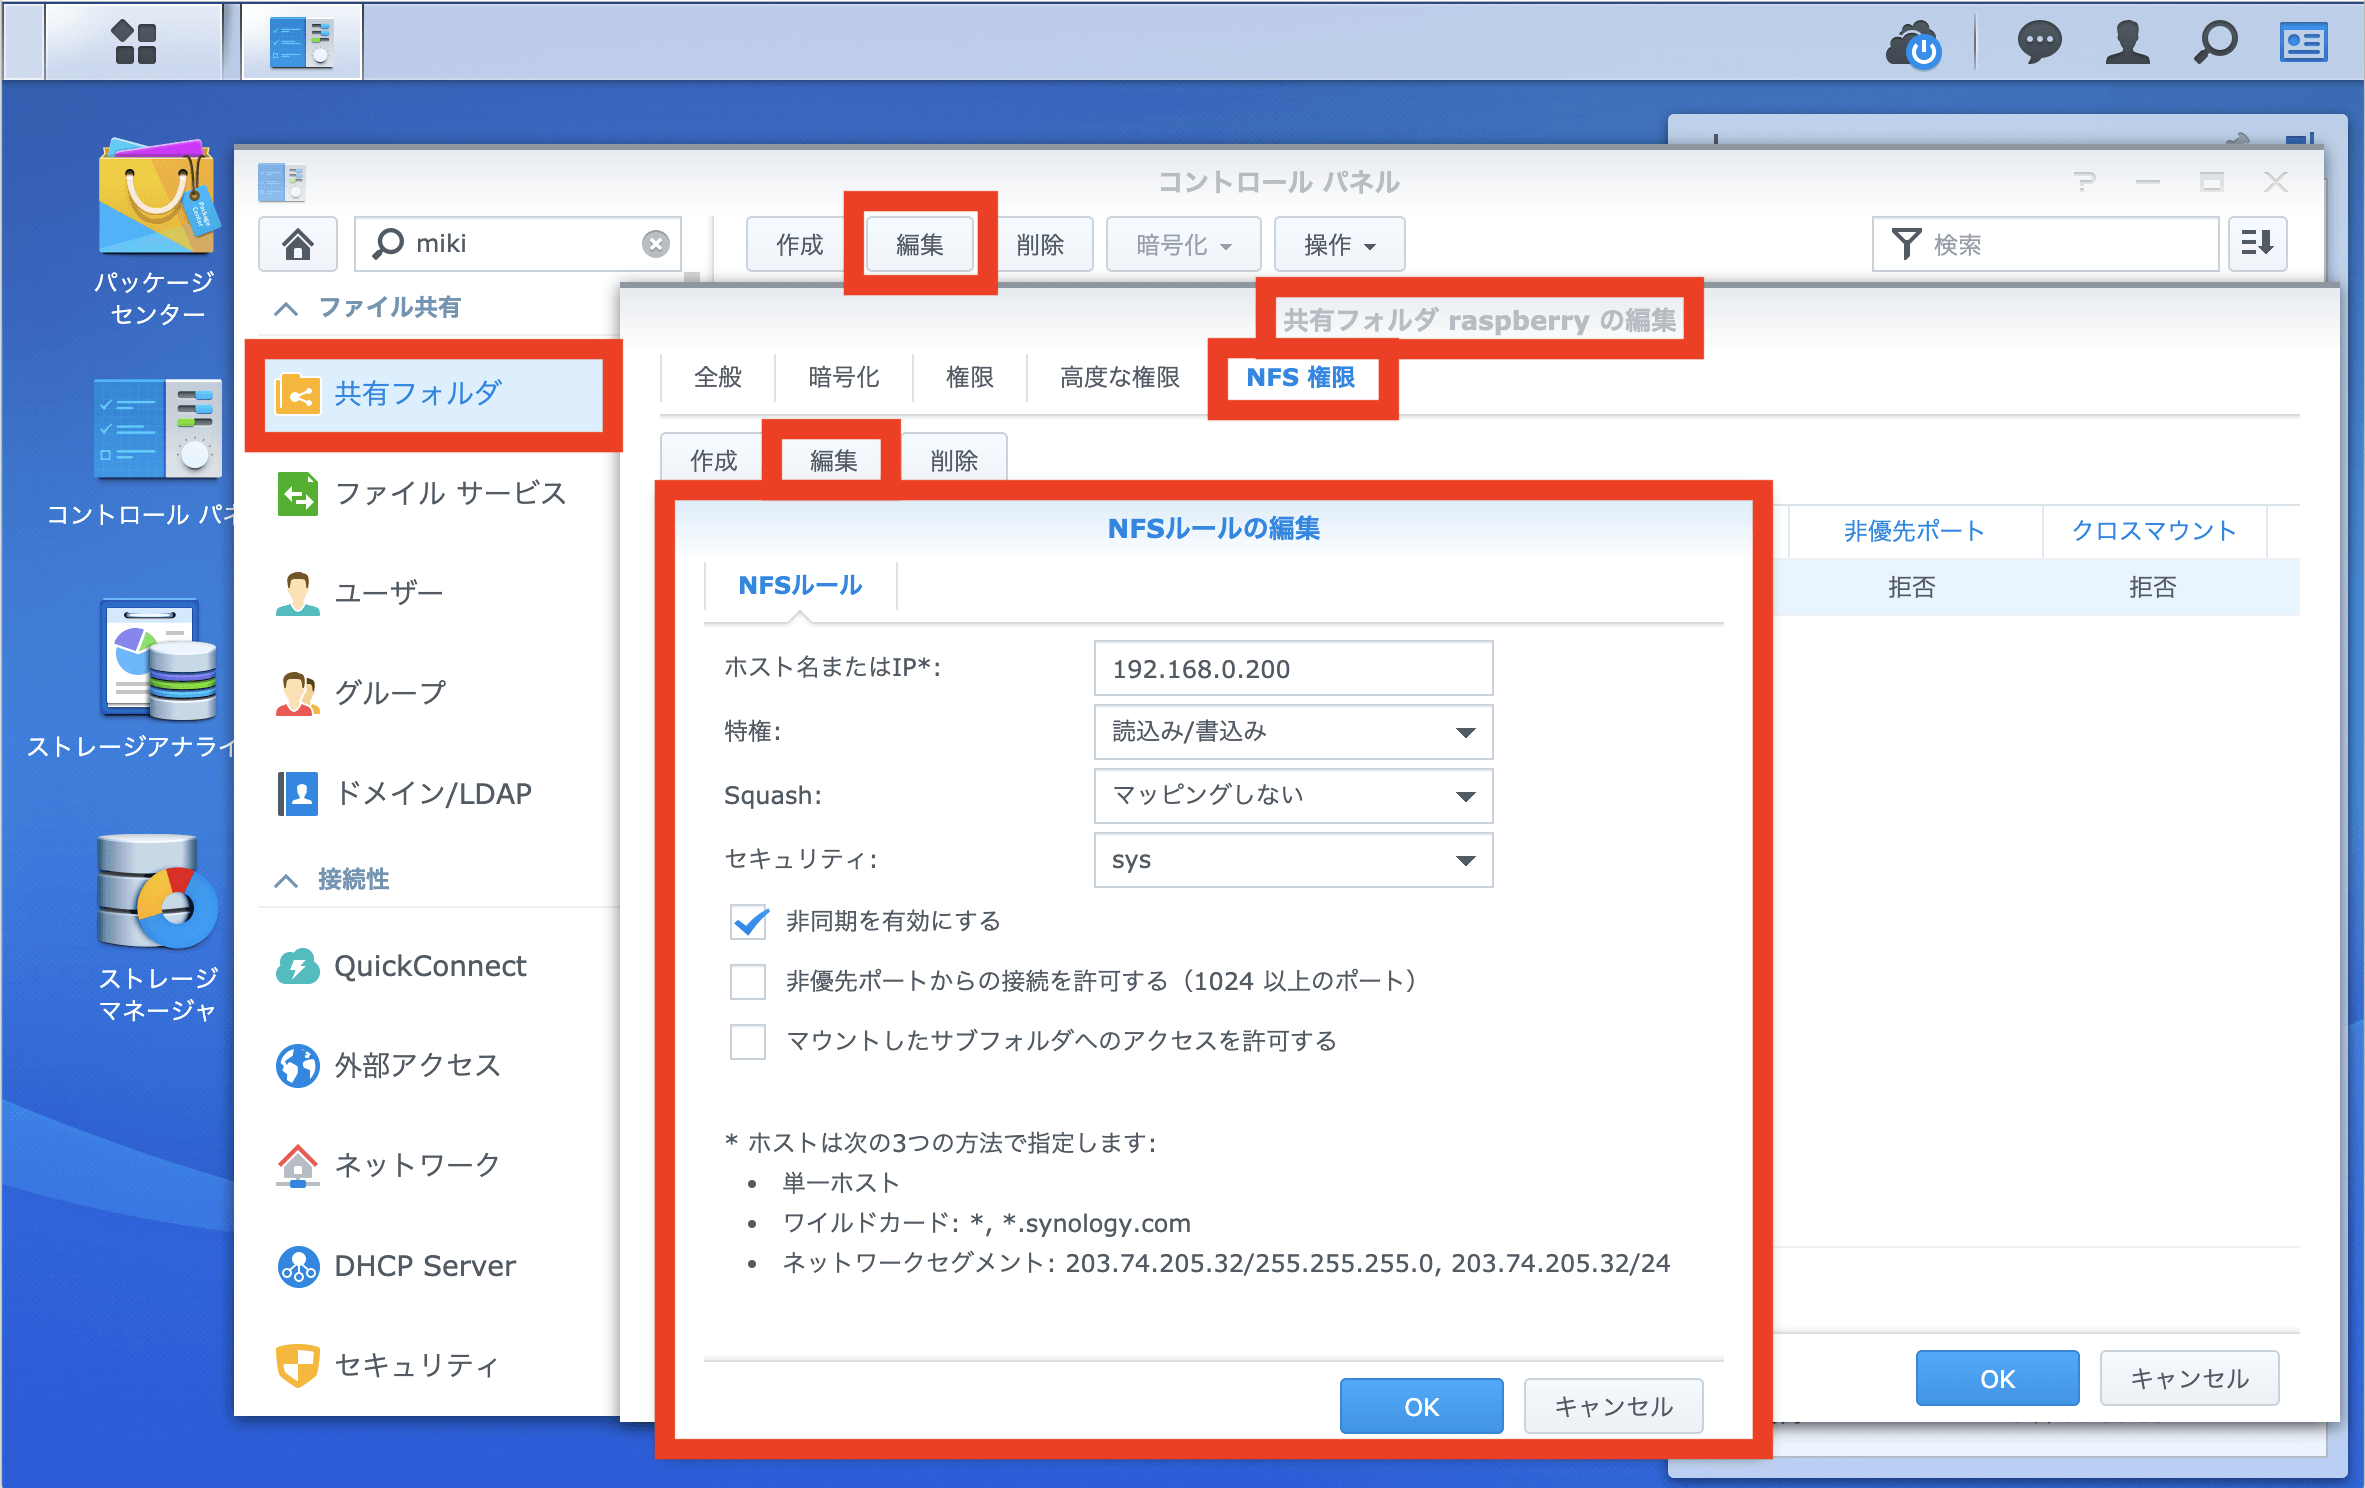
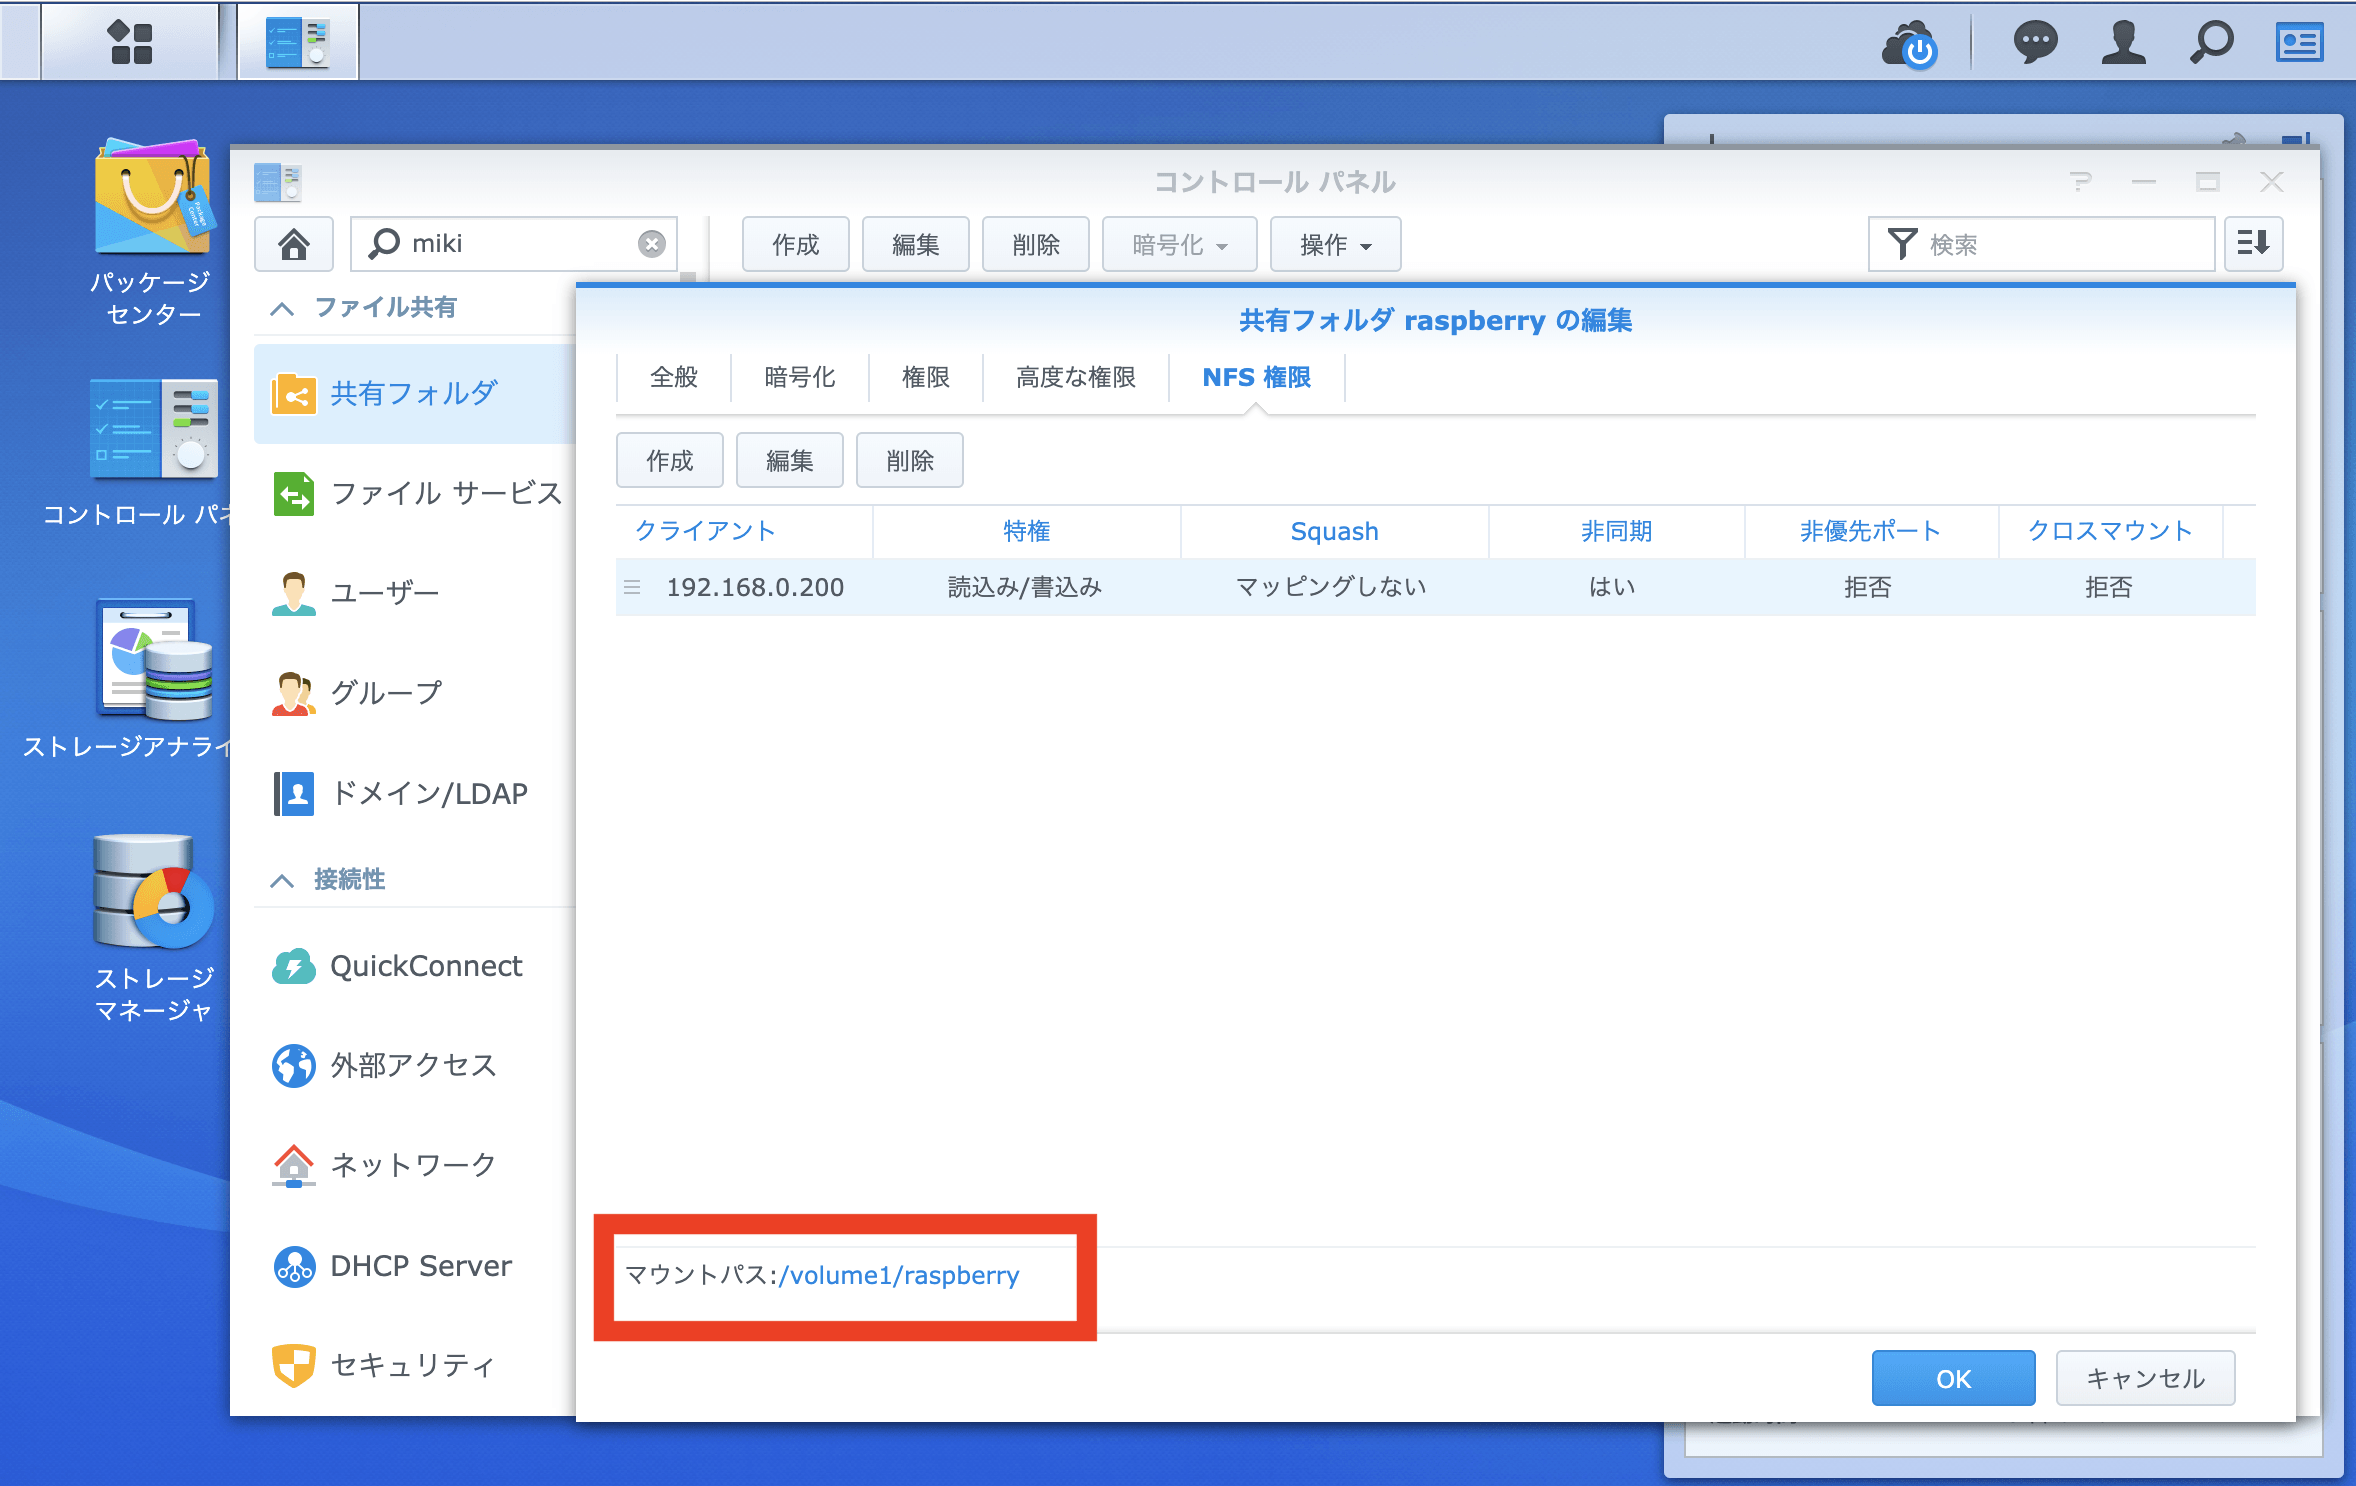
@raspberrypi:~ $ sudo showmount -e 192.168.0.100
Export list for 192.168.0.100:
/volume1/raspberry 192.168.0.200
@raspberrypi:~ $ sudo mkdir /mnt/synology
@raspberrypi:~ $ sudo mount -t nfs 192.168.0.100:/volume1/raspberry /mnt/synology
Raspberry Pi起動・再起動時のNFS自動マウント
/etc/fstabにNFSボリュームのマウント情報を記載
@raspberrypi:~ $ cat /etc/fstab
proc /proc proc defaults 0 0
/dev/mmcblk0p6 /boot vfat defaults 0 2
/dev/mmcblk0p7 / ext4 defaults,noatime 0 1
# a swapfile is not a swap partition, no line here
# use dphys-swapfile swap[on|off] for that
192.168.0.100:/volume1/raspberry /mnt/synology nfs defaults,_netdev 0 0
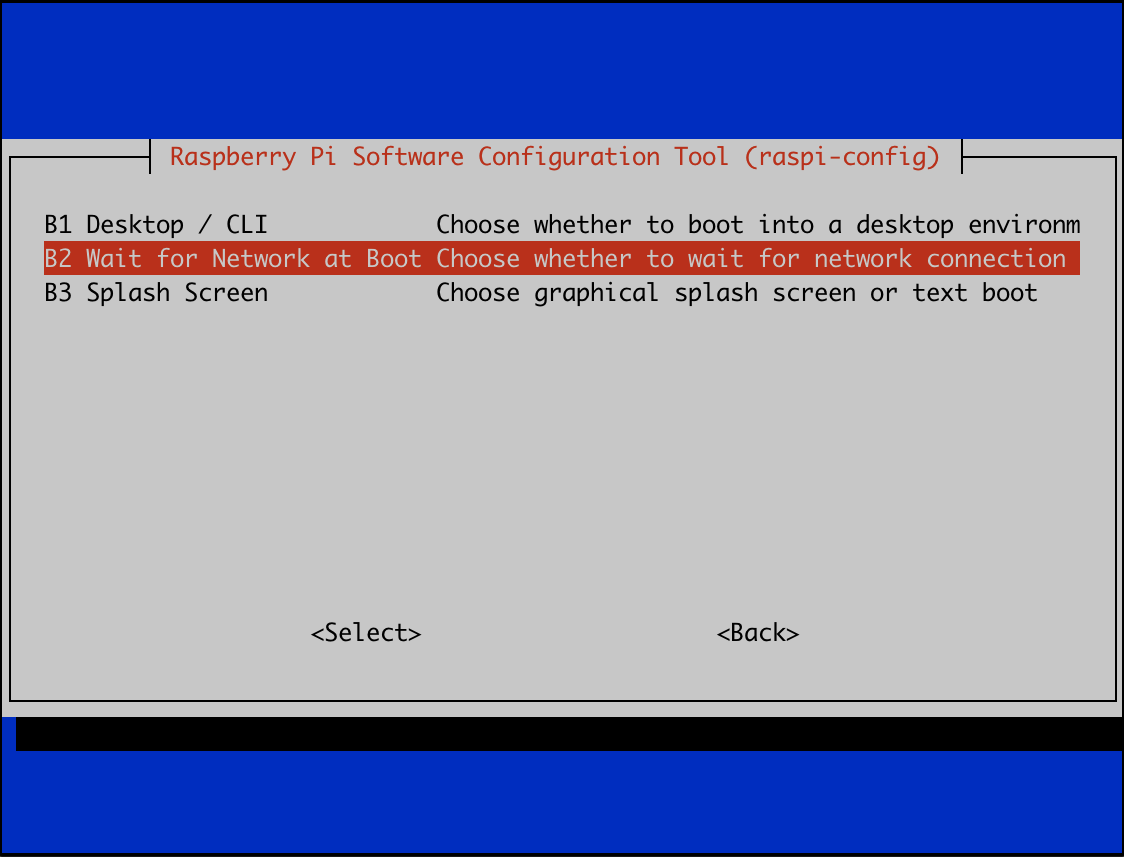
Raspberry PiのBootオプション変更(NASマウントタイミング変更)
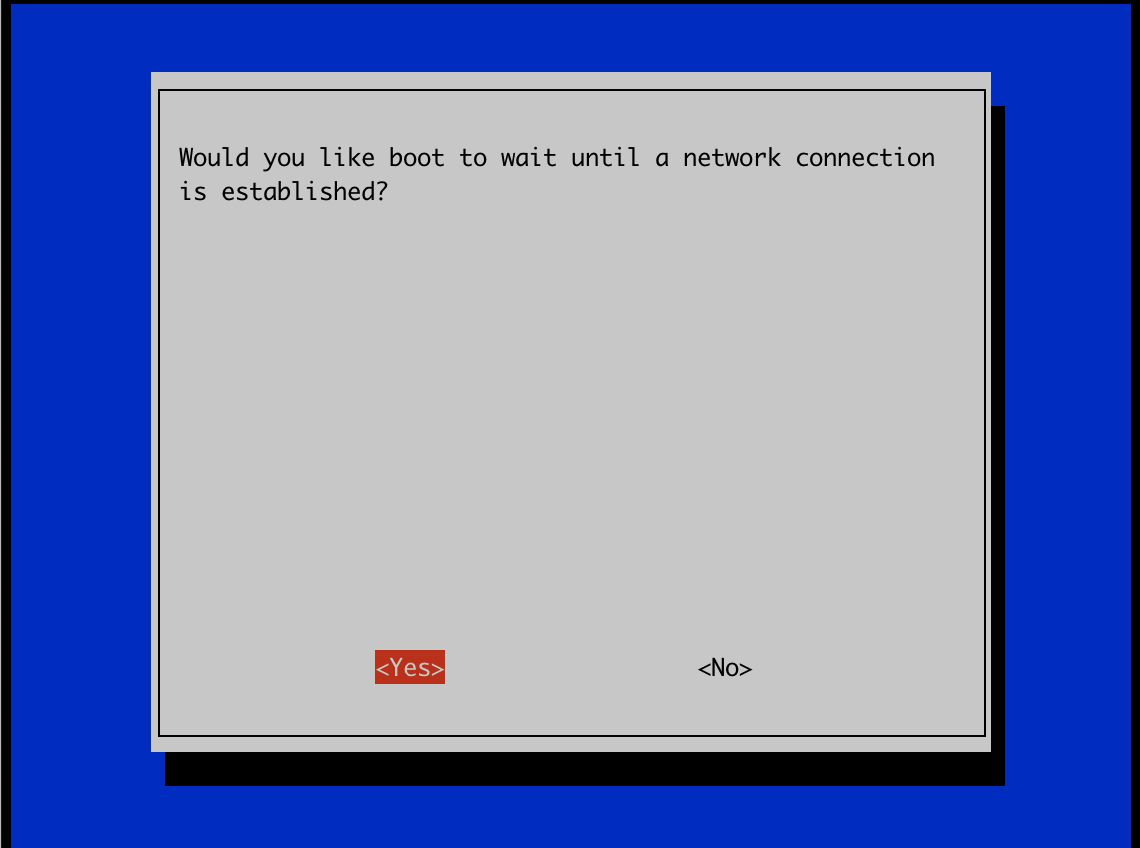
Raspberry PiのBoot Option「Wait for Network at Boot Choose whether to wait for network」を変更します。「raspi-config」を用いて、設定を行います。
@raspberrypi:~ $ sudo raspi-config
3 Boot Options Configure options for start-up を選択
B2 Wait for Network at Boot Chose whether to wait for network connection を選択
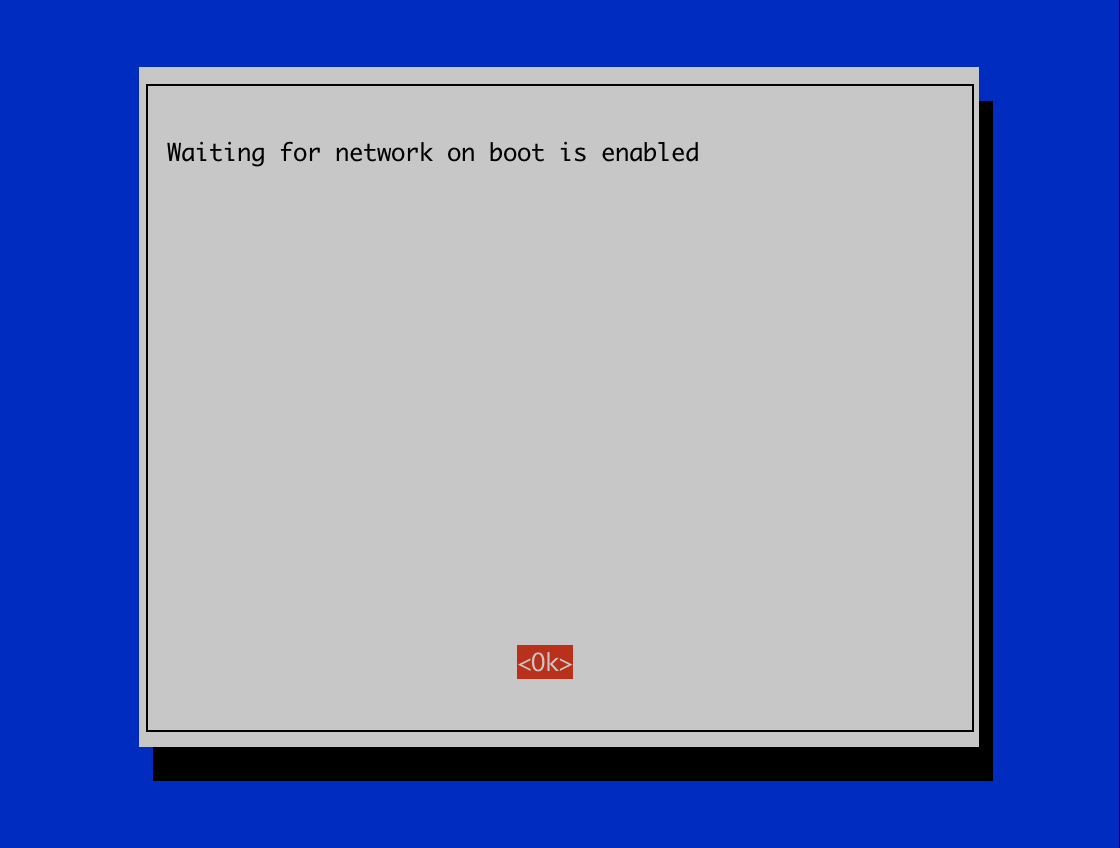
<Yes> を選択
<Ok> を選択
/etc/rc.localに3秒Sleep後マウント
上記の設定後も、起動・再起動時の自動マウントが実行されませんでした。 シスログ(/var/log/syslog)を確認したところ、やはり起動時のマウント時にNASへのネットワークマウントが失敗しておりました。 mount.nfs: Network is unreachable
Jul 9 06:36:22 raspberrypi rpc.mountd[473]: Version 1.3.3 starting
Jul 9 06:36:23 raspberrypi mount[489]: mount.nfs: Network is unreachable
Jul 9 06:36:23 raspberrypi systemd[1]: mnt-synology.mount: Mount process exited, code=exited, status=32/n/a
Jul 9 06:36:23 raspberrypi systemd[1]: mnt-synology.mount: Failed with result 'exit-code'.
Jul 9 06:36:23 raspberrypi systemd[1]: Failed to mount /mnt/synology.
よって、/etc/rc.localに3秒のスリープとマウントコマンドを追加しました。 sleep 3 sudo mount -t nfs 192.168.0.100:/volume1/raspberry /mnt/synology
#!/bin/sh -e
#
# rc.local
#
# This script is executed at the end of each multiuser runlevel.
# Make sure that the script will "exit 0" on success or any other
# value on error.
#
# In order to enable or disable this script just change the execution
# bits.
#
# By default this script does nothing.

# Print the IP address
_IP=$(hostname -I) || true
if [ "$_IP" ]; then
  printf "My IP address is %s\n" "$_IP"
fi

#After Sleep 3, then execute a mount command
sleep 3
sudo mount -t nfs 192.168.0.100:/volume1/raspberry /mnt/synology

exit 0