root@raspberrypi:~# parted /dev/sda
GNU Parted 3.2
Using /dev/sda
Welcome to GNU Parted! Type 'help' to view a list of commands.
(parted) mktable msdos
Warning: The existing disk label on /dev/sda will be destroyed and all data on
this disk will be lost. Do you want to continue?
Yes/No? yes
(parted) mkpart primary fat32 0% 100M
(parted) mkpart primary ext4 100M 100%
(parted) print
Model: StoreJet StoreJet Transce (scsi)
Disk /dev/sda: 120GB
Sector size (logical/physical): 512B/512B
Partition Table: msdos
Disk Flags:

Number Start End Size Type File system Flags
1 1049kB 99.6MB 98.6MB primary fat32 lba
2 99.6MB 120GB 120GB primary ext4 lba

(parted) quit
Information: You may need to update /etc/fstab.
import glob, os

# Current directory
current_dir = os.path.dirname(os.path.abspath(__file__))

# Directory where the data will reside, relative to 'darknet.exe'
path_data = 'data/obj/'

# Percentage of images to be used for the test set
percentage_test = 10;

# Create and/or truncate train.txt and test.txt
file_train = open('train.txt', 'w')
file_test = open('test.txt', 'w')

# Populate train.txt and test.txt
counter = 1
index_test = round(100 / percentage_test)
for pathAndFilename in glob.iglob(os.path.join(current_dir, "*.jpg")):
    title, ext = os.path.splitext(os.path.basename(pathAndFilename))

    if counter == index_test:
        counter = 1
        file_test.write(path_data + title + '.jpg' + "\n")
    else:
        file_train.write(path_data + title + '.jpg' + "\n")
        counter = counter + 1
// Unattended-Upgrade::Origins-Pattern controls which packages are
// upgraded.
//
// Lines below have the format format is "keyword=value,...".  A
// package will be upgraded only if the values in its metadata match
// all the supplied keywords in a line.  (In other words, omitted
// keywords are wild cards.) The keywords originate from the Release
// file, but several aliases are accepted.  The accepted keywords are:
//   a,archive,suite (eg, "stable")
//   c,component     (eg, "main", "contrib", "non-free")
//   l,label         (eg, "Debian", "Debian-Security")
//   o,origin        (eg, "Debian", "Unofficial Multimedia Packages")
//   n,codename      (eg, "jessie", "jessie-updates")
//     site          (eg, "http.debian.net")
// The available values on the system are printed by the command
// "apt-cache policy", and can be debugged by running
// "unattended-upgrades -d" and looking at the log file.
//
// Within lines unattended-upgrades allows 2 macros whose values are
// derived from /etc/debian_version:
//   ${distro_id}            Installed origin.
//   ${distro_codename}      Installed codename (eg, "buster")
Unattended-Upgrade::Origins-Pattern {
        // Codename based matching:
        // This will follow the migration of a release through different
        // archives (e.g. from testing to stable and later oldstable).
        // Software will be the latest available for the named release,
        // but the Debian release itself will not be automatically upgraded.
//      "origin=Debian,codename=${distro_codename}-updates";
//      "origin=Debian,codename=${distro_codename}-proposed-updates";
        "origin=Debian,codename=${distro_codename},label=Debian";
        "origin=Debian,codename=${distro_codename},label=Debian-Security";

        // Archive or Suite based matching:
        // Note that this will silently match a different release after
        // migration to the specified archive (e.g. testing becomes the
        // new stable).
//      "o=Debian,a=stable";
//      "o=Debian,a=stable-updates";
//      "o=Debian,a=proposed-updates";
//      "o=Debian Backports,a=${distro_codename}-backports,l=Debian Backports";
};

// Python regular expressions, matching packages to exclude from upgrading
Unattended-Upgrade::Package-Blacklist {
    // The following matches all packages starting with linux-
//  "linux-";

    // Use $ to explicitely define the end of a package name. Without
    // the $, "libc6" would match all of them.
//  "libc6$";
//  "libc6-dev$";
//  "libc6-i686$";

    // Special characters need escaping
//  "libstdc\+\+6$";

    // The following matches packages like xen-system-amd64, xen-utils-4.1,
    // xenstore-utils and libxenstore3.0
//  "(lib)?xen(store)?";

    // For more information about Python regular expressions, see
    // https://docs.python.org/3/howto/regex.html
};

// This option allows you to control if on a unclean dpkg exit
// unattended-upgrades will automatically run
//   dpkg --force-confold --configure -a
// The default is true, to ensure updates keep getting installed
//Unattended-Upgrade::AutoFixInterruptedDpkg "true";

// Split the upgrade into the smallest possible chunks so that
// they can be interrupted with SIGTERM. This makes the upgrade
// a bit slower but it has the benefit that shutdown while a upgrade
// is running is possible (with a small delay)
//Unattended-Upgrade::MinimalSteps "true";

// Install all updates when the machine is shutting down
// instead of doing it in the background while the machine is running.
// This will (obviously) make shutdown slower.
// Unattended-upgrades increases logind's InhibitDelayMaxSec to 30s.
// This allows more time for unattended-upgrades to shut down gracefully
// or even install a few packages in InstallOnShutdown mode, but is still a
// big step back from the 30 minutes allowed for InstallOnShutdown previously.
// Users enabling InstallOnShutdown mode are advised to increase
// InhibitDelayMaxSec even further, possibly to 30 minutes.
//Unattended-Upgrade::InstallOnShutdown "false";

// Send email to this address for problems or packages upgrades
// If empty or unset then no email is sent, make sure that you
// have a working mail setup on your system. A package that provides
// 'mailx' must be installed. E.g. "user@example.com"
//Unattended-Upgrade::Mail "";
Unattended-Upgrade::Mail "xxx@xxx.com";

// Set this value to "true" to get emails only on errors. Default
// is to always send a mail if Unattended-Upgrade::Mail is set
//Unattended-Upgrade::MailOnlyOnError "false";

// Remove unused automatically installed kernel-related packages
// (kernel images, kernel headers and kernel version locked tools).
//Unattended-Upgrade::Remove-Unused-Kernel-Packages "true";

// Do automatic removal of newly unused dependencies after the upgrade
//Unattended-Upgrade::Remove-New-Unused-Dependencies "true";

// Do automatic removal of unused packages after the upgrade
// (equivalent to apt-get autoremove)
//Unattended-Upgrade::Remove-Unused-Dependencies "false";
Unattended-Upgrade::Remove-Unused-Dependencies "true";

// Automatically reboot *WITHOUT CONFIRMATION* if
//  the file /var/run/reboot-required is found after the upgrade
//Unattended-Upgrade::Automatic-Reboot "false";
Unattended-Upgrade::Automatic-Reboot "true";

// Automatically reboot even if there are users currently logged in
// when Unattended-Upgrade::Automatic-Reboot is set to true
//Unattended-Upgrade::Automatic-Reboot-WithUsers "true";

// If automatic reboot is enabled and needed, reboot at the specific
// time instead of immediately
//  Default: "now"
//Unattended-Upgrade::Automatic-Reboot-Time "02:00";
Unattended-Upgrade::Automatic-Reboot-Time "02:00";

// Use apt bandwidth limit feature, this example limits the download
// speed to 70kb/sec
//Acquire::http::Dl-Limit "70";

// Enable logging to syslog. Default is False
// Unattended-Upgrade::SyslogEnable "false";

// Specify syslog facility. Default is daemon
// Unattended-Upgrade::SyslogFacility "daemon";

// Download and install upgrades only on AC power
// (i.e. skip or gracefully stop updates on battery)
// Unattended-Upgrade::OnlyOnACPower "true";

// Download and install upgrades only on non-metered connection
// (i.e. skip or gracefully stop updates on a metered connection)
// Unattended-Upgrade::Skip-Updates-On-Metered-Connections "true";

// Verbose logging
// Unattended-Upgrade::Verbose "false";

// Print debugging information both in unattended-upgrades and
// in unattended-upgrade-shutdown
// Unattended-Upgrade::Debug "false";
以下インストール時のスクリーンログです。
@raspberrypi:~ $ sudo apt-get install -y unattended-upgrades
[sudo] パスワード:
パッケージリストを読み込んでいます... 完了
依存関係ツリーを作成しています
状態情報を読み取っています... 完了
以下のパッケージが自動でインストールされましたが、もう必要とされていません:
rpi.gpio-common
これを削除するには 'sudo apt autoremove' を利用してください。
以下の追加パッケージがインストールされます:
python3-distro-info
提案パッケージ:
bsd-mailx default-mta | mail-transport-agent needrestart powermgmt-base
以下のパッケージが新たにインストールされます:
python3-distro-info unattended-upgrades
アップグレード: 0 個、新規インストール: 2 個、削除: 0 個、保留: 0 個。
86.9 kB のアーカイブを取得する必要があります。
この操作後に追加で 339 kB のディスク容量が消費されます。
取得:1 http://raspbian.raspberrypi.org/raspbian buster/main armhf python3-distro-info all 0.21 [7,896 B]
取得:2 http://raspbian.raspberrypi.org/raspbian buster/main armhf unattended-upgrades all 1.11.2 [79.0 kB]
86.9 kB を 2秒 で取得しました (38.8 kB/s)
パッケージを事前設定しています ...
以前に未選択のパッケージ python3-distro-info を選択しています。
(データベースを読み込んでいます ... 現在 143029 個のファイルとディレクトリがインストールされています。)
.../python3-distro-info_0.21_all.deb を展開する準備をしています ...
python3-distro-info (0.21) を展開しています...
以前に未選択のパッケージ unattended-upgrades を選択しています。
.../unattended-upgrades_1.11.2_all.deb を展開する準備をしています ...
unattended-upgrades (1.11.2) を展開しています...
python3-distro-info (0.21) を設定しています ...
unattended-upgrades (1.11.2) を設定しています ...
Creating config file /etc/apt/apt.conf.d/20auto-upgrades with new version
Creating config file /etc/apt/apt.conf.d/50unattended-upgrades with new version
Created symlink /etc/systemd/system/multi-user.target.wants/unattended-upgrades.service → /lib/systemd/system/unattended-upgrades.service.
Synchronizing state of unattended-upgrades.service with SysV service script with /lib/systemd/systemd-sysv-install.
Executing: /lib/systemd/systemd-sysv-install enable unattended-upgrades
man-db (2.8.5-2) のトリガを処理しています ...
systemd (241-5+rpi1) のトリガを処理しています ...
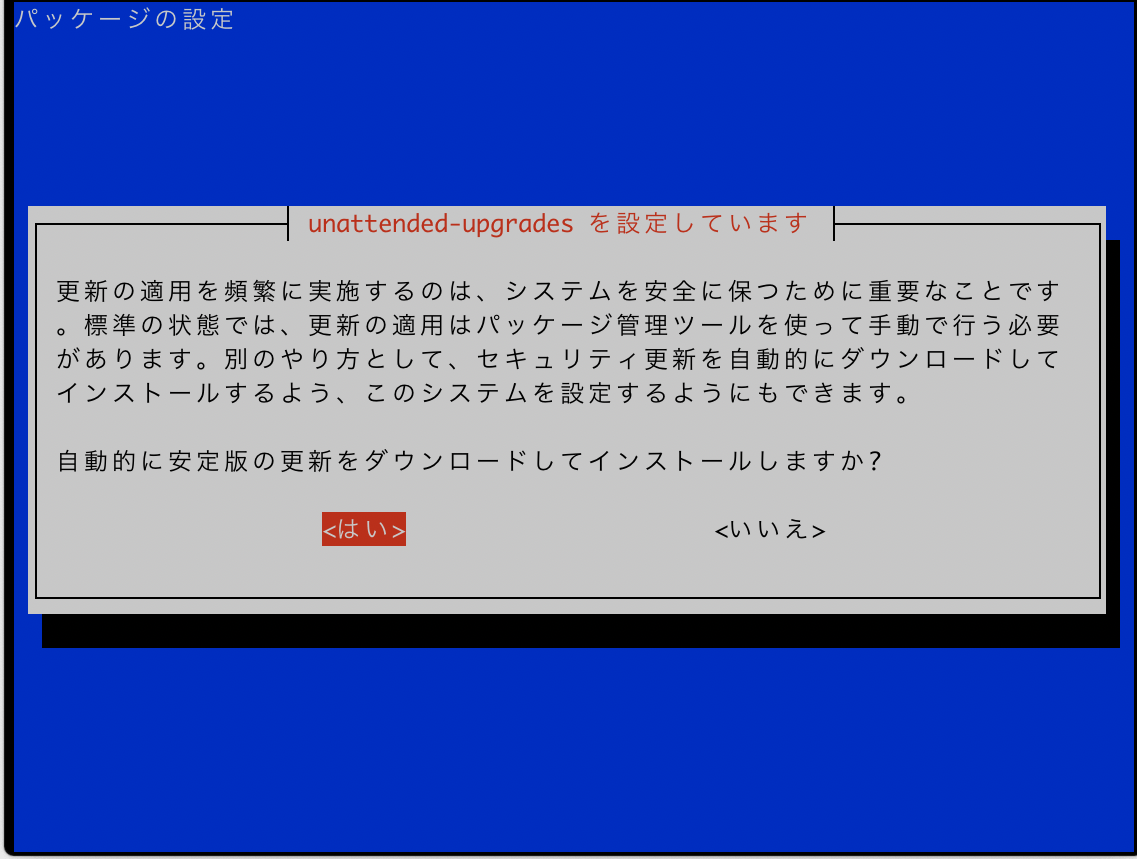
@raspberrypi:~ $ sudo dpkg-reconfigure -plow unattended-upgrades
パッケージの設定
lqqqqqqqqqqqqqqqqqu unattended-upgrades を設定しています tqqqqqqqqqqqqqqqqqqk
x x
x 更新の適用を頻繁に実施するのは、システムを安全に保つために重要なことです x
x 。標準の状態では、更新の適用はパッケージ管理ツールを使って手動で行う必要 x
x があります。別のやり方として、セキュリティ更新を自動的にダウンロードして x
x インストールするよう、このシステムを設定するようにもできます。 x
x x
x 自動的に安定版の更新をダウンロードしてインストールしますか? x
x x
x <はい> <いいえ> x
x x
mqqqqqqqqqqqqqqqqqqqqqqqqqqqqqqqqqqqqqqqqqqqqqqqqqqqqqqqqqqqqqqqqqqqqqqqqqqqj
パッケージを事前設定しています ...
以前に未選択のパッケージ python3-distro-info を選択しています。
(データベースを読み込んでいます ... 現在 143029 個のファイルとディレクトリがインストールされています。)
.../python3-distro-info_0.21_all.deb を展開する準備をしています ...
python3-distro-info (0.21) を展開しています...
以前に未選択のパッケージ unattended-upgrades を選択しています。
.../unattended-upgrades_1.11.2_all.deb を展開する準備をしています ...
unattended-upgrades (1.11.2) を展開しています...
python3-distro-info (0.21) を設定しています ...
unattended-upgrades (1.11.2) を設定しています ...
Creating config file /etc/apt/apt.conf.d/20auto-upgrades with new version
Creating config file /etc/apt/apt.conf.d/50unattended-upgrades with new version
Created symlink /etc/systemd/system/multi-user.target.wants/unattended-upgrades.service → /lib/systemd/system/unattended-upgrades.service.
Synchronizing state of unattended-upgrades.service with SysV service script with /lib/systemd/systemd-sysv-install.
Executing: /lib/systemd/systemd-sysv-install enable unattended-upgrades
man-db (2.8.5-2) のトリガを処理しています ...
systemd (241-5+rpi1) のトリガを処理しています ...
@raspberrypi:~ $ sudo vi /etc/apt/apt.conf.d/50unattended-upgrades
@raspberrypi:~ $ sudo cat /usr/share/doc/cron-apt/README
cron-apt for Debian
-------------------

The intention of cron-apt is to automate the process to upgrade the Debian
GNU/Linux operating system. By default it only download packages which means
that the actual installation/upgrade must be done manually. It is possible
to fully update the upgrade procedure if you want but be aware that this
may break the installation in case something goes wrong.

Compared to cron script in APT:
-------------------------------

APT package has its own script /etc/cron.daily/apt, which can do:
* fancy auto-clean with rule
* check and download upgradable packages automatically
* automatic unattended upgrade
+ need to install unattended-upgrades package
+ aimed for security upgrade and have its blacklist capability
+ mail capability (The extent of this, i do not know for sure?)

These can be enabled via apt configuration variables (usually stored in
/etc/apt/apt.conf.d/02backup and 50unattended-upgrades).

If the above is what you need, then consider to use that instead of cron-apt.

General Configuration:
----------------------

All cron-apt configuration is placed in /etc/cron-apt. The structure of that
directory is as follows.

Main configuration:
- config
- action.d/
- config.d/
Additional configuration for logging:
- *msg.d/
- *msgs/

The general principle of cron-apt configuration is that actions are defined in
/etc/cron-apt/action.d/. Each action file can contain one or more lines to
execute. Each line in an action file is passed as an argument to apt-get
(or more precisely the command defined by the APTCOMMAND and OPTIONS
configuration variables). The actions are executed in alphabetical order and
line by line. Use a number from zero (0) to nine (9) to give a precise order.

The default actions are:
* 0-update: Updates the list of known packages
* 3-download: Downloads the updated packages but do not install them

The file /etc/cron-apt/config holds the main configuration data.

It is also possible to add extra configuration for each action (same syntax as
/etc/cron-apt/config) by naming the file /etc/cron-apt/config.d/<actionname>.
The configuration from one action is kept to the next action as well.

Configuration file syntax:
--------------------------

The configuration files (/etc/cron-apt/config and
/etc/cron-apt/config.d/<action>) consists of a number of variables that can be
set to values as outlined below. In addition they follow the POSIX /bin/sh
syntax which means that they can be used for hooks and simlar things as well
as simply setting variables. These variables are described below with their
default value.

APTCOMMAND=/usr/bin/apt-get (default)

The command used to execute all actions. By default apt-get is used and
this is also the recommended command to use. For more information see
above. Alternative settings can be:

APTCOMMAND=/usr/bin/aptitude
APTCOMMAND=/usr/bin/apt-file

OPTIONS="-o quiet=1"

General apt options that will be passed to all APTCOMMAND calls.
Use "-o quiet" instead of "-q" for aptitude compatibility.

You can for example add an additional sources.list file here.
OPTIONS="-o quiet=1 --no-list-cleanup -o Dir::Etc::SourceList=/etc/apt/security.sources.list"
You can also set an alternative sources.list file here.
OPTIONS="-o quiet=1 --no-list-cleanup -o Dir::Etc::SourceList=/etc/apt/securi ty.sources.list -o Dir::Etc::SourceParts=\"/dev/null\""
If you want to allow unauthenticated and untrusted packages add the
following to your options directive.
OPTIONS="-o quiet=1 -o APT::Get::AllowUnauthenticated=true -o aptitude::Cmdli ne::ignore-trust-violations=yes"
To limit the bandwidth used use the following line. This example limit the
bandwidth usage to 25 kB/s.
OPTIONS="-o Acquire::http::Dl-Limit=25"

MAILON="error"

When to send email about the cron-apt results.
Value:
error (send mail on error runs)
upgrade (when packages are upgraded)
changes (mail when change in output from an action)
output (send mail when output is generated)
always (always send mail)
never (never send mail)
(else never send mail)

SYSLOGON="upgrade"

When to log the cron-apt results to syslog.
Value:
error (syslog on error runs)
upgrade (when packages is upgraded)
changes (syslog when change in output from an action)
output (syslog when output is generated)
always (always syslog)
never (never syslog)
(else never syslog)

RUNSLEEP=3600

The random sleep time in seconds. This is used to prevent clients from
accessing the APT sources all at the same time and overwhelming them.
Default is 3600 seconds which means one hour.

DONTRUN=""

Do not run the command, if there is an error in the previous run (default).
Value:
error (do not run if there is an error on last run)
(else always run, remove previous error file and run)

MAILTO="root"

The email address to send mail to.

MAILWIDTH="900"

Maximum characters per line in the outgoing mail message.
Wrapping occurs at whitespace.

DEBUG="output"

When to log to the cron-apt log file.
Value:
verbose (log everything)
always (always log)
upgrade (when packages is upgraded)
changes (log when change in output from an action)
output (log when output is generated)
error (log error runs only)
never (log nothing)
(else log nothing)

DIFFONCHANGES=prepend

What to do with the diff when *ON is set to 'changes'.
Value:
prepend (prepend to the output)
append (append to the output)
only (only show the diff, not the output itself)
(else do nothing)

REFRAINFILE=/etc/cron-apt/refrain

If this file exist cron-apt will silently exit.

HOSTNAME=""

If this is non-empty, it will be used as the host name in subjects of
generated e-mail messages. If this is empty, the output of uname -n
will be used.

SUBJECTPREFIX="CRON-APT"

The start string for the email subject line when reports are
sent by email.

The total subject line is
<SUBJECTPREFIX> error|completed on <HOSTNAME> [<CONFIG>]

DIFFIGNORE=""

Ignore lines matching this regexp to determine whether changes occurred
for MAILON="changes". If empty no lines will be ignored.

Suggested value for aptitude:
DIFFIGNORE="^\(Get:[[:digit:]]\+\|Hit\|Ign\|Del\|Fetched\|Freed\|Reading\)[[:space:]]"

Suggested value for apt-get:
DIFFIGNORE="^\(Get:[[:digit:]]\+\|Hit\|Ign\)[[:space:]]"

XHEADER*

Support for mail headers. You can add up to 9 headers to the mail sent.
This below example can be used for OTRS.
The default is no headers added.
XHEADER1="X-OTRS-Queue: updates"
XHEADER2="X-OTRS-Loop: true"
...

APT_CONFIG=/etc/apt/cron.apt.paths

Additional APT configuration file that is loaded first. This can be set in
order to use a completely different APT configuration for cron-apt. See the
/usr/share/doc/cron-apt/README and apt.conf(5) for details

export APT_CONFIG=/etc/apt/cron.apt.paths

PATH

A path is needed for cron-apt to work. The default PATH is as written
below.

export PATH=/sbin:/bin:/usr/sbin:/usr/bin:/usr/local/sbin:/usr/local/bin

MINTMPDIRSIZE=10

The minimum amount of disc space (in kB) that need to exist on the
device where temporary files are created (mktemp) to allow cron-apt
to run. If set to 0 it will always continue even if empty.

ACTIONDIR="/etc/cron-apt/action.d"

The directory where the actions is stored.

ACTIONCONFDIR="/etc/cron-apt/config.d"

The directory where configuration per action is stored. The message file
must have the same name as the action file.

MAILMSGDIR="/etc/cron-apt/mailmsg.d"

The directory where messages that will be prepended to the email that is
sent (per action) is stored. The message file must have the same name as
the action file.

SYSLOGMSGDIR="/etc/cron-apt/syslogmsg.d"

The directory where messages that will be prepended to text that is
sent (per action) to syslog. The message file must have the same name as
the action file.

ERRORMSGDIR="/etc/cron-apt/errormsg.d"

The directory where messages that will be prepended to the error message
(per action) is stored. The message file must have the same name as
the action file.

LOGMSGDIR="/etc/cron-apt/logmsg.d"

The directory where messages that will be prepended to the log (debug)
message (per action) is stored. The message file must have the same name as
the action file.

MAILONMSGSDIR="/etc/cron-apt/mailonmsgs"

The directory where messages that will be prepended to the mail message
(per MAILON type) is stored. The message file must have the same name as
the MAILON directive.

SYSLOGONMSGSDIR="/etc/cron-apt/syslogonmsgs"

The directory where messages that will be prepended to the syslog message
(per SYSLOGON type) is stored. The message file must have the same name as
the SYSLOGON directive.

NOLOCKWARN=""

Whether to warn about the fact that dotlockfile is not installed.
Value:
"" (warn if dotlockfile is not installed)
"nowarn" (don't give warning if dotlockfile not installed)

ERROR="/var/log/cron-apt/error"

The temporary file that contains error messages.

TEMP="/var/log/cron-apt/temp"

The temporary file that contains current run information when still running
the script.

LOGDIR="/var/log/cron-apt"

The directory to place temporary logs. A convenience copy of the
last mail message sent out is also placed here as
$LOGDIR/lastfullmessage to process in a .profile script or a monitoring
plugin.

LOG="$LOGDIR/log"

The temporary logfile (for debugging). Use syslog for normal logging.

MAIL="/var/log/cron-apt/mail"

The temporary file that contain information to be sent in email.

EXITON="error"

Whether to exit on errors or not.
Value:
error (exit on error only)
(else never exit)

UMASK_APT="022"

Umask for the files created by the APT command used. In all other cases
umask 077 will be used.

Alternative APT command:
------------------------

The APTCOMMAND configuration variable defines the APT command to use to execute
the actions. By default /usr/bin/apt-get is used and this is is also the
recommended command to use.

But you can actually use any program you like. Although aptitude is the
recommended tool for interactive upgrades, for cron-apt's purposes apt-get is
better and, for most configurations, the extra features of aptitude are not
relevant. If you insist on using aptitide, you will have to work around some
of its bugs.
OBSERVE that cron-apt is indended to use apt-get and tools like aptitude do not
have full support for noninteractive upgrades. You may have to tune options
to not create infinit logfiles for example.

Setting it to /usr/bin/aptitude (to use aptitude instead of apt-get) will
resolve changed Recommends (and Suggests as well, if aptitude is configured
so).

You can also set other utilities (especially useful for files in the config.d/
directory) to set some completely different tool.

Configuration for logging:
--------------------------

In addition to the main configuration it is possible to define extra
information to be logged at execution. The principle is that files in
<something>msg.d/ is logged for each action and files in <something>msgs/ are
logged for matching configuration directive.

The the below descriptions the following tag syntax is used: [TAG].
The tag means that this configuration is only used in case the TAG
configuration variable tell that logging should be done.

* /etc/cron-apt/errormsg.d/
Contains a file for each action to log in case an error occur in the
corresponding action. This is used in case any of the configuration
directive tells that logging should be done.
* /etc/cron-apt/logmsg.d/ [DEBUG]
Contains a file for each action to log to stdout.
* /etc/cron-apt/mailmsg.d/ [MAILON]
Contains a file for each action to prepend to the email sent.
* /etc/cron-apt/syslogmsg.d/ [SYSLOGON]
Contain files for each action to log in syslog.
* /etc/cron-apt/mailonmsgs/ [MAILON]
Contain files, with name corresponding to the MAILON configuration variable,
with text to prepend to the email sent.
* /etc/cron-apt/syslogonmsgs/ [SYSLOGON]
Contain files, with name corresponding to the SYSLOGON configuration
variable, with text to log to syslog.

For more details about this see 'Configuration file syntax' below.

Regular execution:
------------------

If you want this tool to be run even if you do not have it up at
04 in the morning you can create a symbolic link from /etc/cron.daily/cron-apt
to /usr/sbin/cron-apt. It will then be run every day (even if the computer is
not on at that time). Similar things can be done for each week, and so on.
You have to have anacron installed for this to work. If not, daily scripts
run 6 AM by crond.

ln -s /usr/sbin/cron-apt /etc/cron.daily/cron-apt

Observe that it is not always a good thing to update package information
and download files when the computer is started. This is especially true
if you do not have a good Internet connection.

You also need to disable the normal cron.d/cron-apt file if you do not want
it to be run twice.

Also note that anacron does not run anything while on battery power.
So in the event you want to run regular updates also when running on battery
only you need to change the anacron default setting.
For more information how to do that see /usr/share/doc/anacron/README.Debian.

Alternate sources.list file
---------------------------

If you just want to update security related things you can always use an
alternate sources.list files by giving this extra information to the OPTIONS
variable in the configuration file.

OPTIONS="-o quiet=1 --no-list-cleanup -o Dir::Etc::SourceList=/etc/apt/security.sources.list -o Dir::Etc::SourceParts=\"/dev/null\""

Alternatively you can use a separate APT configuration file as described
in the chapter below. You can for example point to a source list as follows:

Dir::Etc::SourceList "/etc/apt/security.sources.list";
Dir::Etc::SourceParts "/dev/null"

In that case you only need to update the OPTIONS variable to include the
'--no-list-cleanup' argument.

Alternate APT main configuration
--------------------------------

There are cases when you need the APT configuration for use with cron-apt to
differ substantially from your standard configuration. For example, cron-apt
will not work with the default configuration of APT, when apt-listbugs is
installed, because this adds a hook that expects keyboard interactivity.

Unfortunately, the apt-tools do not accept Dir::Etc::Main and Dir::Etc::Parts
settings on the command-line. In order to use different paths for them, you
have to create another APT configuration file containing eg:

Dir::Etc::Main "cron.apt.conf";
Dir::Etc::Parts "cron.apt.conf.d";

Then uncomment the following line in your cron-apt configuration file and
point it to your newly created APT configuration file:

export APT_CONFIG=/etc/apt/cron.apt.paths

Don't forget additional options you might have set in /etc/apt/apt.conf since
this file is no longer use when APT_CONFIG point to another conf file.

Development and documentation
-----------------------------

If you want more information about this software you can visit the homepage
at http://inguza.com/software/cron-apt/. You can find documentation,
development information and other things there.

Copyright information:
----------------------

Copyright (C) 2002-2018 Ola Lundqvist <ola@inguza.com>
Copyright (C) 2018 Sebastian Klamar <bug.cron-apt@sebastian.klamar.name>
Copyright (C) 2004,2007,2013,2016 Bob Proulx <bob@proulx.com>
Copyright (C) 2016 Bas Zoetekouw <bas@debian.org>
Copyright (C) 2016 Geoffroy Youri Berret <efrim@azylum.org>
Copyright (C) 2009 Edward Malone <edward.malone88@gmail.com>
Copyright (C) 2004-2011,2013,2017 Marc Haber <mh+debian-bugs@zugschlus.de>
Copyright (C) 2006 Felix Palmen <fmp@palmen.homeip.net>
Copyright (C) 2004 Marc Sherman <msherman@projectile.ca>
Copyright (C) 2004 David Weinehall
Copyright (C) 2003 Sean Finney <seanius@seanius.net>
Copyright (C) 2002 Marcel Kolaja <marcel@solnet.cz>

License terms
-------------

This program is free software; you can redistribute it and/or modify
it under the terms of the GNU General Public License as published by
the Free Software Foundation; either version 2 of the License, or
(at your option) any later version.

This program is distributed in the hope that it will be useful,
but WITHOUT ANY WARRANTY; without even the implied warranty of
MERCHANTABILITY or FITNESS FOR A PARTICULAR PURPOSE. See the
GNU General Public License for more details.

You should have received a copy of the GNU General Public License
along with this program as the file COPYING; if not, write to the
Free Software Foundation, Inc., 51 Franklin Street, Fifth Floor, Boston,
MA 02110-1301 USA.
@raspberrypi: $ sudo apt-get install fswebcam
Reading package lists... Done
Building dependency tree
Reading state information... Done
The following packages were automatically installed and are no longer required:
libboost-system1.62.0 libboost-thread1.62.0 libreoffice-gtk2
Use 'sudo apt autoremove' to remove them.
The following NEW packages will be installed:
fswebcam
0 upgraded, 1 newly installed, 0 to remove and 0 not upgraded.
Need to get 43.5 kB of archives.
After this operation, 116 kB of additional disk space will be used.
Get:1 http://ftp.jaist.ac.jp/pub/Linux/raspbian-archive/raspbian buster/main armhf fswebcam armhf 20140113-2 [43.5 kB]
Fetched 43.5 kB in 1s (39.0 kB/s)
perl: warning: Setting locale failed.
perl: warning: Please check that your locale settings:
LANGUAGE = (unset),
LC_ALL = (unset),
LC_CTYPE = "UTF-8",
LANG = "ja_JP.UTF-8"
are supported and installed on your system.
perl: warning: Falling back to a fallback locale ("ja_JP.UTF-8").
locale: Cannot set LC_CTYPE to default locale: No such file or directory
locale: LC_ALL??????????????????: ??????????????????????
Selecting previously unselected package fswebcam.
(Reading database ... 151227 files and directories currently installed.)
Preparing to unpack .../fswebcam_20140113-2_armhf.deb ...
Unpacking fswebcam (20140113-2) ...
Setting up fswebcam (20140113-2) ...
Processing triggers for man-db (2.8.5-2) ...
#
# Config file for sSMTP sendmail
#
# The person who gets all mail for userids < 1000
# Make this empty to disable rewriting.
root=postmaster

# The place where the mail goes. The actual machine name is required no
# MX records are consulted. Commonly mailhosts are named mail.domain.com
mailhub=@SynologyIP@

# Where will the mail seem to come from?
#rewriteDomain=

# The full hostname
hostname=raspberrypi.miki-ie.com

# Are users allowed to set their own From: address?
# YES - Allow the user to specify their own From: address
# NO - Use the system generated From: address
#FromLineOverride=YES
メール送信テスト
@raspberrypi:~ $ mail -s test aaaa@gmail.com -aFrom:miki@192.168.0.108 Cc: Null message body; hope that's ok


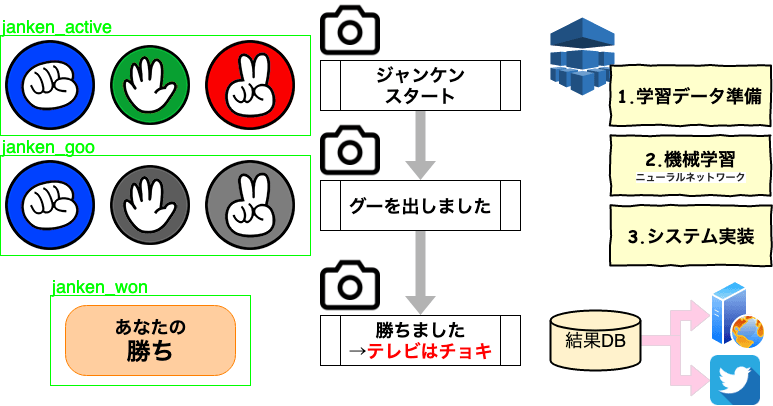
 めざましじゃんけん時に取得したWEBカメラ画像を216枚で画像認識エンジンを動作させた際の性能比較です。